Oreo No-Bake Cheesecake Cups | Lemons + Zest

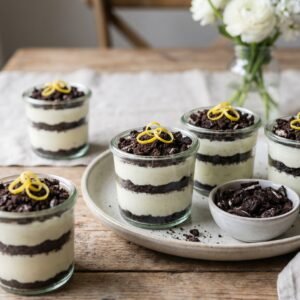
If you’re craving a dessert that’s rich, creamy, and refreshingly light at the same time, these Oreo no-bake cheesecake cups are about to become your new favorite treat. With layers of crushed Oreo cookies, smooth cheesecake filling, and a bright hint of lemon zest, this recipe strikes the perfect balance between indulgent and refreshing.

The best part? There’s no oven required. These Oreo no-bake cheesecake cups come together quickly, making them ideal for busy days, last-minute gatherings, or whenever you want an effortless dessert that still feels special and impressive.

Why You’ll Love This Recipe

These Oreo no-bake cheesecake cups are everything you want in a dessert—simple, delicious, and visually stunning.

Here’s why they’re a must-try:

  • No baking required
  • Ready in under 30 minutes (plus chilling time)
  • Creamy, rich texture with a refreshing citrus twist
  • Perfect for parties, holidays, or individual servings
  • Easy to customize with different flavors

They’re the kind of dessert that looks fancy but is surprisingly easy to make.
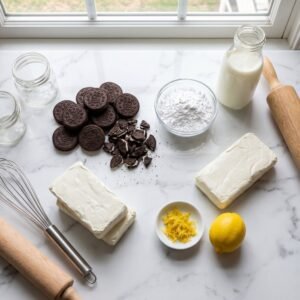

Ingredients

To make these irresistible Oreo no-bake cheesecake cups, you’ll need:

  • 20 Oreo cookies, crushed
  • 2 tablespoons melted butter
  • 8 oz cream cheese, softened
  • 1/2 cup powdered sugar
  • 1 teaspoon vanilla extract
  • 1 tablespoon fresh lemon zest
  • 1 cup heavy whipping cream
  • Optional: extra crushed Oreos and lemon zest for topping

Ingredient Notes

The beauty of these Oreo no-bake cheesecake cups lies in the contrast between rich and refreshing flavors. Oreo cookies provide a chocolatey crunch that pairs perfectly with the creamy filling, while lemon zest adds a bright, citrusy lift that keeps the dessert from feeling too heavy.

Make sure your cream cheese is softened before mixing to achieve a smooth, lump-free texture. Fresh lemon zest is key—it adds natural flavor without overpowering the sweetness.


Step-by-Step Instructions

1. Prepare the Crust

Crush Oreo cookies into fine crumbs and mix with melted butter until combined. Spoon the mixture into the bottom of serving cups and press gently.

2. Make the Cheesecake Filling

In a bowl, beat cream cheese, powdered sugar, vanilla, and lemon zest until smooth and creamy.

3. Whip the Cream

In a separate bowl, whip heavy cream until stiff peaks form. Fold it gently into the cream cheese mixture.

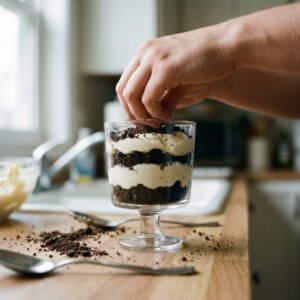
4. Assemble the Cups

Layer the cheesecake filling over the Oreo crust. Add additional layers if desired for a layered look.

5. Chill

Refrigerate for at least 2 hours before serving to allow the flavors to set.

Tips for Perfect Results

To make the best Oreo no-bake cheesecake cups, follow these expert tips:

  • Use full-fat cream cheese for the creamiest texture
  • Chill long enough for the layers to set properly
  • Fold whipped cream gently to keep the mixture airy
  • Use clear cups for a beautiful layered presentation
  • Adjust lemon zest to your taste preference

These small details help elevate your dessert to a professional level.


Variations

One of the best things about Oreo no-bake cheesecake cups is how versatile they are.

Chocolate Lover’s Version

Add melted chocolate to the cheesecake filling for extra richness.

Berry Twist

Top with fresh strawberries or raspberries.

Peanut Butter Delight

Mix in a swirl of peanut butter into the filling.

Mini Party Cups

Serve in small cups for bite-sized party desserts.

What to Serve With It

These Oreo no-bake cheesecake cups pair beautifully with a variety of drinks and desserts.

  • Fresh coffee or espresso
  • Iced tea or lemonade
  • Chocolate desserts for contrast
  • Fresh fruit platters

They’re perfect as a standalone dessert or part of a larger spread.


Storage & Reheating

These Oreo no-bake cheesecake cups are perfect for making ahead.

  • Store in the refrigerator for up to 4 days
  • Cover tightly to prevent drying out
  • Do not freeze, as texture may change
  • No reheating needed—serve chilled

They actually taste even better after a few hours in the fridge.


Common Mistakes to Avoid

Avoid these common mistakes when making Oreo no-bake cheesecake cups:

  • Using cold cream cheese (causes lumps)
  • Not whipping cream to stiff peaks
  • Skipping chill time
  • Overmixing the filling

Avoiding these ensures a smooth, creamy result.


FAQs

Can I make Oreo no-bake cheesecake cups ahead of time?

Yes! They’re perfect for making a day in advance.

Can I use store-bought whipped topping?

Yes, but homemade whipped cream gives better flavor and texture.

How strong is the lemon flavor?

It’s light and refreshing, but you can adjust to taste.

Can I make this recipe gluten-free?

Yes, use gluten-free chocolate sandwich cookies.


Final Thoughts

These Oreo no-bake cheesecake cups are the ultimate easy dessert—rich, creamy, and perfectly balanced with a hint of citrus freshness. They’re simple enough for beginners but impressive enough for entertaining.

Whether you’re making them for a party, holiday, or just a sweet treat at home, this recipe is guaranteed to become a favorite. Once you try these Oreo no-bake cheesecake cups, you’ll find yourself making them again and again.

Creamy Chicken Caesar Pasta Salad: An Easy Family Favorite

If you’re looking for a crowd-pleasing dish that’s both comforting and refreshing, this creamy chicken Caesar pasta salad is exactly what you need. It combines everything you love about a classic Caesar salad—crisp romaine, savory dressing, and Parmesan cheese—with hearty pasta and tender chicken for a satisfying, all-in-one meal.

Perfect for busy weeknights, potlucks, or meal prep, this creamy chicken Caesar pasta salad is as versatile as it is delicious. It’s creamy without being too heavy, packed with flavor, and easy to throw together with simple ingredients you likely already have on hand.

Why You’ll Love This Recipe

This creamy chicken Caesar pasta salad is a go-to recipe for so many reasons. It’s quick, satisfying, and perfect for feeding a crowd or prepping ahead.

Here’s why it’s a favorite:

  • Combines pasta salad and Caesar salad in one dish
  • Ready in under 30 minutes
  • Great for meal prep and leftovers
  • Family-friendly and customizable
  • Perfect for picnics, BBQs, and gatherings

Once you make it, it’ll quickly become part of your regular rotation.


Ingredients

To make this flavorful creamy chicken Caesar pasta salad, you’ll need:

  • 12 oz pasta (penne, rotini, or bowtie)
  • 2 cups cooked chicken (grilled or rotisserie)
  • 2 cups romaine lettuce, chopped
  • 1/2 cup grated Parmesan cheese
  • 3/4 cup Caesar dressing
  • 1/2 cup croutons
  • Salt and black pepper to taste
  • Optional: cherry tomatoes or bacon bits

Ingredient Notes

The beauty of this creamy chicken Caesar pasta salad is in its simplicity, but choosing the right ingredients makes a big difference. Use a sturdy pasta like penne or rotini that holds onto the dressing well. Fresh romaine adds crunch, while high-quality Caesar dressing delivers that classic tangy, garlicky flavor.

Rotisserie chicken is a great shortcut, saving time while still providing juicy, flavorful protein. Freshly grated Parmesan is always recommended for the best taste and texture.


Step-by-Step Instructions

1. Cook the Pasta

Bring a large pot of salted water to a boil and cook the pasta until al dente. Drain and rinse under cold water to cool completely.

2. Prepare the Ingredients

Chop the romaine lettuce and slice or shred the cooked chicken into bite-sized pieces.

3. Combine Everything

In a large bowl, mix the cooled pasta, chicken, lettuce, and Parmesan cheese.

4. Add Dressing

Pour in the Caesar dressing and toss until everything is evenly coated.

5. Finish and Serve

Top with croutons and a sprinkle of black pepper before serving.

Tips for Perfect Results

To make the best creamy chicken Caesar pasta salad, keep these tips in mind:

  • Cool pasta completely before adding dressing
  • Add lettuce just before serving to keep it crisp
  • Use freshly grated Parmesan for better flavor
  • Don’t overdress—add gradually to control consistency
  • Toss gently to avoid breaking the pasta

These tips ensure a balanced texture and flavor in every bite.


Variations

This creamy chicken Caesar pasta salad is incredibly versatile and easy to customize.

Grilled Chicken Version

Use freshly grilled chicken for a smoky flavor.

Bacon Caesar Pasta Salad

Add crispy bacon bits for extra richness.

Veggie-Packed Option

Include cucumbers, cherry tomatoes, or avocado.

Lightened-Up Version

Use a lighter Caesar dressing or Greek yogurt-based dressing.

What to Serve With It

This creamy chicken Caesar pasta salad works as both a main dish and a side.

  • Garlic bread or breadsticks
  • Fresh fruit salad
  • Grilled vegetables
  • Lemonade or iced tea

It’s perfect for summer gatherings or casual family dinners.


Storage & Reheating

This creamy chicken Caesar pasta salad stores well, making it great for leftovers.

  • Store in an airtight container in the refrigerator for up to 3 days
  • Keep croutons separate to maintain crunch
  • Add extra dressing before serving if needed
  • Not suitable for freezing

The flavors often improve after a few hours in the fridge.


Common Mistakes to Avoid

Avoid these common mistakes when making creamy chicken Caesar pasta salad:

  • Adding dressing while pasta is still warm
  • Overloading with dressing
  • Letting lettuce sit too long (it wilts)
  • Skipping seasoning

Paying attention to these details ensures the best results.


FAQs

Can I make creamy chicken Caesar pasta salad ahead of time?

Yes! Just add the lettuce and croutons right before serving.

What pasta works best?

Short pasta like penne, rotini, or bowtie holds the dressing well.

Can I use store-bought dressing?

Absolutely. Choose a high-quality Caesar dressing for best flavor.

Is this recipe healthy?

It can be! Use grilled chicken and a lighter dressing for a healthier version.


Final Thoughts

This creamy chicken Caesar pasta salad is the perfect blend of comfort and freshness. It’s easy to make, packed with flavor, and versatile enough for any occasion—from quick weeknight meals to weekend gatherings.

Once you try this recipe, you’ll see why it’s a true family favorite. Keep it in your recipe collection for those moments when you need something simple, satisfying, and guaranteed to please.

Salted Caramel Chocolate Cookies: Perfectly Sweet and Savory

If you’re looking for a cookie that delivers the ultimate balance of rich chocolate, buttery caramel, and a hint of salt, these salted caramel chocolate cookies are exactly what you need. Each bite is soft, chewy, and filled with gooey caramel pockets that melt into the chocolate dough, finished with a sprinkle of flaky sea salt for that perfect sweet-and-savory contrast.

These cookies feel indulgent and bakery-quality, yet they’re simple enough to make right at home. Whether you’re baking for a holiday tray, a special occasion, or just a cozy night in, this salted caramel chocolate cookies recipe is guaranteed to impress.

Why You’ll Love This Recipe

There’s something truly irresistible about salted caramel chocolate cookies, and once you try them, you’ll understand why they’re such a favorite.

Here’s what makes them special:

  • Perfect balance of sweet and salty flavors
  • Soft, chewy texture with gooey caramel centers
  • Rich chocolate flavor in every bite
  • Easy to make with simple ingredients
  • Great for gifting, parties, or everyday treats

These cookies are the definition of comfort baking with a gourmet twist.


Ingredients

To make these decadent salted caramel chocolate cookies, you’ll need:

  • 1/2 cup unsalted butter, softened
  • 1/2 cup granulated sugar
  • 1/2 cup brown sugar
  • 1 large egg
  • 1 teaspoon vanilla extract
  • 1 1/4 cups all-purpose flour
  • 1/3 cup cocoa powder
  • 1/2 teaspoon baking soda
  • 1/4 teaspoon salt
  • 3/4 cup chocolate chips
  • 12 soft caramel candies (cut into halves)
  • Flaky sea salt for topping

Ingredient Notes

The key to perfect salted caramel chocolate cookies lies in the quality of your ingredients. Use a good cocoa powder for a deep chocolate flavor and soft caramels that melt easily into the cookie centers.

Brown sugar adds moisture and chewiness, while the combination of granulated sugar helps create slightly crisp edges. Don’t skip the flaky sea salt—it enhances the sweetness and makes the flavors pop.


Step-by-Step Instructions

1. Make the Dough

In a bowl, cream together butter, granulated sugar, and brown sugar until light and fluffy. Mix in the egg and vanilla extract.

2. Combine Dry Ingredients

In a separate bowl, whisk together flour, cocoa powder, baking soda, and salt. Gradually add to the wet mixture.

3. Add Chocolate Chips

Fold in chocolate chips evenly throughout the dough.

4. Fill with Caramel

Scoop dough, flatten slightly, place a caramel piece in the center, and wrap dough around it to seal.

5. Bake

Place cookies on a lined baking sheet and bake at 350°F (175°C) for 10–12 minutes.

6. Finish with Sea Salt

Sprinkle flaky sea salt on top while cookies are still warm.

Tips for Perfect Results

To achieve bakery-quality salted caramel chocolate cookies, keep these tips in mind:

  • Chill the dough for 20–30 minutes for thicker cookies
  • Seal caramel completely to prevent leaking
  • Don’t overbake—cookies should be soft in the center
  • Use parchment paper for even baking
  • Sprinkle salt immediately after baking for best adhesion

These tips help create that perfect gooey center and chewy texture.


Variations

One of the best things about salted caramel chocolate cookies is how customizable they are.

Double Chocolate Version

Add white chocolate chips for extra richness.

Nutty Twist

Mix in chopped pecans or walnuts for crunch.

Stuffed Deluxe

Add both caramel and a chocolate truffle center.

Gluten-Free Option

Use a gluten-free flour blend.

What to Serve With It

These salted caramel chocolate cookies pair beautifully with drinks and desserts.

  • Cold milk or chocolate milk
  • Coffee or espresso
  • Vanilla ice cream
  • Hot chocolate

They also make an excellent addition to dessert boards or gift boxes.


Storage & Reheating

To keep your salted caramel chocolate cookies fresh and delicious:

  • Store in an airtight container at room temperature for up to 4 days
  • Refrigerate for up to 1 week
  • Freeze baked cookies for up to 2 months
  • Warm in the microwave for 10–15 seconds to revive gooey centers

Proper storage keeps them soft and flavorful.


Common Mistakes to Avoid

Avoid these common mistakes when making salted caramel chocolate cookies:

  • Not sealing caramel properly
  • Overbaking the cookies
  • Skipping the salt topping
  • Using hard caramel instead of soft

These small details make a big difference in the final result.


FAQs

Can I use homemade caramel?

Yes, just make sure it’s thick enough to stay inside the cookie.

Why did my caramel leak out?

The dough may not have been sealed tightly around the caramel.

Can I freeze the dough?

Absolutely! Freeze dough balls and bake when needed.

Do I have to use sea salt?

Flaky sea salt is recommended, but you can skip or substitute lightly.


Final Thoughts

These salted caramel chocolate cookies are everything a great dessert should be—rich, gooey, sweet, and just a little bit salty. They’re easy enough for everyday baking but impressive enough for special occasions.

Once you take that first bite and experience the melted caramel center with the hint of sea salt, you’ll understand why these cookies are truly unforgettable. Add this salted caramel chocolate cookies recipe to your baking list—you’ll be making it again and again.

Mozzarella Sticks: The Ultimate Irresistible Snack Recipe For Parties And Gatherings

When it comes to crowd-pleasing appetizers, nothing beats a plate of hot, crispy mozzarella sticks fresh out of the fryer. With their golden, crunchy coating and irresistibly gooey cheese center, they’re the ultimate comfort snack that disappears within minutes at any party or gathering.

Whether you’re hosting game night, planning a family get-together, or just craving a cheesy indulgence, this mozzarella sticks recipe delivers restaurant-quality results right in your kitchen. The best part? They’re surprisingly easy to make with just a handful of ingredients and a few simple techniques.

Why You’ll Love This Recipe

These homemade mozzarella sticks are everything you want in a snack—crispy, cheesy, and incredibly satisfying.

Here’s why this recipe stands out:

  • Perfectly crispy coating with gooey cheese inside
  • Easy to make at home with simple ingredients
  • Ideal for parties, game days, and gatherings
  • Freezer-friendly for make-ahead convenience
  • Better than restaurant versions

Once you try these, you may never go back to store-bought again.


Ingredients

To make the best mozzarella sticks recipe, you’ll need:

  • 12 mozzarella string cheese sticks
  • 1 cup all-purpose flour
  • 2 large eggs
  • 1 cup breadcrumbs (Italian seasoned preferred)
  • 1/2 cup panko breadcrumbs (for extra crunch)
  • 1 teaspoon garlic powder
  • 1 teaspoon Italian seasoning
  • Salt and black pepper to taste
  • Oil for frying

Optional for Serving:

  • Marinara sauce
  • Ranch dressing

Ingredient Notes

The secret to perfect mozzarella sticks lies in the coating. Using a mix of regular breadcrumbs and panko gives you that ideal balance of crunch and texture. Italian seasoning and garlic powder add flavor to every bite, making these sticks anything but bland.

String cheese is the easiest and most consistent option, as it melts evenly and holds its shape well during frying. For best results, always freeze the cheese sticks before breading to prevent them from melting too quickly.


Step-by-Step Instructions

1. Freeze the Cheese

Place mozzarella sticks in the freezer for at least 1 hour. This step is essential to prevent cheese from leaking during frying.

2. Set Up Breading Station

Prepare three bowls: one with flour, one with beaten eggs, and one with breadcrumbs mixed with panko and seasonings.

3. Coat the Cheese

Dip each cheese stick into flour, then egg, then breadcrumbs. Repeat the egg and breadcrumb step for a double coating.

4. Freeze Again

Place coated sticks back in the freezer for at least 30 minutes.

5. Fry Until Golden

Heat oil to 350°F and fry mozzarella sticks for 1–2 minutes until golden brown. Remove and drain on paper towels.

Tips for Perfect Results

Making perfect mozzarella sticks is all about technique. Follow these expert tips:

  • Always freeze before and after breading
  • Double coat for extra crunch and protection
  • Maintain oil temperature at 350°F
  • Fry in small batches to avoid overcrowding
  • Serve immediately for best texture

These tips ensure your cheese stays inside while the outside gets perfectly crispy.


Variations

One of the best things about this mozzarella sticks recipe is how customizable it is.

Spicy Mozzarella Sticks

Add cayenne pepper or chili flakes to the breadcrumbs.

Air Fryer Version

Cook at 390°F for 6–8 minutes for a lighter option.

Gluten-Free Option

Use gluten-free flour and breadcrumbs.

Stuffed Version

Wrap mozzarella with pepperoni for a pizza-style twist.

What to Serve With It

These mozzarella sticks pair perfectly with a variety of dips and sides that enhance their cheesy goodness.

  • Marinara sauce (classic pairing)
  • Ranch or garlic aioli
  • Honey mustard
  • Side of fries or onion rings

They’re the perfect addition to any appetizer spread.


Storage & Reheating

If you have leftovers, mozzarella sticks can still taste great with proper storage.

  • Store in an airtight container in the fridge for up to 3 days
  • Reheat in an oven or air fryer to restore crispiness
  • Avoid microwaving, as it makes them soggy
  • Freeze uncooked breaded sticks for up to 2 months

This makes them a great make-ahead snack option.


Common Mistakes to Avoid

Even a simple recipe like mozzarella sticks can go wrong. Avoid these common mistakes:

  • Skipping the freezing step
  • Not double coating
  • Frying at too low a temperature
  • Overcrowding the pan

Avoiding these ensures crispy results with no cheese leakage.


FAQs

Can I make mozzarella sticks ahead of time?

Yes! Bread and freeze them, then fry when ready to serve.

Can I bake instead of fry?

Yes, but they won’t be as crispy. Bake at 400°F for about 10 minutes.

Why does the cheese leak out?

This usually happens if they’re not frozen long enough or not double coated.

Can I use different cheese?

Yes, but mozzarella works best due to its melt and stretch.


Final Thoughts

These homemade mozzarella sticks are the ultimate snack for parties and gatherings—crispy on the outside, gooey on the inside, and completely irresistible. They’re easy to prepare, fun to eat, and guaranteed to be a hit with everyone.

Whether you’re hosting a big event or just craving a cheesy treat, this mozzarella sticks recipe delivers every time. Once you try them fresh from your own kitchen, you’ll see why they’re such a beloved classic.

Ultimate Cheesy Garlic Chicken Wraps – Quick and Easy Chicken Wrap Recipes

If you’re looking for a fast, flavorful, and satisfying meal that the whole family will love, these Ultimate Cheesy Garlic Chicken Wraps are exactly what you need. Packed with juicy seasoned chicken, melty cheese, and bold garlic flavor, these wraps are the definition of comfort food in a handheld form.

What makes these Ultimate Cheesy Garlic Chicken Wraps stand out is how effortlessly they come together. In under 30 minutes, you can turn simple pantry ingredients into a restaurant-quality meal that works for lunch, dinner, or even meal prep. They’re rich, cheesy, garlicky, and absolutely irresistible from the first bite.

Why You’ll Love This Recipe

These Ultimate Cheesy Garlic Chicken Wraps are the kind of recipe that instantly becomes a weeknight favorite. They’re simple enough for busy days but flavorful enough to feel like a treat.

Here’s why you’ll love them:

  • Ready in under 30 minutes
  • Packed with cheesy, garlicky flavor
  • Perfect for lunch, dinner, or meal prep
  • Easy to customize with your favorite ingredients
  • Family-friendly and crowd-pleasing

Once you try them, they’ll quickly earn a permanent spot in your recipe rotation.


Ingredients

To make the best Ultimate Cheesy Garlic Chicken Wraps, you’ll need:

  • 2 cups cooked chicken breast (shredded or chopped)
  • 4 large flour tortillas
  • 1 1/2 cups shredded mozzarella or cheddar cheese
  • 3 cloves garlic, minced
  • 2 tablespoons butter or olive oil
  • 1/2 cup creamy garlic sauce or ranch dressing
  • Salt and black pepper to taste
  • Optional: parsley for garnish

Ingredient Notes

The key to amazing Ultimate Cheesy Garlic Chicken Wraps is building layers of flavor. Fresh garlic is essential—it creates that bold, aromatic base that defines the dish. Melted butter helps carry the garlic flavor throughout the chicken, making every bite rich and savory.

For the cheese, mozzarella gives you that stretchy, gooey melt, while cheddar adds a sharper flavor. You can also combine both for the ultimate cheesy experience. A creamy garlic sauce or ranch ties everything together with a smooth, tangy finish.


Step-by-Step Instructions

1. Cook the Garlic Chicken

In a skillet, melt butter over medium heat. Add minced garlic and sauté until fragrant. Stir in cooked chicken, season with salt and pepper, and cook until well coated and heated through.

2. Warm the Tortillas

Lightly warm tortillas in a pan or microwave to make them flexible and easy to roll.

3. Assemble the Wraps

Spread garlic sauce on each tortilla. Add chicken, sprinkle generously with cheese, and add optional parsley.

4. Roll and Toast

Roll tightly into wraps. Place seam-side down in a skillet and toast until golden and crispy, allowing the cheese inside to melt fully.

Tips for Perfect Results

To make the best Ultimate Cheesy Garlic Chicken Wraps, follow these expert tips:

  • Don’t overcook the garlic—it should be fragrant, not browned
  • Use freshly shredded cheese for better melting
  • Warm tortillas before assembling to prevent tearing
  • Toast wraps seam-side down first to seal them
  • Don’t overfill or they may burst while cooking

These small steps make a big difference in texture and flavor.


Variations

One of the best things about Ultimate Cheesy Garlic Chicken Wraps is how easily you can customize them.

Spicy Version

Add chili flakes or hot sauce for a kick.

Bacon Garlic Chicken Wraps

Add crispy bacon for extra smoky flavor.

Veggie Loaded

Include spinach, mushrooms, or bell peppers.

Low-Carb Option

Use low-carb tortillas or lettuce wraps instead.

What to Serve With It

These Ultimate Cheesy Garlic Chicken Wraps pair beautifully with simple, complementary sides.

  • French fries or sweet potato fries
  • Side salad with vinaigrette
  • Roasted vegetables
  • Creamy coleslaw

They’re filling on their own but even better as part of a full meal.


Storage & Reheating

If you have leftovers, these Ultimate Cheesy Garlic Chicken Wraps store and reheat well.

  • Store in an airtight container in the fridge for up to 3 days
  • Reheat in a skillet or air fryer for best crispiness
  • Avoid microwaving if possible to keep texture intact
  • Freeze wrapped individually for up to 2 months

Proper reheating brings back their crispy, cheesy goodness.


Common Mistakes to Avoid

Even easy recipes can go wrong if you’re not careful. Avoid these mistakes when making Ultimate Cheesy Garlic Chicken Wraps:

  • Burning the garlic (it turns bitter quickly)
  • Using too much filling (causes tearing)
  • Skipping tortilla warming step
  • Not sealing wraps properly when toasting

Avoiding these ensures perfect wraps every time.


FAQs

Can I use rotisserie chicken?

Yes! Rotisserie chicken is a great time-saving option.

What cheese works best?

Mozzarella melts beautifully, but cheddar or a blend adds extra flavor.

Can I make these ahead of time?

Yes, assemble ahead and toast just before serving for best results.

Are these wraps freezer-friendly?

Yes, wrap tightly and freeze for up to 2 months.


Final Thoughts

These Ultimate Cheesy Garlic Chicken Wraps are everything you want in a quick meal—cheesy, garlicky, crispy, and completely satisfying. They’re easy enough for busy weeknights but delicious enough to feel like something special.

Whether you’re cooking for family, meal prepping, or just craving comfort food, this recipe delivers every time. Once you try these Ultimate Cheesy Garlic Chicken Wraps, they’ll quickly become a go-to favorite in your kitchen.

Chocolate Chip Cookie Dough Brownie Bites 🍫🍪✨ | Fudgy, Creamy & Bakery-Perfect

If you’ve ever found yourself torn between warm, fudgy brownies and soft, sweet chocolate chip cookie dough, this recipe is your dream come true. These chocolate chip cookie dough brownie bites combine both desserts into one irresistible, bite-sized treat that’s rich, indulgent, and completely bakery-worthy.

Each bite features a dense brownie base topped with smooth, edible cookie dough and finished with a drizzle of chocolate for the ultimate dessert experience. Whether you’re baking for a party, holiday tray, or just a late-night craving, these chocolate chip cookie dough brownie bites disappear fast—so you may want to make a double batch.

Image Prompt: Close-up of chocolate chip cookie dough brownie bites stacked on a dessert plate, showing fudgy brownie base and creamy cookie dough topping with chocolate drizzle, natural lighting, shallow depth of field, 4k food photography.

Why You’ll Love This Recipe

These chocolate chip cookie dough brownie bites are the perfect combination of two classic desserts in one easy-to-eat form.

Here’s why they’re a must-try:

  • Combines brownies and cookie dough in one bite
  • Rich, fudgy, and creamy texture
  • Perfect for parties, holidays, or gifting
  • Easy to make ahead and store
  • Bakery-style flavor without complicated steps

They’re the kind of dessert that gets people asking for the recipe every single time.


Ingredients

To make these indulgent chocolate chip cookie dough brownie bites, you’ll need:

For the Brownie Base:

  • 1 box brownie mix (or homemade brownie batter)
  • Ingredients listed on box (usually eggs, oil, water)

For the Cookie Dough Layer:

  • 1/2 cup unsalted butter, softened
  • 1/2 cup brown sugar
  • 1/4 cup granulated sugar
  • 1 teaspoon vanilla extract
  • 1 cup all-purpose flour (heat-treated)
  • 2 tablespoons milk
  • 3/4 cup mini chocolate chips

For Topping:

  • Melted chocolate or chocolate drizzle

Ingredient Notes

The magic of chocolate chip cookie dough brownie bites lies in balancing textures. The brownie layer should be rich and fudgy—not cakey—while the cookie dough layer stays soft and creamy.

Always heat-treat your flour for the cookie dough to make it safe for eating. You can do this by baking it at 350°F for about 5 minutes or microwaving it in short intervals. Mini chocolate chips are best because they distribute evenly and give you perfect chocolate flavor in every bite.


Step-by-Step Instructions

1. Prepare the Brownie Base

Prepare brownie batter according to package instructions. Pour into a lined baking pan and bake until just set and fudgy. Let it cool completely before adding cookie dough.

2. Make the Cookie Dough Layer

In a bowl, cream together butter, brown sugar, and granulated sugar until fluffy. Mix in vanilla, flour, and milk until smooth. Fold in mini chocolate chips.

3. Assemble the Layers

Spread cookie dough evenly over the cooled brownie layer. Press gently to smooth the surface.

4. Add Chocolate Drizzle

Drizzle melted chocolate over the top for an extra indulgent finish.

5. Chill and Slice

Refrigerate for at least 1 hour, then slice into bite-sized squares.

Tips for Perfect Results

To make the best chocolate chip cookie dough brownie bites, keep these expert tips in mind:

  • Let brownies cool completely before adding cookie dough
  • Use mini chocolate chips for better distribution
  • Chill before slicing for clean, sharp edges
  • Don’t overmix cookie dough for best texture
  • Line your pan with parchment paper for easy removal

These small details help you achieve bakery-level results at home.


Variations

One of the best things about chocolate chip cookie dough brownie bites is how easy they are to customize.

Peanut Butter Twist

Swirl peanut butter into the brownie layer for extra richness.

Double Chocolate Version

Add cocoa powder to the cookie dough for a chocolate overload.

Holiday Edition

Top with sprinkles or crushed peppermint for seasonal flair.

Gluten-Free Option

Use a gluten-free brownie mix and flour alternative.

What to Serve With It

These chocolate chip cookie dough brownie bites are rich and satisfying, so they pair best with simple accompaniments.

  • Cold milk or chocolate milk
  • Vanilla ice cream
  • Coffee or espresso
  • Fresh berries for balance

They’re perfect for dessert tables or party platters.


Storage & Reheating

These chocolate chip cookie dough brownie bites store beautifully, making them ideal for make-ahead desserts.

  • Store in an airtight container in the refrigerator for up to 5 days
  • Freeze for up to 2 months
  • Let frozen bites thaw for 10–15 minutes before serving
  • No reheating needed—best served chilled or room temperature

They actually taste even better after a day as the flavors blend.


Common Mistakes to Avoid

Even simple desserts can go wrong. Avoid these mistakes when making chocolate chip cookie dough brownie bites:

  • Adding cookie dough before brownies are fully cooled
  • Skipping flour heat treatment
  • Overbaking brownies (they should stay fudgy)
  • Not chilling before slicing

Avoiding these ensures perfect layers and clean cuts.


FAQs

Are chocolate chip cookie dough brownie bites safe to eat?

Yes, as long as you heat-treat the flour used in the cookie dough.

Can I make them ahead of time?

Absolutely! They’re perfect for making 1–2 days in advance.

Can I freeze brownie bites?

Yes, they freeze very well for up to 2 months.

What’s the best brownie mix to use?

A fudgy-style brownie mix works best for texture contrast.


Final Thoughts

These chocolate chip cookie dough brownie bites are the ultimate indulgent dessert—rich, creamy, fudgy, and completely irresistible. They combine two classic favorites into one easy, bite-sized treat that’s perfect for any occasion.

Whether you’re making them for a party, holiday gathering, or just because you love dessert, this recipe guarantees smiles all around. Once you try these chocolate chip cookie dough brownie bites, they’ll quickly become a go-to favorite in your baking rotation.

Quick & Delicious Sausage Egg Breakfast Rolls – The Perfect Brunch Bite!

If you’re searching for a fast, satisfying, and crowd-pleasing breakfast, these sausage egg breakfast rolls are exactly what you need. They combine fluffy scrambled eggs, savory breakfast sausage, and melted cheese, all tucked inside soft, golden-baked rolls. The result is a handheld brunch bite that’s perfect for busy mornings, meal prep, or weekend gatherings.

What makes these sausage egg breakfast rolls so special is their simplicity. You don’t need fancy ingredients or complicated steps—just a few breakfast staples and about 30 minutes in the kitchen. Whether you’re feeding a family or prepping breakfasts for the week, this recipe delivers every time.

Why You’ll Love This Recipe

These sausage egg breakfast rolls are the kind of recipe that quickly becomes a household favorite. They’re warm, filling, and incredibly versatile.

Here’s why you’ll love them:

  • Ready in about 30 minutes
  • Perfect for meal prep or grab-and-go breakfasts
  • Kid-friendly and crowd-pleasing
  • Made with simple, affordable ingredients
  • Easy to customize with different fillings

They’re ideal for busy mornings when you want something homemade without the hassle.


Ingredients

To make these delicious sausage egg breakfast rolls, you’ll need:

  • 1 can refrigerated biscuit dough or dinner rolls
  • 6 large eggs
  • 1/2 pound breakfast sausage
  • 1 cup shredded cheddar cheese
  • 2 tablespoons milk
  • 1 tablespoon butter
  • Salt and black pepper to taste

Optional Add-Ins:

  • Chopped green onions
  • Diced bell peppers
  • Hot sauce or salsa

Ingredient Notes

The key to perfect sausage egg breakfast rolls is balancing flavor and texture. Use high-quality breakfast sausage for the best savory flavor—either pork sausage or turkey sausage works well depending on your preference.

Fresh eggs create the fluffiest filling, especially when cooked low and slow with a splash of milk. Cheese adds creaminess and binds everything together, while soft biscuit dough gives the rolls their signature golden, fluffy exterior.


Step-by-Step Instructions

1. Cook the Sausage

In a skillet over medium heat, cook the sausage until browned and fully cooked. Break it into small crumbles for even distribution.

2. Scramble the Eggs

In a bowl, whisk eggs with milk, salt, and pepper. Melt butter in a pan and cook the eggs over low heat until soft and fluffy.

3. Prepare the Dough

Flatten each biscuit or roll slightly to create space for the filling.

4. Assemble the Rolls

Add a spoonful of eggs, sausage, and cheese to each piece of dough. Fold and pinch to seal tightly.

5. Bake Until Golden

Place rolls on a baking sheet and bake at 375°F (190°C) for 12–15 minutes, or until golden brown.

Tips for Perfect Results

To make the best sausage egg breakfast rolls, keep these tips in mind:

  • Don’t overfill the dough or it may burst while baking
  • Cook eggs gently for a fluffy texture
  • Seal edges tightly to prevent leaking
  • Brush tops with butter for extra golden color

These small steps help ensure your rolls come out perfect every time.


Variations

One of the best things about sausage egg breakfast rolls is how easy they are to customize.

Spicy Version

Add jalapeños or hot sausage for a kick.

Veggie Option

Include spinach, mushrooms, or bell peppers.

Cheesy Overload

Use a mix of cheddar, mozzarella, and pepper jack.

Sweet & Savory Twist

Add a touch of maple syrup glaze on top after baking.

What to Serve With It

These sausage egg breakfast rolls pair well with a variety of breakfast sides and drinks.

  • Fresh fruit salad
  • Hash browns or breakfast potatoes
  • Yogurt with granola
  • Coffee, tea, or fresh orange juice

They’re great on their own but even better as part of a full brunch spread.


Storage & Reheating

If you have leftovers, sausage egg breakfast rolls store and reheat beautifully.

  • Store in an airtight container in the refrigerator for up to 3 days
  • Freeze for up to 2 months
  • Reheat in the oven or air fryer for best texture
  • Microwave for 30–45 seconds for a quick option

Proper storage keeps them soft and flavorful.


Common Mistakes to Avoid

Even simple recipes can go wrong if you’re not careful. Avoid these mistakes when making sausage egg breakfast rolls:

  • Overcooking the eggs (they become dry)
  • Overfilling the dough
  • Not sealing edges properly
  • Baking at too low a temperature

Avoiding these ensures perfectly baked rolls every time.


FAQs

Can I make sausage egg breakfast rolls ahead of time?

Yes! Assemble them the night before and bake in the morning.

Can I freeze them?

Absolutely. They freeze well and reheat easily in the oven or air fryer.

What’s the best cheese to use?

Cheddar works best, but any melting cheese will do.

Can I use crescent dough instead of biscuits?

Yes, crescent dough makes them extra flaky and soft.


Final Thoughts

These sausage egg breakfast rolls are the ultimate easy breakfast or brunch recipe. They’re warm, satisfying, and packed with classic morning flavors that everyone loves. Whether you’re meal prepping or serving a crowd, this recipe is guaranteed to impress.

Once you try these sausage egg breakfast rolls, they’ll quickly become a staple in your breakfast rotation—simple, delicious, and always satisfying.

Moose Farts: The 15-Minute Dessert That Disappears First

If you’ve never heard of moose farts, you’re not alone—and yes, the name is as unforgettable as the dessert itself. This quirky, no-bake treat has gained popularity across North American kitchens for one simple reason: it’s ridiculously easy and insanely delicious. In just about 15 minutes, you can whip up a tray of moose farts dessert, and trust me—they will be gone before you know it.

At their core, moose farts are rich, sweet coconut-chocolate bites with a soft, truffle-like texture and a buttery graham cracker base. They require no baking, minimal cleanup, and deliver maximum flavor. Perfect for holidays, potlucks, or late-night cravings, this is the kind of recipe that gets requested again and again.

Why You’ll Love This Recipe

There are countless reasons why moose farts dessert has become a hidden gem in the world of no-bake sweets.

Here’s why you’ll love them:

  • Ready in just 15 minutes
  • No baking required
  • Made with simple pantry ingredients
  • Perfect for parties, holidays, and gifting
  • Sweet, chewy, and irresistibly addictive

They’re the kind of dessert that surprises people—simple to make, but unforgettable in taste.


Ingredients

To make classic moose farts dessert, you’ll need just a handful of easy ingredients:

  • 1/2 cup unsalted butter, softened
  • 1/2 cup sweetened condensed milk
  • 1 1/2 cups graham cracker crumbs
  • 1 cup shredded coconut (plus extra for coating)
  • 1/2 cup mini chocolate chips
  • 1 teaspoon vanilla extract
  • Optional: melted chocolate for drizzling


Ingredient Notes

The magic of moose farts dessert comes from the balance of textures. The graham cracker crumbs provide structure, the sweetened condensed milk binds everything together, and the coconut adds a chewy, tropical twist. Mini chocolate chips melt slightly into the mixture, creating pockets of rich chocolate flavor.

If you want a stronger coconut taste, toast the shredded coconut lightly before mixing it in. This adds a deeper, nutty aroma that takes the dessert to the next level.


Step-by-Step Instructions

1. Mix the Base

In a large bowl, combine softened butter and sweetened condensed milk. Stir until smooth and creamy.

2. Add Dry Ingredients

Mix in graham cracker crumbs, shredded coconut, vanilla extract, and mini chocolate chips. Stir until fully combined and a thick dough forms.

3. Shape the Balls

Roll the mixture into small bite-sized balls using your hands. If the mixture is sticky, chill it for 10 minutes first.

4. Coat and Finish

Roll each ball in extra shredded coconut or drizzle with melted chocolate for a finishing touch.


Tips for Perfect Results

To make the best moose farts dessert, keep these helpful tips in mind:

  • Chill the mixture slightly if it’s too sticky to handle
  • Use finely shredded coconut for better coating
  • Don’t overmix—just combine until it holds together
  • Store in a cool place for the best texture

These small steps ensure your treats come out perfectly shaped and delicious every time.


Variations

One of the best things about moose farts dessert is how easy it is to customize.

Chocolate Lovers Version

Add cocoa powder to the base mixture for a richer chocolate flavor.

Nutty Twist

Mix in chopped pecans or walnuts for crunch.

Holiday Style

Roll in colored sprinkles or crushed candy canes.

Dairy-Free Option

Use dairy-free condensed milk and plant-based butter.


What to Serve With It

These moose farts dessert bites are perfect on their own, but they also pair beautifully with other treats and drinks.

  • Hot coffee or espresso
  • Tea or hot chocolate
  • Holiday dessert platters
  • Ice cream for a sweet pairing

They’re especially popular at parties because they’re easy to grab and eat in one bite.


Storage & Reheating

Good news—moose farts dessert stores beautifully, making them ideal for make-ahead treats.

  • Store in an airtight container in the fridge for up to 1 week
  • Freeze for up to 2 months
  • Let frozen bites thaw at room temperature for 10–15 minutes before serving

They taste even better after chilling, as the flavors meld together.


Common Mistakes to Avoid

Even though moose farts dessert is simple, a few mistakes can affect the final result:

  • Adding too many crumbs, making them dry
  • Not chilling the mixture when too soft
  • Skipping the coating step
  • Using large chocolate chips that don’t distribute evenly

Avoiding these ensures a smooth, chewy, perfectly balanced treat.


FAQs

Why are they called moose farts?

The name is just a fun, playful nod to their Canadian-inspired origin and humorous style—no actual moose involved!

Can I make moose farts dessert ahead of time?

Yes! They’re actually better after chilling for a few hours.

Can I freeze them?

Absolutely. They freeze very well for up to 2 months.

Can I reduce the sweetness?

Yes, use unsweetened coconut or reduce the condensed milk slightly.


Final Thoughts

This moose farts dessert may have a funny name, but there’s nothing funny about how delicious it is. In just 15 minutes, you get a sweet, chewy, coconut-chocolate treat that’s perfect for sharing—or secretly keeping all to yourself.

Whether you’re making them for a party, holiday tray, or just a quick sweet fix, these no-bake bites are guaranteed to disappear fast. Once you try them, you’ll understand why moose farts dessert is always the first thing gone from the table.

Creamy Tomato Garlic Pasta in 30 Minutes (Easy Weeknight Favorite)

If you’re craving a comforting, flavorful meal that doesn’t require hours in the kitchen, this creamy tomato garlic pasta in 30 minutes is exactly what you need. It’s rich, velvety, and packed with bold garlic flavor, balanced perfectly by a smooth tomato cream sauce that clings to every bite of pasta.

This recipe is a lifesaver on busy weeknights when time is short but you still want something homemade and satisfying. Using simple pantry staples, you can create a restaurant-quality dish that feels indulgent yet incredibly easy to prepare. Whether you’re cooking for yourself, your family, or guests, this pasta never disappoints.

Why You’ll Love This Recipe

There are countless reasons to fall in love with this creamy tomato garlic pasta in 30 minutes, especially if you enjoy quick, satisfying meals packed with flavor.

  • Ready in just 30 minutes
  • Uses simple, affordable ingredients
  • Creamy and comforting without being too heavy
  • Perfect for weeknight dinners or meal prep
  • Easily customizable with proteins or veggies

It’s the kind of recipe you’ll keep coming back to because it’s both reliable and incredibly delicious.


Ingredients

To make this flavorful creamy tomato garlic pasta in 30 minutes, gather the following:

  • 12 oz pasta (penne, rigatoni, or spaghetti)
  • 2 tablespoons olive oil
  • 4–5 cloves garlic, minced
  • 1 can (14–15 oz) crushed tomatoes
  • 1/2 cup heavy cream
  • 1/2 cup freshly grated Parmesan cheese
  • 1 teaspoon Italian seasoning
  • 1/2 teaspoon red pepper flakes (optional)
  • Salt and black pepper to taste
  • Fresh basil for garnish

Ingredient Notes

The magic of this creamy tomato garlic pasta in 30 minutes comes from its simplicity, but quality ingredients make a big difference. Opt for high-quality canned tomatoes for a naturally sweet and rich flavor. Fresh garlic is essential—it delivers a bold, aromatic base that defines the dish.

Freshly grated Parmesan melts smoothly into the sauce, creating a silky texture, while heavy cream adds richness. If you prefer a lighter version, you can substitute half-and-half without sacrificing too much creaminess.


Step-by-Step Instructions

1. Cook the Pasta

Bring a large pot of salted water to a boil and cook your pasta until al dente. Reserve about 1/2 cup of pasta water, then drain.

2. Sauté the Garlic

Heat olive oil in a large skillet over medium heat. Add minced garlic and cook for about 1 minute until fragrant, being careful not to burn it.

3. Build the Sauce

Pour in the crushed tomatoes, Italian seasoning, and red pepper flakes. Let the sauce simmer for 8–10 minutes to deepen the flavor.

4. Add Cream and Cheese

Reduce heat and stir in the heavy cream and Parmesan cheese until the sauce becomes smooth and creamy.

5. Combine and Finish

Add the cooked pasta to the sauce, tossing to coat evenly. Use reserved pasta water as needed to adjust consistency.

Tips for Perfect Results

To make the best creamy tomato garlic pasta in 30 minutes, keep these expert tips in mind:

  • Salt your pasta water generously for better flavor
  • Don’t overcook the pasta—al dente is key
  • Simmer the sauce long enough to enhance the tomato flavor
  • Add cheese gradually to prevent clumping
  • Taste and adjust seasoning before serving

These small techniques will elevate your dish to the next level.


Variations

One of the best things about this creamy tomato garlic pasta in 30 minutes is how versatile it is.

Add Protein

Grilled chicken, shrimp, or Italian sausage work beautifully.

Make It Vegetarian

Add spinach, mushrooms, zucchini, or roasted vegetables.

Spice It Up

Increase red pepper flakes or add chili oil.

Dairy-Free Option

Use coconut cream and dairy-free cheese alternatives.

What to Serve With It

This creamy tomato garlic pasta in 30 minutes pairs perfectly with lighter sides to balance its richness.

  • Garlic bread or crusty baguette
  • Fresh green salad with vinaigrette
  • Roasted vegetables
  • Sparkling water or white wine

These sides complement the creamy sauce without overpowering it.


Storage & Reheating

Leftovers of this creamy tomato garlic pasta in 30 minutes can be just as delicious with proper storage.

  • Store in an airtight container in the refrigerator for up to 3 days
  • Reheat gently on the stovetop or microwave
  • Add a splash of milk or cream to revive the sauce

Avoid freezing, as cream-based sauces may separate when thawed.


Common Mistakes to Avoid

Even simple recipes can have pitfalls. Avoid these when making creamy tomato garlic pasta in 30 minutes:

  • Burning the garlic (it turns bitter)
  • Adding cream at too high heat
  • Skipping reserved pasta water
  • Using pre-shredded cheese

Being mindful of these mistakes ensures a smooth, flavorful result.


FAQs

Can I make creamy tomato garlic pasta ahead of time?

Yes, but it’s best enjoyed fresh. Store the sauce separately if possible.

What pasta works best?

Penne, rigatoni, or fettuccine are ideal for holding the sauce.

Can I freeze this pasta?

It’s not recommended due to the cream-based sauce.

How can I make it healthier?

Use whole wheat pasta and reduce the amount of cream.


Final Thoughts

This creamy tomato garlic pasta in 30 minutes proves that you don’t need complicated recipes to create something truly delicious. It’s quick, comforting, and packed with flavor—everything a perfect weeknight meal should be.

Whether you’re cooking for yourself or sharing with loved ones, this dish delivers consistent, satisfying results every time. Once you try it, it’s bound to become a staple in your kitchen.

Crispy Chicken Caesar Wrap: The Ultimate Easy Lunch & Dinner Recipe

There’s something undeniably satisfying about a wrap that delivers both crunch and creaminess in every bite—and this crispy chicken Caesar wrap does exactly that. It takes the classic Caesar salad you already love and transforms it into a hearty, handheld meal that’s perfect for busy days, quick lunches, or casual dinners.

The combination of golden, crispy chicken, fresh romaine lettuce, rich Parmesan cheese, and creamy Caesar dressing wrapped in a soft tortilla creates a flavor-packed experience that feels both comforting and fresh. Whether you’re cooking for yourself or feeding a family, this recipe is simple, reliable, and incredibly delicious.


Why You’ll Love This Recipe

This crispy chicken Caesar wrap is more than just a quick meal—it’s a perfect balance of textures and flavors that keeps you coming back for more.

Here’s why it stands out:

  • Ready in under 30 minutes
  • Combines crispy, creamy, and fresh textures
  • Uses simple, easy-to-find ingredients
  • Perfect for meal prep or on-the-go lunches
  • Easily customizable for different tastes

It’s the kind of recipe that fits seamlessly into your routine while still feeling like a treat.


Ingredients

To make this delicious crispy chicken Caesar wrap, you’ll need:

  • 2 cups crispy chicken (breaded and cooked)
  • 4 large flour tortillas
  • 2 cups romaine lettuce, chopped
  • 1/2 cup grated Parmesan cheese
  • 1/2 cup Caesar dressing
  • 1/2 cup croutons (optional for extra crunch)
  • Freshly ground black pepper
  • Optional: cherry tomatoes or bacon bits


Ingredient Notes

The secret to a great crispy chicken Caesar wrap lies in the quality of your ingredients. Fresh romaine lettuce provides that signature crunch, while a good Caesar dressing brings everything together with its creamy, tangy flavor.

For the chicken, you can use homemade breaded chicken, air-fried tenders, or even store-bought options for convenience. Freshly grated Parmesan is always preferred over pre-shredded—it melts better and adds a richer, more authentic flavor.


Step-by-Step Instructions

1. Prepare the Chicken

Cook your breaded chicken until golden and crispy. Let it rest for a few minutes before slicing into strips to keep it juicy.

2. Toss the Salad

In a large bowl, combine chopped romaine lettuce, Parmesan cheese, and Caesar dressing. Toss gently until evenly coated.

3. Assemble the Wrap

Lay a tortilla flat and add the dressed lettuce mixture. Top with crispy chicken and sprinkle croutons if using.

4. Wrap It Up

Fold in the sides and roll tightly into a wrap. Slice in half for easy serving.


Tips for Perfect Results

To make the best crispy chicken Caesar wrap, keep these helpful tips in mind:

  • Warm tortillas slightly to make them easier to roll
  • Add chicken last to keep it crispy
  • Avoid overdressing the lettuce to prevent sogginess
  • Use freshly cracked pepper for extra flavor

These small adjustments can take your wrap from good to absolutely irresistible.


Variations

One of the best things about a crispy chicken Caesar wrap is how easy it is to customize.

Grilled Chicken Version

Swap crispy chicken for grilled chicken for a lighter option.

Spicy Caesar Wrap

Add buffalo sauce or spicy dressing for a kick.

Low-Carb Option

Use large lettuce leaves instead of tortillas.

Extra Indulgent

Add crispy bacon or extra cheese for a richer wrap.


What to Serve With It

This crispy chicken Caesar wrap pairs perfectly with simple sides that complement its flavors without overpowering them.

  • French fries or sweet potato fries
  • Fresh fruit salad
  • Pasta salad
  • Chips and a light dip

These options make it easy to turn your wrap into a complete, satisfying meal.


Storage & Reheating

If you’re planning ahead, this crispy chicken Caesar wrap can be prepped in advance with a few simple adjustments.

  • Store ingredients separately for best results
  • Keep dressing on the side until ready to eat
  • Refrigerate for up to 3 days
  • Reheat chicken in an oven or air fryer to maintain crispiness

Avoid assembling the wraps too early to prevent soggy tortillas.


Common Mistakes to Avoid

Even a simple recipe like this has a few potential pitfalls. Avoid these when making your crispy chicken Caesar wrap:

  • Using soggy or wilted lettuce
  • Overfilling the tortilla
  • Adding too much dressing
  • Wrapping while the chicken is too hot

Paying attention to these details ensures perfect wraps every time.


FAQs

Can I make crispy chicken Caesar wraps ahead of time?

Yes, but store the components separately and assemble just before serving.

What’s the best chicken to use?

Breaded chicken tenders or homemade crispy chicken work best.

Can I use a different dressing?

Absolutely! Ranch or a lighter Caesar dressing can be used.

Are these wraps healthy?

They can be! Use grilled chicken and a lighter dressing for a healthier version.


Final Thoughts

This crispy chicken Caesar wrap is the perfect blend of convenience and flavor. It transforms a classic salad into a satisfying meal that’s easy to make and even easier to enjoy.

Whether you’re looking for a quick lunch, a family-friendly dinner, or a meal prep favorite, this recipe delivers every time. Once you try it, you’ll see why it’s a staple worth keeping in your rotation.