H1: Red Velvet Thumbprint Cookies – Festive & Elegant Holiday Treat

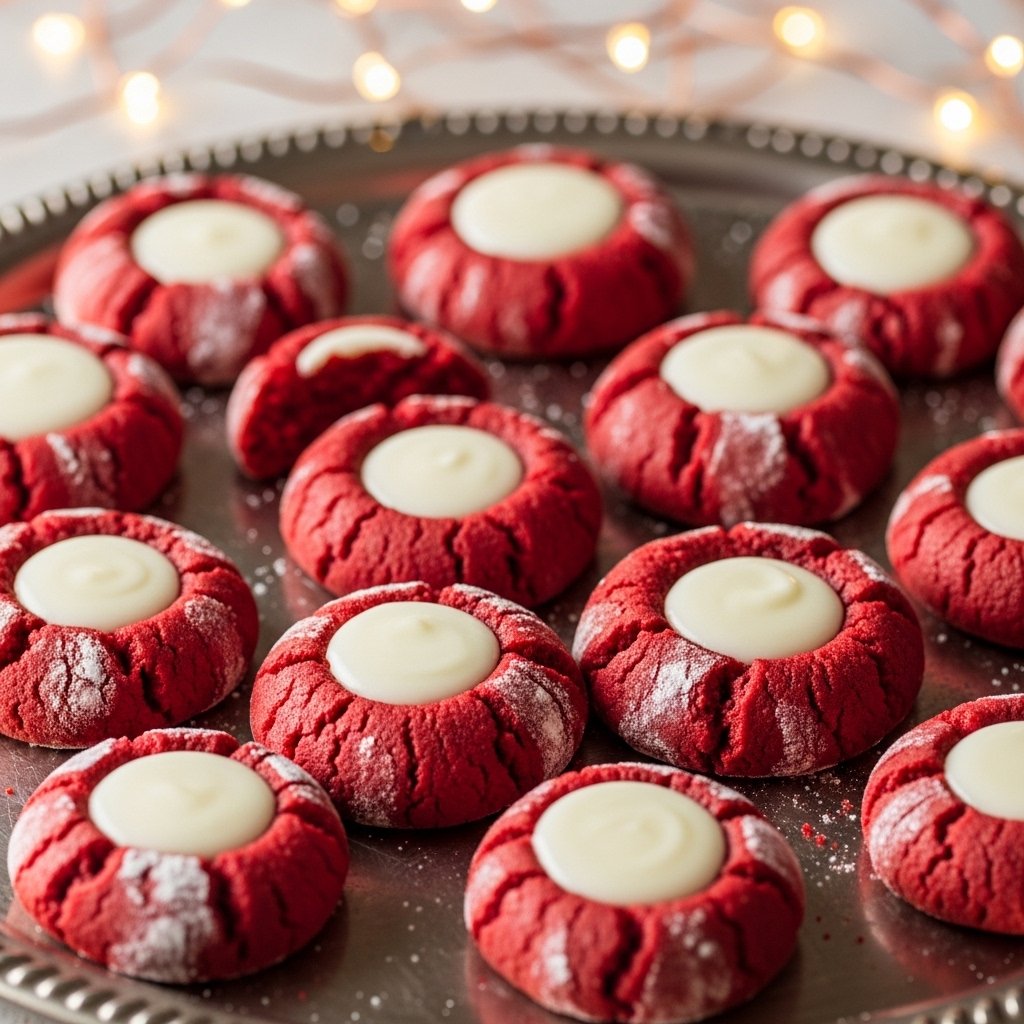
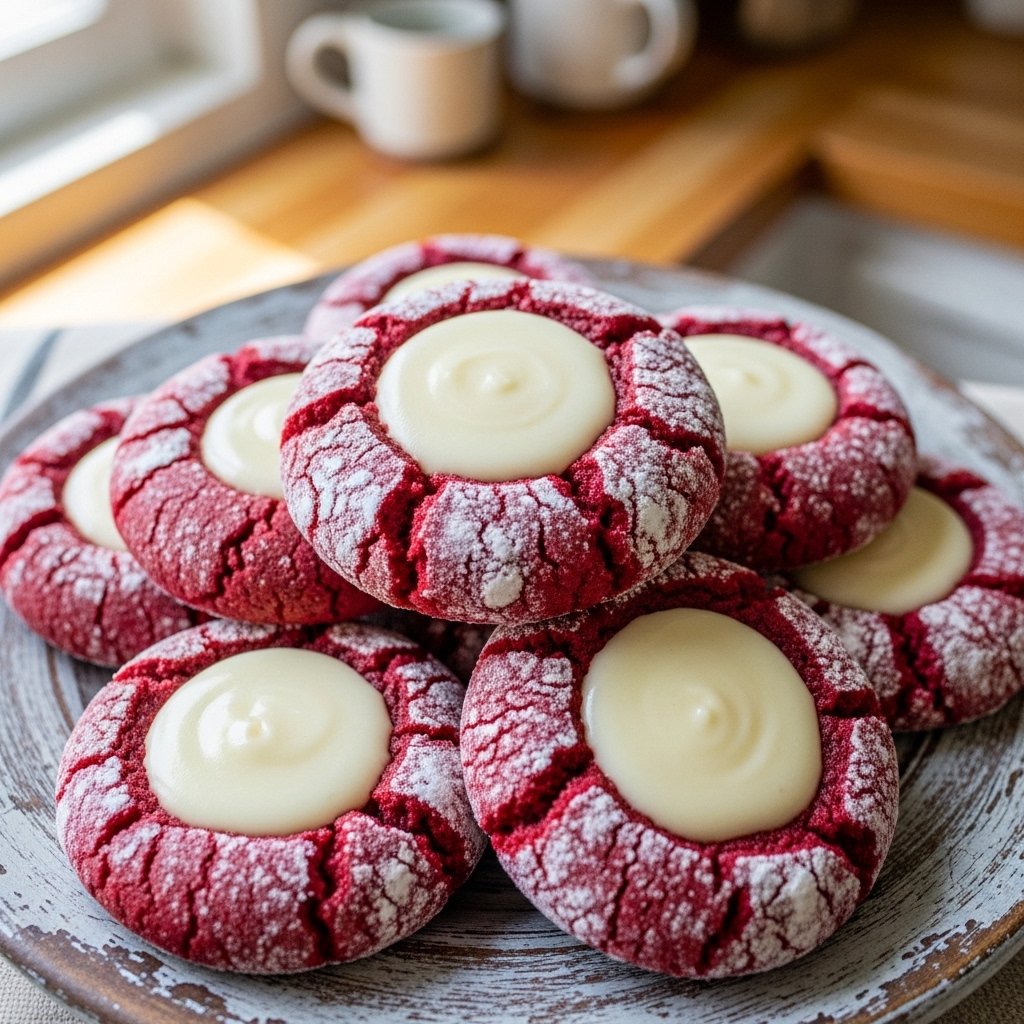
If you’re searching for a dessert that is both eye-catching and delicious, these Red Velvet Thumbprint Cookies Festive & Elegant are exactly what you need. They combine the rich cocoa flavor of classic red velvet with a soft, buttery cookie base and a creamy center that melts in your mouth.

These cookies are perfect for holidays, Valentine’s Day, Christmas cookie boxes, or anytime you want a dessert that feels a little extra special. The beautiful red color paired with a sweet cream cheese or white chocolate filling makes them truly unforgettable.

In this guide, you’ll learn how to make perfect red velvet thumbprint cookies, including expert baking tips, variations, and storage tricks to keep them soft and fresh.


Why You’ll Love These Red Velvet Thumbprint Cookies

These Red Velvet Thumbprint Cookies Festive & Elegant are more than just pretty cookies—they’re soft, chewy, and packed with flavor. The combination of cocoa and vanilla creates a balanced taste, while the creamy filling adds richness in every bite.

They’re also incredibly versatile. You can serve them at parties, package them as edible gifts, or enjoy them with a cup of coffee or hot cocoa at home.


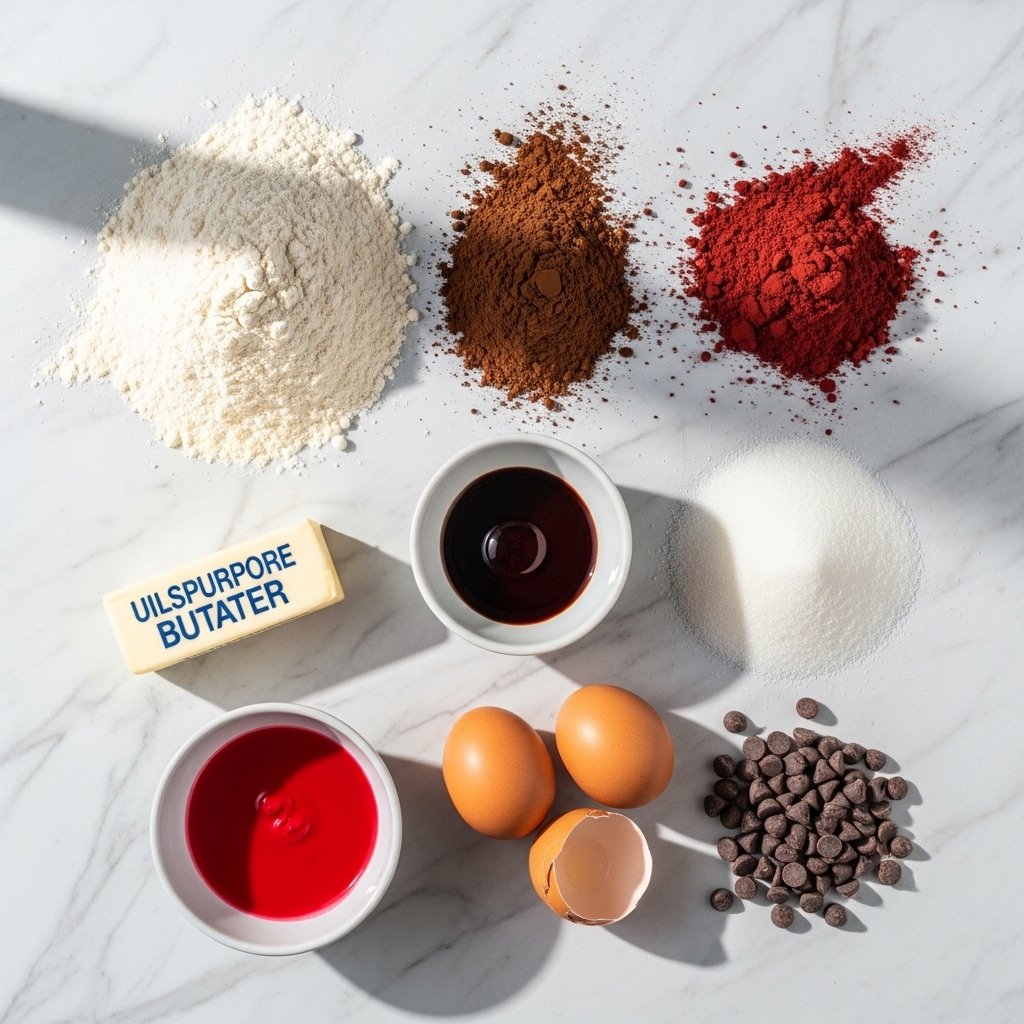
Ingredients for Red Velvet Thumbprint Cookies

To make these red velvet thumbprint cookies, you’ll need simple baking ingredients:

  • 2 ½ cups all-purpose flour
  • 2 tbsp cocoa powder
  • 1 cup unsalted butter (softened)
  • ¾ cup granulated sugar
  • 1 large egg
  • 1 tbsp red food coloring
  • 1 tsp vanilla extract
  • ½ tsp salt
  • Cream cheese or white chocolate filling

These pantry-friendly ingredients come together to create a bakery-quality cookie at home.


Ingredient Notes for Perfect Cookies

The success of Red Velvet Thumbprint Cookies Festive & Elegant depends on a few key ingredients. Use high-quality cocoa powder for a deeper chocolate flavor. Room-temperature butter ensures a smooth and fluffy dough.

For the filling, cream cheese adds a tangy contrast, while white chocolate creates a sweeter, more indulgent center. Both options work beautifully depending on your preference.


Step-by-Step Instructions for Red Velvet Thumbprint Cookies

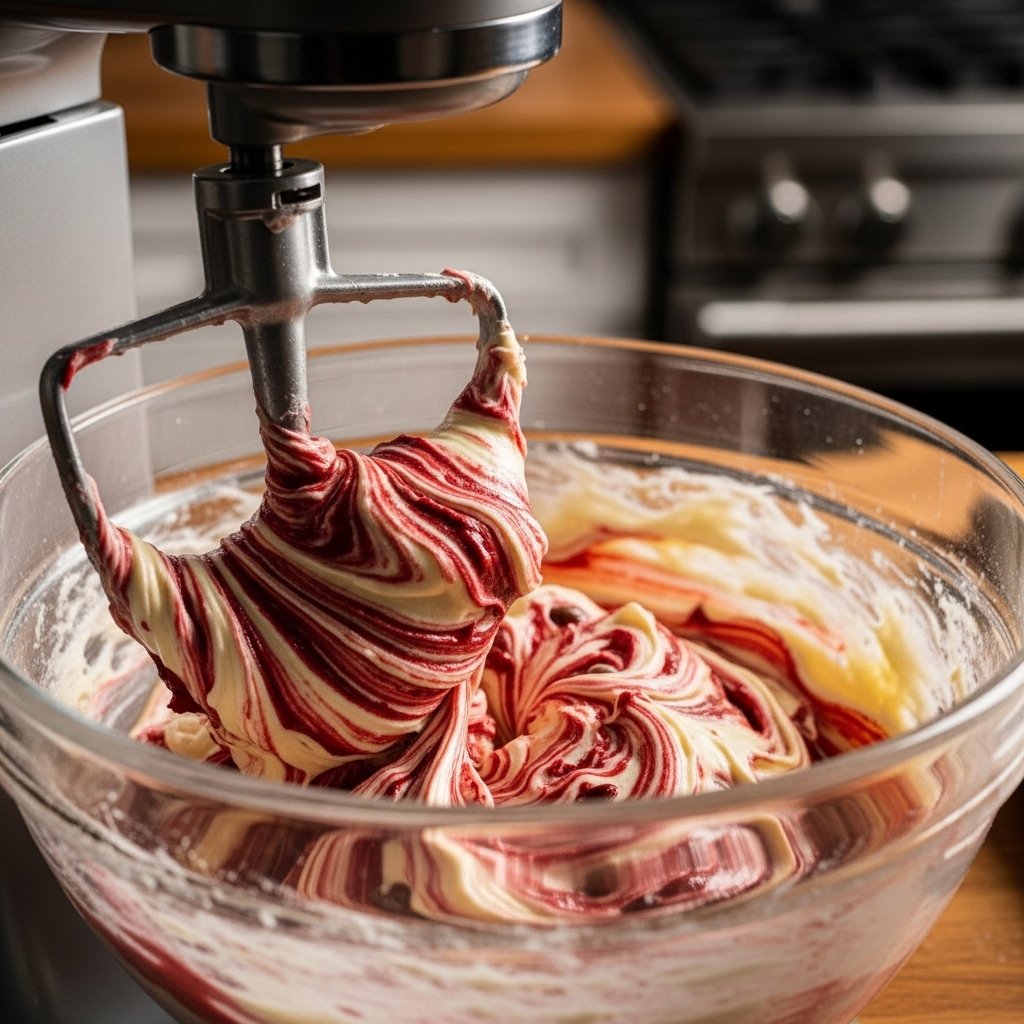
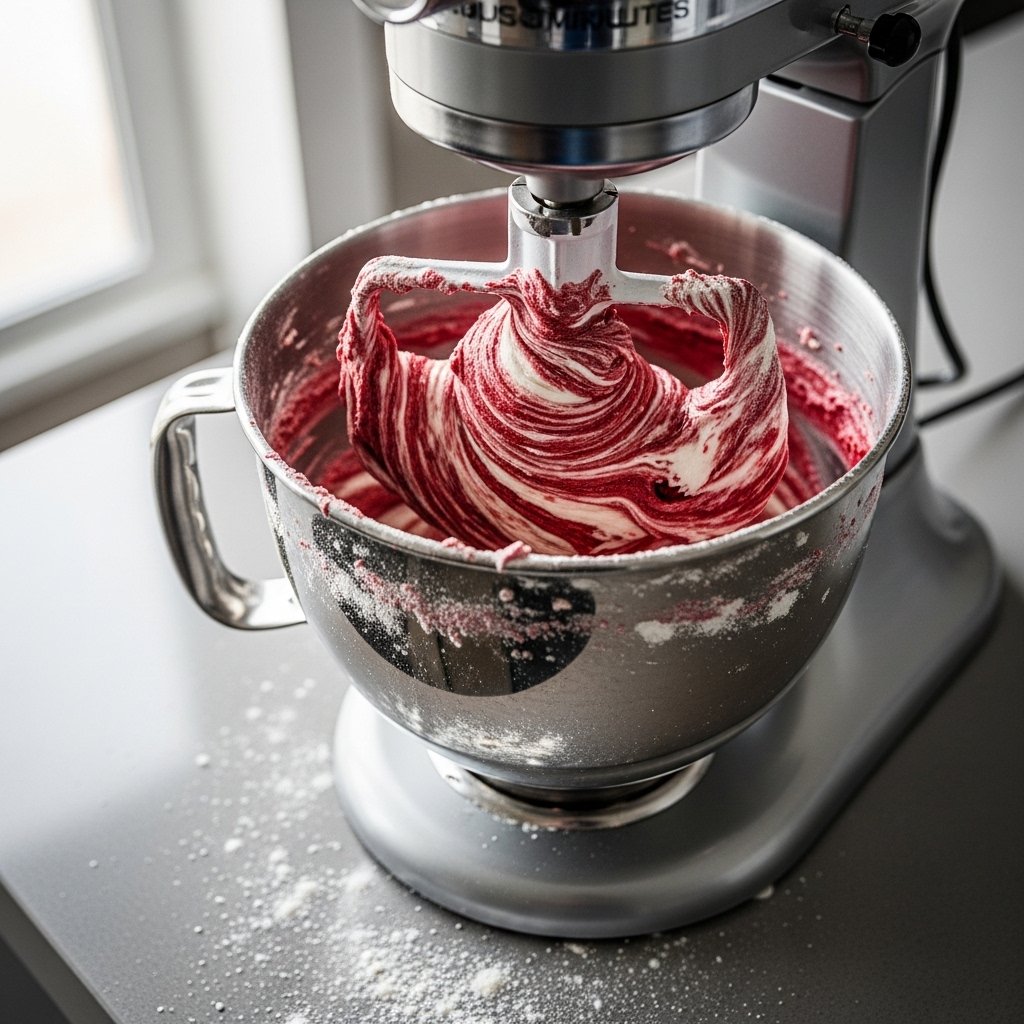
Step 1: Prepare the Dough

Cream together butter and sugar until light and fluffy. Add egg, vanilla, and red food coloring, mixing until fully combined.


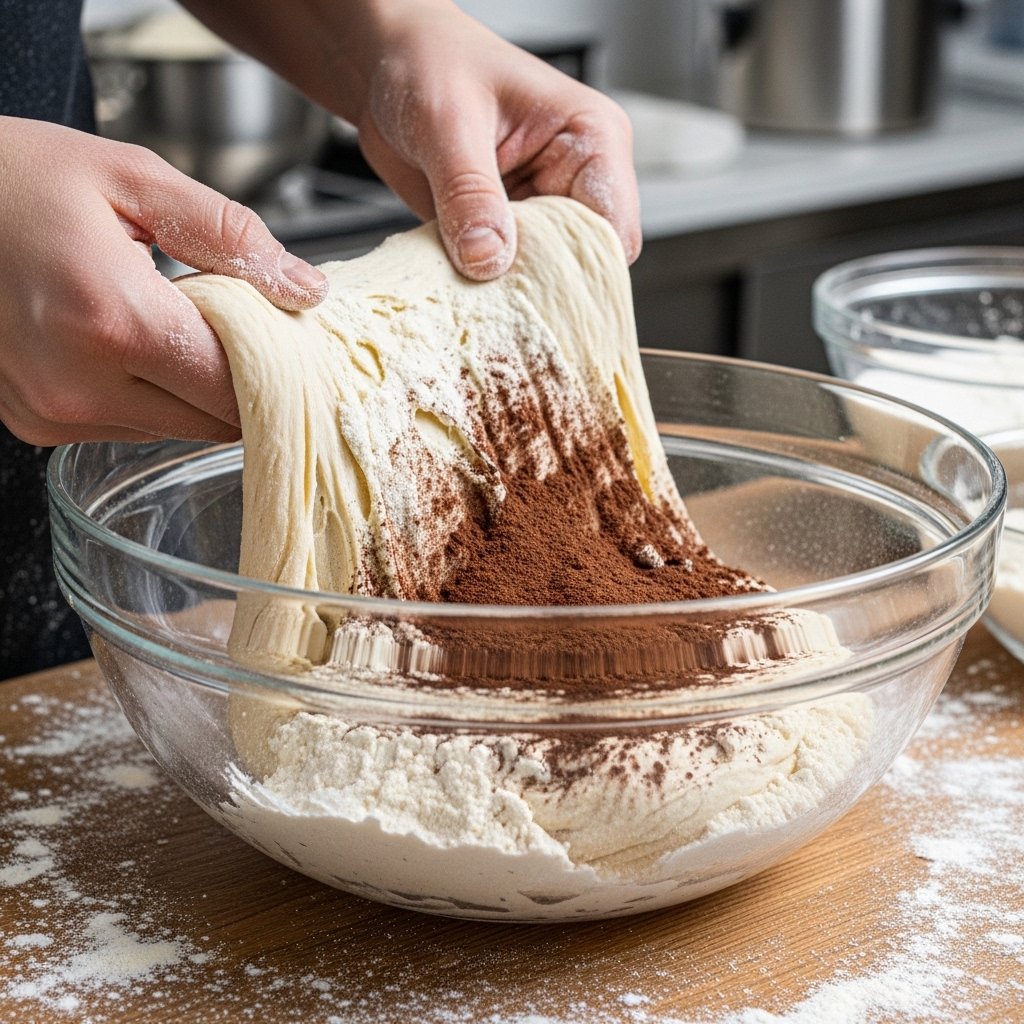
Step 2: Add Dry Ingredients

Sift in flour, cocoa powder, and salt. Mix until a soft dough forms. Chill for 30 minutes for better shaping.


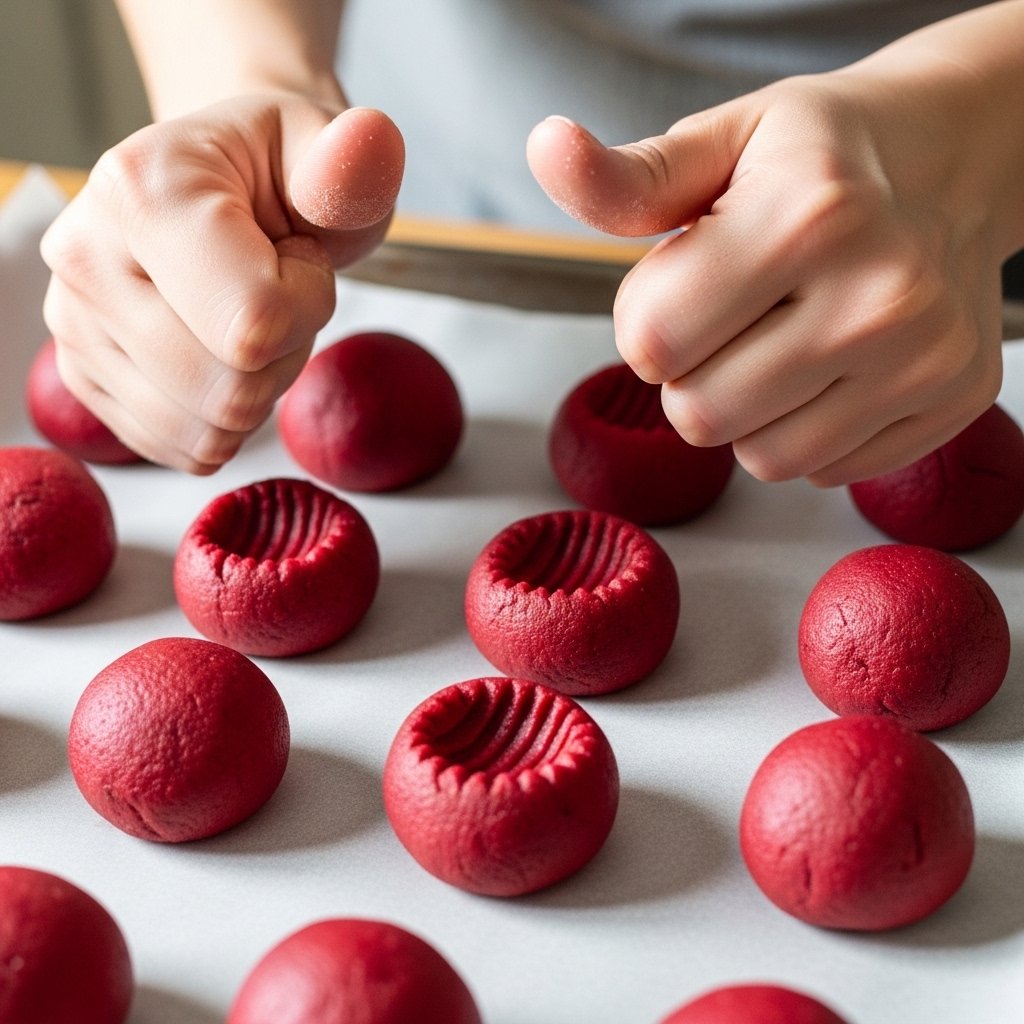
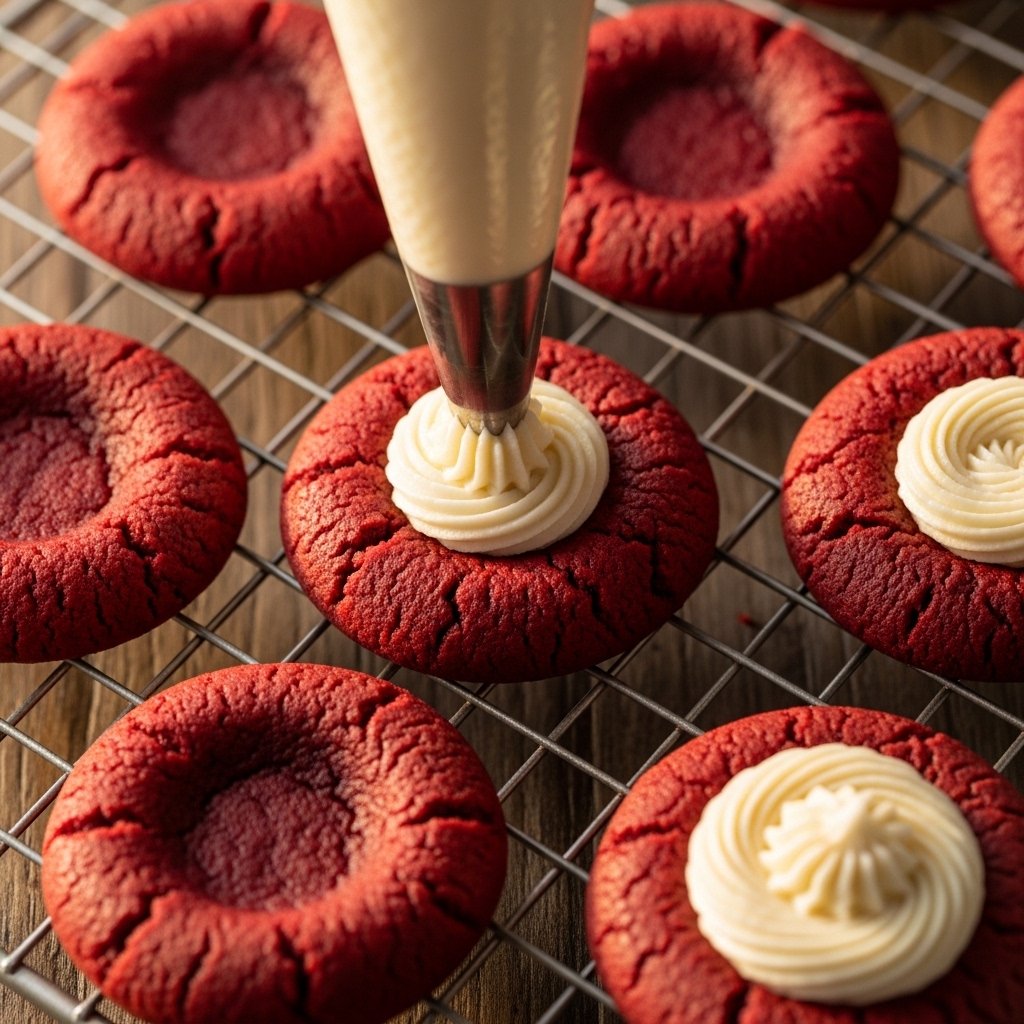
Step 3: Shape and Press

Roll dough into small balls and place on a baking sheet. Use your thumb or spoon to gently press an indent into each cookie.


Step 4: Bake and Fill

Bake at 350°F (175°C) for 10–12 minutes. Once cooled, fill centers with cream cheese or melted white chocolate.


Tips for Perfect Red Velvet Thumbprint Cookies

To make your red velvet thumbprint cookies bakery-perfect every time:

  • Chill dough before baking to prevent spreading
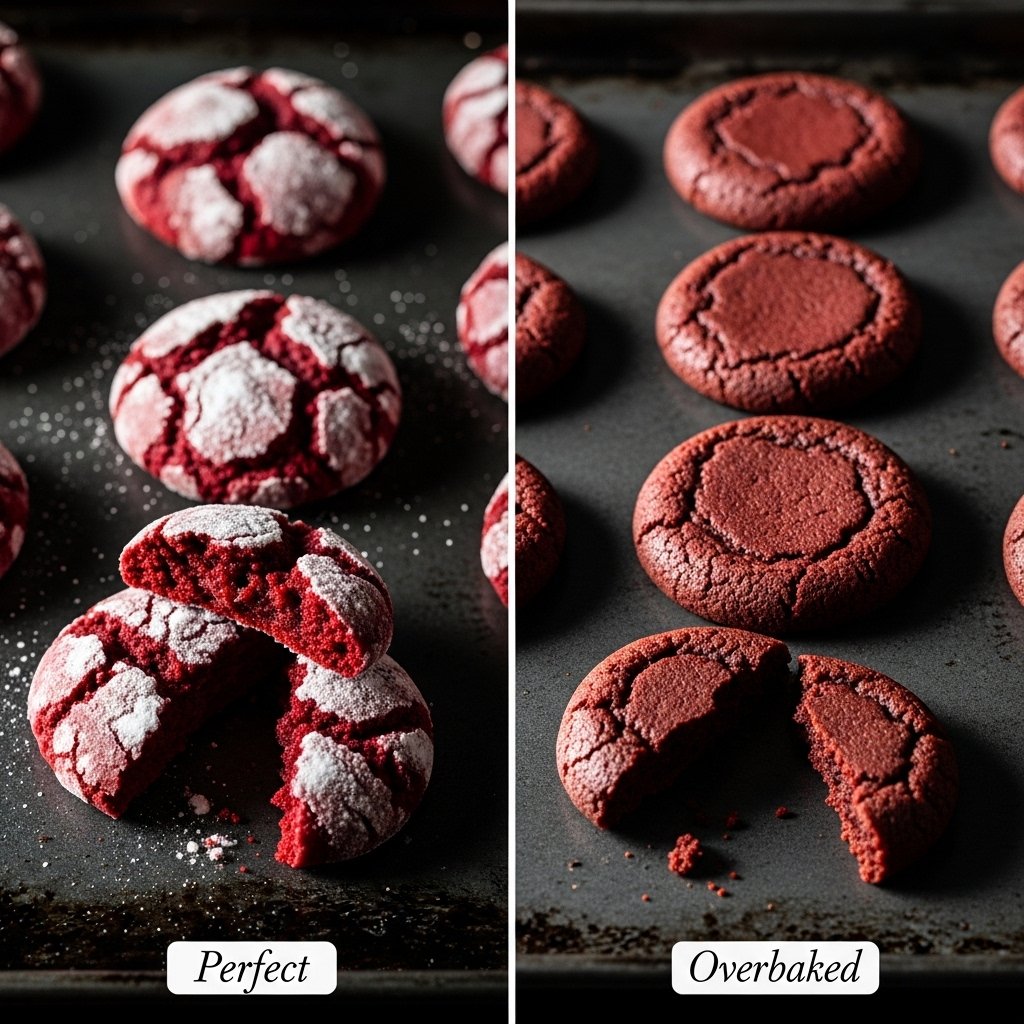
  • Don’t overbake—cookies should stay soft
  • Repress thumbprints gently after baking if they puff up
  • Use gel food coloring for vibrant red color
  • Let cookies cool completely before filling


Variations of Red Velvet Thumbprint Cookies

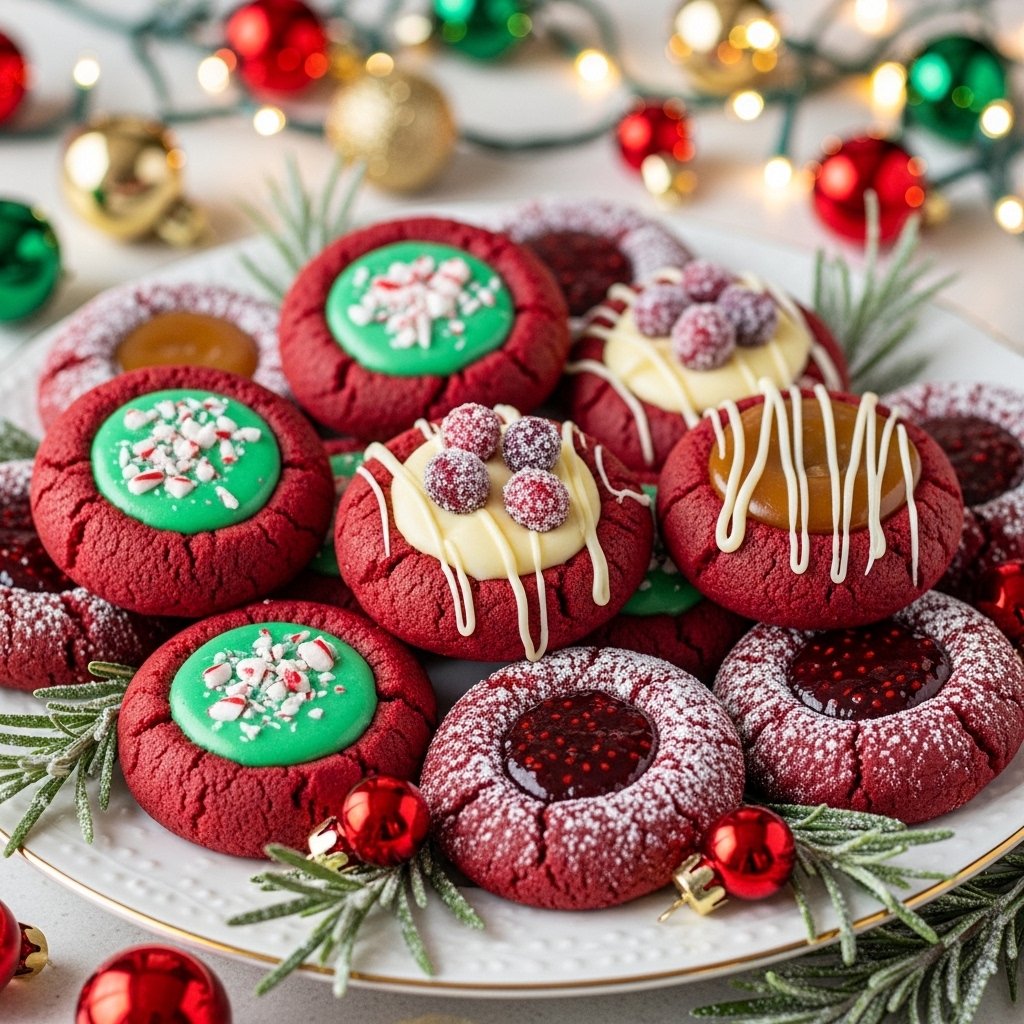
These Red Velvet Thumbprint Cookies Festive & Elegant can be customized in many delicious ways:

  • White Chocolate Center: Sweet and creamy
  • Cream Cheese Frosting: Classic tangy filling
  • Nutella Filling: Rich chocolate hazelnut twist
  • Peppermint Version: Add crushed candy canes for holidays


What to Serve With Red Velvet Thumbprint Cookies

These cookies pair beautifully with:

  • Hot coffee or espresso
  • Warm milk or hot chocolate
  • Vanilla ice cream
  • Holiday dessert platters

They’re perfect for cookie exchanges, parties, or cozy nights at home.


Storage Tips for Red Velvet Thumbprint Cookies

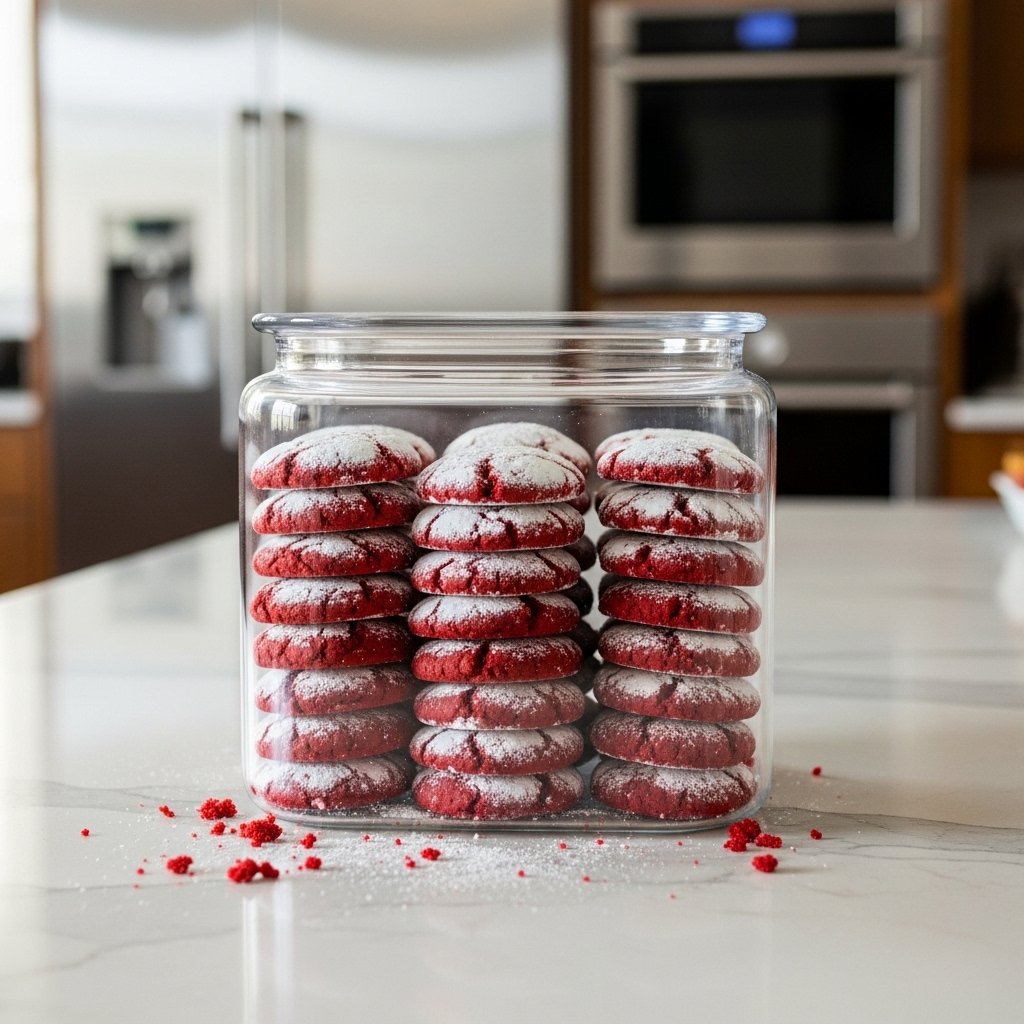
To keep your red velvet thumbprint cookies fresh:

  • Store in an airtight container at room temperature for up to 3 days
  • Refrigerate if using cream cheese filling (up to 5 days)
  • Freeze unfilled cookies for up to 2 months
  • Fill just before serving for best texture


Common Mistakes to Avoid

Avoid these issues when making Red Velvet Thumbprint Cookies Festive & Elegant:

  • Overmixing dough (makes cookies tough)
  • Skipping chilling step
  • Overbaking cookies
  • Adding filling while cookies are warm

Fixing these ensures soft, bakery-style cookies every time.


Frequently Asked Questions (FAQs)

1. Can I make red velvet thumbprint cookies ahead of time?

Yes! You can bake the cookies in advance and fill them before serving.

2. Why did my cookies spread too much?

This usually happens when the dough isn’t chilled properly.

3. Can I freeze red velvet thumbprint cookies?

Yes, freeze unfilled cookies for best results.

4. What filling works best?

Cream cheese and white chocolate are the most popular options.


Final Thoughts

These Red Velvet Thumbprint Cookies Festive & Elegant are the perfect combination of beauty and flavor. Soft, buttery, and filled with creamy goodness, they’re guaranteed to impress at any gathering.

Whether you’re baking for holidays, gifting, or simply treating yourself, this recipe is a must-try addition to your dessert collection. Once you make them, they’ll quickly become a favorite in your kitchen.

H1: Salad Recipes – Fresh, Healthy & Easy Homemade Salad Ideas for Every Meal

If you’re looking for salad recipes that are fresh, easy, and packed with flavor, you’re in the right place. Salads don’t have to be boring bowls of lettuce—they can be colorful, satisfying, and even the star of your meal. From crunchy veggie salads to protein-packed chicken bowls, the possibilities are endless when it comes to homemade salad recipes.

The beauty of salad recipes is how flexible they are. You can mix and match ingredients based on what’s in your fridge, your dietary goals, or even your mood. Whether you want something light and refreshing or hearty and filling, salads can do it all.

In this guide, you’ll learn how to build perfect salads, explore ingredient ideas, discover flavor combinations, and get expert tips to make your salads restaurant-quality at home.


Why You’ll Love These Salad Recipes

These salad recipes are designed to be simple, customizable, and incredibly delicious. You don’t need fancy cooking skills or expensive ingredients—just fresh produce and a few basic pantry staples.

They’re perfect for busy weekdays, meal prep, or even elegant dinner parties. Plus, salads are naturally rich in vitamins, fiber, and healthy fats, making them a smart choice for a balanced lifestyle.


Ingredients for Basic Salad Recipes

Most salad recipes start with a simple structure:

  • Fresh greens (romaine, spinach, arugula, kale)
  • Protein (chicken, tuna, eggs, chickpeas, tofu)
  • Crunch (nuts, seeds, croutons)
  • Fresh vegetables (tomatoes, cucumbers, peppers, carrots)
  • Dressing (vinaigrette, ranch, lemon olive oil)

You can build endless combinations using these basic components.


Ingredient Notes for Better Salad Recipes

To make your salad recipes taste restaurant-quality, ingredient quality matters. Always use fresh, crisp greens and seasonal vegetables for the best flavor. Organic produce often has a richer taste and better texture.

For dressings, homemade is always better. A simple mix of olive oil, lemon juice, salt, and pepper can elevate even the simplest salad.


Step-by-Step Instructions for Salad Recipes

Step 1: Prepare Your Base

Start by washing and drying your greens thoroughly. This ensures your salad stays crisp and not watery.


Step 2: Add Vegetables and Protein

Chop your vegetables and add your preferred protein such as grilled chicken or chickpeas for a more filling meal.


Step 3: Add Crunch and Flavor

Sprinkle nuts, seeds, or croutons for texture and flavor contrast in your salad recipes.


Step 4: Dress and Toss

Drizzle your dressing evenly and toss gently to combine all ingredients without crushing them.


Tips for Perfect Salad Recipes

To make your salad recipes stand out every time, follow these expert tips:

  • Always dry greens completely before mixing
  • Add dressing just before serving
  • Balance textures (soft, crunchy, creamy)
  • Use fresh herbs for extra flavor
  • Don’t overdo the dressing


Variations of Salad Recipes

One of the best things about salad recipes is how easily they can be customized. Try these popular variations:

  • Greek Salad: Feta cheese, olives, cucumber, tomatoes
  • Chicken Caesar Salad: Grilled chicken, parmesan, croutons
  • Avocado Salad: Creamy avocado, lime, cherry tomatoes
  • Quinoa Salad: High-protein grain base with veggies


What to Serve With Salad Recipes

These salad recipes pair perfectly with many dishes. You can serve them alongside grilled meats, soups, sandwiches, or pasta dishes. They also work great as a light main course when topped with protein.

For drinks, try fresh lemonade, iced tea, or infused water to complete your healthy meal.


Storage Tips for Salad Recipes

If you’re meal prepping salad recipes, store ingredients separately to keep them fresh. Keep greens dry in airtight containers with a paper towel to absorb moisture.

Dressings should always be stored separately and added just before eating to avoid soggy salads.


Common Mistakes in Salad Recipes

Avoid these mistakes when preparing salad recipes:

  • Overdressing the salad
  • Using wilted greens
  • Skipping seasoning
  • Not balancing textures
  • Cutting ingredients too large or unevenly

Fixing these issues instantly improves your salad quality.


Frequently Asked Questions (FAQs)

1. What are the best greens for salad recipes?

Romaine, spinach, arugula, and kale are among the best choices because they stay fresh and hold dressings well.

2. Can salad recipes be used for meal prep?

Yes! Just store ingredients separately and assemble before eating for the best texture.

3. How do I make salad recipes more filling?

Add protein like chicken, eggs, beans, or quinoa to turn your salad into a full meal.

4. What is the healthiest salad dressing?

Olive oil with lemon juice or vinegar is one of the healthiest and simplest options.


Conclusion

These salad recipes prove that healthy eating doesn’t have to be boring. With fresh ingredients, simple techniques, and endless customization options, you can create salads that are delicious, satisfying, and beautiful.

Whether you’re making a quick lunch, a dinner side, or a full meal, these salad ideas will help you enjoy eating healthy every day. Try different combinations, experiment with flavors, and make these recipes your own.

Grilled Ranch Chicken & Bacon Sandwich Melt: The Ultimate Cheesy Comfort Sandwich

If you’re craving something bold, cheesy, and incredibly satisfying, this Grilled Ranch Chicken & Bacon Sandwich Melt is about to become your new favorite comfort meal. It combines juicy grilled chicken, crispy bacon, creamy ranch, and melted cheese all pressed between golden, buttery bread. Every bite is packed with smoky, savory, and creamy flavors that hit just right.

This sandwich is perfect for busy weeknights, weekend lunches, or even game-day cravings. It’s quick to prepare, uses simple ingredients, and delivers restaurant-quality taste right from your own kitchen. Once you try this grilled ranch chicken & bacon sandwich melt, you’ll understand why it’s such a crowd-pleaser.


Why You’ll Love This Grilled Ranch Chicken & Bacon Sandwich Melt

This grilled ranch chicken & bacon sandwich melt is the definition of comfort food done right. It’s rich, flavorful, and incredibly easy to make.

Here’s why it stands out:

  • Packed with juicy chicken and crispy bacon
  • Creamy ranch adds bold flavor
  • Melted cheese creates the perfect gooey texture
  • Ready in under 20 minutes
  • Perfect for lunch, dinner, or snacks

It’s the kind of sandwich you’ll crave again and again.


Ingredients for Ranch Chicken & Bacon Sandwich Melt

To make this irresistible grilled ranch chicken & bacon sandwich melt, you’ll need simple pantry and fridge staples:

  • 2 chicken breasts (grilled or cooked and sliced)
  • 4 slices cooked bacon
  • 4 slices cheddar or mozzarella cheese
  • 2–4 tbsp ranch dressing
  • 4 slices sandwich bread or brioche
  • 2 tbsp butter (for grilling)


Ingredient Notes

The key to a perfect ranch chicken bacon sandwich melt is balance. The smoky bacon pairs beautifully with creamy ranch and tender chicken, while cheese brings everything together.

Brioche or sourdough bread works best because it holds up well when grilled and adds extra flavor. Freshly cooked bacon is essential for that crispy texture contrast.


Step-by-Step Instructions

1. Prepare the Chicken

Grill or pan-cook the chicken breasts until fully cooked, then slice them thinly.

2. Cook the Bacon

Fry bacon until crispy and set aside on paper towels to remove excess grease.

3. Assemble the Sandwich

Spread ranch dressing on each slice of bread. Add chicken, bacon, and cheese.

4. Grill the Sandwich

Butter the outside of the bread and grill in a skillet over medium heat until golden and crispy.

5. Melt and Serve

Cook until cheese is melted and the sandwich is perfectly toasted. Slice and serve warm.


Tips for Perfect Results

To make the best grilled ranch chicken & bacon sandwich melt, follow these tips:

  • Use medium heat to avoid burning the bread
  • Don’t overload the sandwich with fillings
  • Let cheese melt fully before removing from pan
  • Use room temperature butter for even browning
  • Press lightly with a spatula for a crispy crust

Variations

This ranch chicken bacon sandwich melt is easy to customize depending on your taste.

Try These Variations:

  • Spicy version: Add jalapeños or hot sauce
  • BBQ twist: Replace ranch with BBQ sauce
  • Deluxe melt: Add avocado slices
  • Cheesy overload: Mix cheddar and provolone


What to Serve With It

This grilled ranch chicken & bacon sandwich melt pairs perfectly with simple, classic sides:

  • Crispy French fries or sweet potato fries
  • Coleslaw or fresh salad
  • Pickles or pickled vegetables
  • Tomato soup for dipping

These sides make the meal even more satisfying.


Storage & Reheating

If you have leftovers, here’s how to keep your sandwich fresh:

  • Store in an airtight container in the fridge for up to 2 days
  • Reheat in a skillet or air fryer for best texture
  • Avoid microwaving to maintain crispiness

Freshly grilled is always best, but leftovers still taste great when reheated properly.


Common Mistakes to Avoid

Avoid these mistakes when making your grilled ranch chicken & bacon sandwich melt:

  • Using too much ranch, making the bread soggy
  • Cooking on high heat and burning the outside
  • Skipping the butter step for grilling
  • Not letting cheese melt fully

FAQs

Can I use rotisserie chicken?

Yes, it works great and saves time.

What’s the best cheese for this sandwich?

Cheddar, mozzarella, or provolone melt beautifully.

Can I make it ahead of time?

You can prep ingredients ahead, but grill fresh for best texture.

Is this sandwich freezer-friendly?

Not recommended, as texture changes after freezing.


Final Thoughts

This grilled ranch chicken & bacon sandwich melt is the ultimate comfort food—crispy, cheesy, smoky, and packed with flavor in every bite. It’s quick enough for busy days but satisfying enough to feel like a treat.

Once you try it, you’ll see why it’s such a popular homemade sandwich. Simple ingredients, easy steps, and maximum flavor make this recipe a guaranteed favorite for any meal of the day.

Global Flavour Cuisine: A World of Taste on Your Plate

Food has the incredible power to connect cultures, tell stories, and bring people together. With global flavour cuisine: a world of taste on your plate, you don’t need to travel the world to experience its richness—you can bring it straight into your kitchen. From spicy Asian stir-fries to comforting Mediterranean bowls and bold Latin-inspired dishes, global cooking is all about exploring diversity through flavor.

This guide is designed to help you create simple yet authentic-inspired meals that celebrate international cuisine. Whether you’re a beginner or an experienced home cook, these ideas will help you turn everyday ingredients into globally inspired dishes full of character and taste.


Why You’ll Love Global Flavour Cuisine

This global flavour cuisine: a world of taste on your plate approach is more than just cooking—it’s a culinary adventure. It allows you to explore different cultures without leaving your home.

Here’s why you’ll love it:

  • Expands your cooking creativity
  • Introduces bold and diverse flavors
  • Uses simple, accessible ingredients
  • Perfect for family meals and gatherings
  • Encourages healthier, fresher cooking

Essential Ingredients for Global Cooking

To master global flavour cuisine, you don’t need complicated ingredients. Instead, focus on versatile staples used across different cultures.

Pantry Essentials:

  • Olive oil, sesame oil, coconut milk
  • Garlic, ginger, onions
  • Rice, noodles, couscous, tortillas
  • Soy sauce, curry paste, spices
  • Fresh herbs like cilantro, basil, parsley


Ingredient Notes

The beauty of global flavour cuisine: a world of taste on your plate lies in how ingredients transform simple dishes. For example, soy sauce and ginger instantly bring an Asian influence, while cumin and paprika add a Mediterranean or Latin touch. Fresh herbs elevate every dish, adding brightness and aroma.

Using fresh, high-quality ingredients ensures your dishes taste authentic and vibrant, even when simplified for home cooking.


Step-by-Step Global Cooking Method

1. Choose Your Cuisine Style

Decide whether you want Asian, Mediterranean, Latin, or fusion flavors.

2. Build a Base

Start with rice, noodles, grains, or flatbreads.

3. Add Protein

Include chicken, beef, seafood, tofu, or legumes.

4. Layer Flavor

Use spices, sauces, and herbs to define the cuisine style.

5. Finish Fresh

Add fresh toppings like lime, cilantro, or yogurt.


Tips for Perfect Global Flavour Cuisine

To truly master global flavour cuisine, keep these expert tips in mind:

  • Learn 2–3 signature spices from each cuisine
  • Don’t overload dishes—balance is key
  • Taste as you cook and adjust seasoning
  • Use fresh herbs at the end for brightness
  • Keep cooking methods simple but flavorful

Variations to Explore

One of the best parts of global flavour cuisine: a world of taste on your plate is endless creativity.

Try These Ideas:

  • Asian: Chicken stir-fry with soy, garlic, and ginger
  • Mediterranean: Greek bowls with feta, olives, and lemon
  • Mexican: Tacos with spiced beef and fresh salsa
  • Indian-inspired: Curry bowls with coconut milk and spices


What to Serve With Global Cuisine Dishes

Global meals are often complete on their own, but pairing them with the right sides enhances the experience.

Great pairings include:

  • Fresh salads with citrus dressing
  • Flatbreads or naan
  • Steamed rice or quinoa
  • Yogurt-based sauces or dips

Storage & Meal Prep Tips

Many global flavour cuisine dishes are perfect for meal prep.

  • Store cooked meals in airtight containers
  • Refrigerate for up to 3–4 days
  • Keep sauces separate when possible
  • Reheat gently to preserve texture and flavor

Meal prepping global dishes helps you enjoy variety throughout the week.


Common Mistakes to Avoid

Even simple global cooking can go wrong if you’re not careful. Avoid these mistakes:

  • Using too many conflicting spices
  • Overcooking proteins
  • Skipping acidity (like lemon or lime)
  • Not balancing flavors properly

FAQs

What is global flavour cuisine?

It refers to cooking dishes inspired by different international cuisines and flavor profiles.

Can I cook global cuisine at home easily?

Yes, most recipes use simple ingredients and easy cooking techniques.

Do I need special ingredients?

Not necessarily—many global dishes use pantry staples with a few key spices.

Is global cuisine healthy?

Yes, especially when using fresh ingredients, lean proteins, and balanced portions.


Final Thoughts

Exploring global flavour cuisine: a world of taste on your plate is one of the most exciting ways to elevate your home cooking. It opens the door to new cultures, bold flavors, and creative meal ideas—all from your own kitchen.

You don’t need to be an expert chef to enjoy international cooking. Start simple, experiment often, and let your taste buds travel the world one dish at a time. With every meal, you’ll discover new favorites and build confidence in global-inspired cooking.

Easy Crispy High-Protein Chicken Ranch Quesadilla in Just 10 Minutes!

If you’re craving something quick, crispy, cheesy, and packed with protein, this Easy Crispy High-Protein Chicken Ranch Quesadilla in Just 10 Minutes is about to become your new favorite go-to meal. It’s the perfect balance of convenience and flavor—ideal for busy weeknights, post-workout meals, or even a satisfying lunch when you don’t want to spend time cooking.

This quesadilla combines juicy chicken, creamy ranch, and melted cheese all wrapped in a golden, crispy tortilla. The best part? You can make it in just 10 minutes using simple ingredients you probably already have in your kitchen. Fast food has nothing on this homemade version.


Why You’ll Love This High-Protein Chicken Ranch Quesadilla

This easy crispy high-protein chicken ranch quesadilla is more than just a quick meal—it’s a flavor-packed experience that fits perfectly into a busy lifestyle.

Here’s why it stands out:

  • Ready in just 10 minutes
  • High in protein and very filling
  • Crispy on the outside, gooey on the inside
  • Perfect for meal prep or quick snacks
  • Kid-friendly and crowd-pleasing

Once you try it, you’ll see why it’s a repeat recipe in so many kitchens.


Ingredients for Chicken Ranch Quesadilla

To make this high-protein chicken ranch quesadilla, you only need a few simple ingredients:

  • 2 large flour tortillas
  • 1 cup cooked shredded chicken
  • 1/2 cup shredded cheddar cheese
  • 1/2 cup shredded mozzarella cheese
  • 2–3 tbsp ranch dressing
  • 1 tbsp butter or olive oil
  • Optional: chopped green onions or jalapeños


Ingredient Notes

The secret to a great crispy chicken ranch quesadilla is balance. The chicken provides the protein, while the ranch adds creamy tanginess and the cheese delivers that irresistible melt.

Using a mix of cheddar and mozzarella gives both flavor and stretch. If you want a healthier option, you can use whole wheat tortillas or light ranch dressing without sacrificing taste.


Step-by-Step Instructions

1. Prepare the Filling

In a bowl, mix shredded chicken with ranch dressing until well coated.

2. Heat the Pan

Place a skillet over medium heat and lightly coat with butter or oil.

3. Assemble the Quesadilla

Lay one tortilla in the pan. Add cheese, chicken mixture, and more cheese on top. Place the second tortilla over it.

4. Cook Until Crispy

Cook for 2–3 minutes per side until golden brown and crispy.

5. Slice and Serve

Remove from heat, let it cool slightly, then slice into wedges.


Tips for Perfect Results

To make the best easy crispy high-protein chicken ranch quesadilla, follow these expert tips:

  • Use medium heat to avoid burning the tortilla
  • Don’t overfill or it may fall apart
  • Press lightly with a spatula for extra crispiness
  • Let it rest for 1 minute before slicing for cleaner cuts
  • Use freshly shredded cheese for better melting

Variations

One of the best parts of this chicken ranch quesadilla is how easy it is to customize.

Try These Variations:

  • Spicy version: Add jalapeños or hot sauce
  • BBQ twist: Replace ranch with BBQ sauce
  • Veggie boost: Add spinach, peppers, or mushrooms
  • Low-carb: Use low-carb tortillas


What to Serve With It

This high-protein chicken ranch quesadilla pairs perfectly with simple, fresh sides:

  • Salsa or guacamole
  • Sour cream or extra ranch
  • Fresh salad or coleslaw
  • Mexican-style rice or corn

These sides help turn it into a complete, satisfying meal.


Storage & Reheating

If you have leftovers, this quesadilla stores surprisingly well.

  • Store in an airtight container for up to 2 days
  • Reheat in a skillet or air fryer for best crispiness
  • Avoid microwaving to keep the texture crispy

Meal prepping extra quesadillas is a great idea for busy days.


Common Mistakes to Avoid

Even simple recipes like this can go wrong if you’re not careful. Avoid these mistakes:

  • Using too much ranch, making it soggy
  • Cooking on high heat and burning the tortilla
  • Overstuffing the quesadilla
  • Not using enough cheese to bind everything

FAQs

Can I use rotisserie chicken?

Yes, rotisserie chicken works perfectly and saves time.

Is this quesadilla healthy?

Yes, especially since it’s high in protein and can be adjusted with lighter ingredients.

Can I make it ahead of time?

You can prep the filling ahead, but cook it fresh for best texture.

What cheese melts best?

Cheddar and mozzarella are the best combination for flavor and melt.


Final Thoughts

This easy crispy high-protein chicken ranch quesadilla in just 10 minutes proves that fast food doesn’t need to come from a drive-thru. With simple ingredients and quick cooking, you can enjoy a crispy, cheesy, protein-packed meal anytime.

It’s versatile, satisfying, and perfect for busy schedules. Once you try it, it will easily become one of your favorite quick meals for lunch, dinner, or even a late-night snack.

Easy Summer Chicken Recipes for Busy Days: Quick, Fresh & Flavorful Meals

When the weather heats up and life gets busier, having a collection of easy summer chicken recipes for busy days can be a total lifesaver. Chicken is one of the most versatile proteins out there—it cooks quickly, pairs well with fresh seasonal ingredients, and can be turned into endless delicious meals without much effort.

In this guide, you’ll discover simple, flavorful, and family-friendly chicken recipes that are perfect for summer. Whether you’re grilling outdoors, meal prepping for the week, or throwing together a fast dinner after a long day, these ideas will help you stay stress-free in the kitchen while still eating well.


Why You’ll Love These Easy Summer Chicken Recipes for Busy Days

These easy summer chicken recipes for busy days are designed for real life. They’re quick, light, and packed with flavor without requiring complicated steps or long cooking times.

Here’s why you’ll love them:

  • Quick to prepare in under 30 minutes
  • Perfect for hot summer weather
  • Healthy, fresh, and satisfying
  • Great for meal prep and leftovers
  • Easy to customize with seasonal ingredients

Essential Ingredients for Summer Chicken Recipes

To make the best easy summer chicken recipes for busy days, you only need a handful of fresh, simple ingredients. The key is keeping things light and seasonal.

Must-Have Ingredients:

  • Boneless, skinless chicken breasts or thighs
  • Fresh herbs (basil, parsley, cilantro)
  • Citrus (lemon, lime, orange)
  • Summer vegetables (zucchini, corn, tomatoes, bell peppers)
  • Olive oil and garlic
  • Light marinades or dressings


Ingredient Notes

For the most flavorful easy summer chicken recipes for busy days, always start with good-quality chicken. Boneless cuts cook faster and are perfect for weeknight meals. Fresh citrus and herbs add brightness, while olive oil helps keep everything juicy and tender.

Avoid heavy sauces in the summer—light marinades and fresh seasonings work best for warm-weather cooking.


Step-by-Step Cooking Method

1. Prepare the Chicken

Pat the chicken dry and season it lightly with salt, pepper, and your favorite spices.

2. Add Flavor

Marinate with olive oil, garlic, and citrus juice for at least 15 minutes if time allows.

3. Cook the Chicken

Grill, pan-sear, or bake until golden brown and fully cooked through.

4. Add Fresh Elements

Top with fresh herbs, vegetables, or a light sauce before serving.


Tips for Perfect Results

To make your easy summer chicken recipes for busy days even better, keep these simple tips in mind:

  • Don’t overcook the chicken—keep it juicy and tender
  • Use a meat thermometer for accuracy (165°F is perfect)
  • Let chicken rest before slicing to retain juices
  • Use fresh herbs right before serving for maximum flavor
  • Cook extra for easy leftovers

Delicious Variations

One of the best things about easy summer chicken recipes for busy days is how flexible they are. You can change flavors depending on your mood or what you have at home.

Try These Variations:

  • Lemon herb grilled chicken with zucchini
  • BBQ chicken with corn and coleslaw
  • Mediterranean chicken bowls with cucumber and feta
  • Chicken avocado salad wraps


What to Serve With Summer Chicken Recipes

These easy summer chicken recipes for busy days pair perfectly with light, refreshing sides that complete the meal without feeling heavy.

Great options include:

  • Fresh garden salad
  • Grilled vegetables
  • Rice or quinoa bowls
  • Fruit salad or watermelon slices

Storage & Meal Prep Tips

These recipes are excellent for meal prep, making your week much easier.

  • Store cooked chicken in airtight containers
  • Refrigerate for up to 3–4 days
  • Slice or shred chicken for quick use in salads or wraps
  • Reheat gently to avoid drying out

Meal prepping saves time and helps you stick to healthy eating habits.


Common Mistakes to Avoid

Even simple easy summer chicken recipes for busy days can go wrong if you’re not careful. Avoid these mistakes:

  • Overcooking chicken, making it dry
  • Using too much marinade or sauce
  • Skipping seasoning
  • Not letting the chicken rest before slicing

FAQs

What is the easiest summer chicken recipe?

Grilled lemon herb chicken is one of the simplest and fastest summer meals.

Can I meal prep summer chicken recipes?

Yes, they store well and are perfect for weekly meal prep.

How do I keep chicken juicy in summer recipes?

Use marinades, avoid overcooking, and let it rest before serving.

What sides go best with summer chicken?

Fresh salads, grilled veggies, and light grains like quinoa work perfectly.


Final Thoughts

These easy summer chicken recipes for busy days are all about keeping things simple, fresh, and stress-free. With minimal ingredients and quick cooking methods, you can enjoy delicious meals without spending hours in the kitchen.

Whether you’re cooking for family, meal prepping for the week, or just trying to eat lighter in the summer heat, these chicken recipes are reliable, flavorful, and endlessly versatile. Once you try them, they’ll quickly become staples in your summer meal rotation.

Low Calorie Dinner Ideas | Healthy Weight Loss Meals That Actually Taste Amazing

Finding satisfying low calorie dinner ideas | healthy weight loss meals that don’t feel like “diet food” can be a real struggle. Most people want meals that are filling, flavorful, and easy to prepare after a long day—but still support weight loss goals. The good news? You absolutely don’t need to sacrifice taste to eat light in the evening.

In this guide, I’m sharing practical, delicious, and realistic low calorie dinner ideas you can actually enjoy every day. These meals are balanced, nutrient-dense, and designed to keep you full without going overboard on calories. Whether you’re meal prepping or cooking fresh, these ideas will help you stay on track without feeling restricted.


Why You’ll Love These Low Calorie Dinner Ideas

These healthy weight loss meals are not about restriction—they’re about balance. You’ll enjoy real food with real flavor while still making smart choices for your health.

Here’s why these dinners work so well:

  • Naturally low in calories but high in nutrients
  • Easy to prepare in under 30 minutes
  • Perfect for weight loss and clean eating
  • Flexible for different dietary needs
  • Satisfying enough to prevent late-night snacking

Key Ingredients for Healthy Weight Loss Meals

The foundation of great low calorie dinner ideas | healthy weight loss meals starts with choosing the right ingredients. Focus on foods that are high in fiber, protein, and volume.

Essential Ingredients:

  • Lean proteins: chicken breast, turkey, fish, tofu
  • Vegetables: broccoli, zucchini, spinach, peppers
  • Healthy carbs: quinoa, brown rice, sweet potatoes
  • Healthy fats: olive oil, avocado, nuts (in moderation)
  • Flavor boosters: garlic, lemon, herbs, spices


Ingredient Notes

When building low calorie dinner ideas, the key is volume and balance. Vegetables like zucchini, spinach, and cauliflower help you feel full without adding many calories. Lean proteins keep you satisfied longer, while herbs and spices add flavor without extra fat or sugar.

Avoid heavy sauces and instead use lighter options like lemon juice, yogurt-based dressings, or simple seasoning blends.


Easy Step-by-Step Healthy Dinner Formula

Creating healthy weight loss meals doesn’t have to be complicated. Use this simple formula every time:

1. Choose a Lean Protein

Grilled chicken, baked fish, or plant-based options like tofu.

2. Add Vegetables

Fill half your plate with colorful, nutrient-rich vegetables.

3. Include a Smart Carb

Use small portions of quinoa, rice, or sweet potatoes.

4. Finish with Flavor

Add herbs, spices, or light sauces to enhance taste.


Tips for Perfect Low Calorie Dinners

To make your low calorie dinner ideas | healthy weight loss meals even better, keep these tips in mind:

  • Use non-stick pans to reduce oil usage
  • Bake or grill instead of frying
  • Season generously with herbs and spices
  • Eat slowly to improve digestion and fullness
  • Prep ingredients ahead of time for busy nights

These small habits can make a big difference in your weight loss journey.


Delicious Variations to Try

One of the best parts of healthy weight loss meals is how flexible they are. You can mix and match ingredients to keep things interesting.

Try These Variations:

  • Grilled chicken salad with avocado and lemon dressing
  • Zucchini noodles with turkey meat sauce
  • Baked salmon with asparagus and quinoa
  • Vegetable stir-fry with tofu and light soy sauce


What to Serve With Low Calorie Dinners

Even light meals can feel satisfying when paired with the right sides. These additions complement your low calorie dinner ideas perfectly:

  • Fresh green salad
  • Clear vegetable soup
  • Steamed veggies
  • Greek yogurt dip or light sauces

These sides add volume without unnecessary calories.


Storage & Meal Prep Tips

Meal prepping your healthy weight loss meals is one of the best ways to stay consistent.

  • Store cooked meals in airtight containers
  • Refrigerate for up to 3–4 days
  • Keep sauces separate to avoid sogginess
  • Reheat gently to preserve texture and flavor

Meal prep helps you avoid unhealthy last-minute choices.


Common Mistakes to Avoid

Even with good intentions, mistakes can happen. Avoid these when making low calorie dinner ideas | healthy weight loss meals:

  • Skipping protein, which leads to hunger later
  • Overusing oils or high-calorie dressings
  • Eating too little, causing cravings later
  • Not seasoning properly, making food boring

Balance is key to sustainable eating habits.


FAQs

Are low calorie dinners good for weight loss?

Yes, they help create a calorie deficit while keeping meals nutritious and satisfying.

Can I eat low calorie meals every day?

Absolutely, as long as you include balanced nutrients like protein, fiber, and healthy fats.

What are the best proteins for weight loss dinners?

Chicken breast, fish, turkey, eggs, and tofu are excellent choices.

How do I stay full on low calorie meals?

Focus on fiber-rich vegetables and lean protein to increase satiety.


Final Thoughts

These low calorie dinner ideas | healthy weight loss meals prove that eating healthy doesn’t have to be boring or restrictive. With the right ingredients and simple cooking methods, you can enjoy flavorful, satisfying dinners that support your goals.

Whether you’re trying to lose weight, eat cleaner, or simply feel better, these meals are designed to fit into real life—not a strict diet plan. Start small, stay consistent, and enjoy the process of eating well every day.

Juicy Steak Protein Bites: The Ultimate High-Protein Snack You’ll Crave

If you’re looking for a flavorful, satisfying, and protein-packed dish, these juicy steak protein bites are exactly what you need. Perfectly seared on the outside and tender on the inside, these bite-sized pieces of steak are ideal for quick meals, snacks, or even appetizers for gatherings. They’re simple to make, incredibly versatile, and loaded with bold, savory flavor.

What makes these steak bites stand out is their ability to deliver restaurant-quality results in your own kitchen—without complicated techniques. Whether you’re following a high-protein diet, meal prepping for the week, or just craving something hearty, this recipe checks all the boxes.


Why You’ll Love This Recipe

These juicy steak protein bites are a must-try for so many reasons. They’re quick, easy, and incredibly satisfying.

Here’s why they’ll become a favorite:

  • High in protein and perfect for fitness goals
  • Ready in under 20 minutes
  • Packed with bold, savory flavor
  • Great for meal prep or quick dinners
  • Versatile enough for snacks or main dishes

Once you try them, you’ll find yourself making them again and again.


Ingredients

To make the best juicy steak protein bites, you’ll need a handful of simple ingredients:

  • 1 lb sirloin steak (cut into bite-sized cubes)
  • 2 tbsp olive oil
  • 3 cloves garlic (minced)
  • 1 tsp salt
  • 1/2 tsp black pepper
  • 1 tsp smoked paprika
  • 1/2 tsp onion powder
  • 1 tbsp butter
  • Fresh parsley (optional, for garnish)


Ingredient Notes

For the juiciest steak protein bites, choose a tender cut like sirloin, ribeye, or tenderloin. These cuts cook quickly and stay tender when seared properly. Avoid tougher cuts unless you plan to marinate them longer.

The combination of garlic, butter, and spices enhances the natural flavor of the steak without overpowering it. Fresh parsley adds a pop of color and freshness at the end.


Step-by-Step Instructions

1. Prep the Steak

Cut your steak into evenly sized cubes to ensure even cooking. Pat them dry with paper towels to help achieve a perfect sear.

2. Season Generously

Toss the steak pieces with salt, pepper, paprika, and onion powder until evenly coated.

3. Heat the Pan

Heat olive oil in a large skillet over medium-high heat until hot but not smoking.

4. Sear the Steak

Add steak bites in a single layer. Sear for 2–3 minutes per side until browned and cooked to your desired doneness.

5. Add Garlic and Butter

Reduce heat slightly, add butter and minced garlic, and toss the steak bites until coated and fragrant.

6. Garnish and Serve

Remove from heat, sprinkle with fresh parsley, and serve immediately.


Tips for Perfect Results

To make the best juicy steak protein bites, follow these expert tips:

  • Don’t overcrowd the pan—cook in batches if needed
  • Use high heat to achieve a golden crust
  • Let the steak rest briefly after cooking
  • Pat steak dry before seasoning for better searing
  • Avoid overcooking to keep the bites tender

These small techniques make a big difference in flavor and texture.


Variations

These steak protein bites are incredibly versatile and easy to customize.

Try These Variations:

  • Spicy: Add chili flakes or cayenne pepper
  • Garlic herb: Use rosemary and thyme for extra flavor
  • Asian-inspired: Toss in soy sauce and sesame oil
  • Low-carb: Serve with cauliflower rice or salad


What to Serve With It

These juicy steak protein bites pair well with a variety of sides depending on your meal goals.

Serve them with:

  • Roasted vegetables
  • Mashed potatoes or sweet potatoes
  • Fresh salads
  • Rice or quinoa bowls

They’re just as good on their own as they are part of a full meal.


Storage & Reheating

If you have leftovers, these steak protein bites store surprisingly well.

  • Store in an airtight container in the refrigerator for up to 3 days
  • Reheat in a skillet over medium heat for best results
  • Avoid microwaving too long to prevent toughness

They also make great leftovers for salads or wraps.


Common Mistakes to Avoid

Avoid these common mistakes when making juicy steak protein bites:

  • Overcrowding the pan, which prevents proper searing
  • Using low heat, resulting in less flavor
  • Overcooking the steak
  • Skipping the resting step

Paying attention to these details ensures perfect results every time.


FAQs

What’s the best cut of steak for protein bites?

Sirloin, ribeye, or tenderloin are the best choices for tenderness and flavor.

Can I make steak bites ahead of time?

Yes, they can be cooked ahead and reheated, though they’re best fresh.

How do I keep steak bites juicy?

Avoid overcooking and use high heat for a quick sear.

Are steak protein bites healthy?

Yes, they are high in protein and can be part of a balanced diet when paired with healthy sides.


Final Thoughts

These juicy steak protein bites are the perfect combination of simplicity, flavor, and nutrition. Whether you’re preparing a quick dinner, a high-protein snack, or a crowd-pleasing appetizer, this recipe delivers every time.

With minimal ingredients and maximum flavor, it’s a dish that proves you don’t need complicated steps to create something truly delicious. Try it once, and it might just become a staple in your weekly meal rotation.

Cold Lunch Idea: Easy Wrap Recipes for Lunch You’ll Love

If you’re searching for a reliable cold lunch idea, these easy wrap recipes for lunch are exactly what you need. They’re quick to prepare, incredibly versatile, and perfect for busy weekdays when you don’t have time to cook or reheat food. Whether you’re packing lunch for work, school, or a day out, wraps are one of the easiest ways to enjoy a balanced and satisfying meal.

What makes wraps so appealing is their convenience. You can prepare them ahead of time, customize them with your favorite ingredients, and enjoy them cold without sacrificing flavor. In this guide, I’ll show you how to create delicious wraps that are fresh, filling, and anything but boring.


Why You’ll Love This Cold Lunch Idea

This cold lunch idea with easy wrap recipes for lunch is a game-changer for anyone who wants something fast, healthy, and delicious.

Here’s why these wraps stand out:

  • No reheating required—perfect for on-the-go meals
  • Ready in under 15 minutes
  • Easy to customize for picky eaters
  • Great for meal prep and lunchboxes
  • Balanced with protein, veggies, and carbs

Once you start making wraps, you’ll never run out of lunch inspiration.


Ingredients

To create the perfect easy wrap recipes for lunch, you’ll need a mix of fresh and flavorful ingredients:

  • Large flour tortillas or whole wheat wraps
  • Cooked proteins (chicken, turkey, tuna, or tofu)
  • Fresh vegetables (lettuce, spinach, cucumbers, bell peppers)
  • Cheese (cheddar, mozzarella, or feta)
  • Spreads (hummus, mayo, cream cheese, or ranch)
  • Optional extras (avocado, olives, shredded carrots)


Ingredient Notes

When preparing a cold lunch idea, freshness is everything. Crisp vegetables and high-quality proteins will elevate your wraps from basic to amazing. Whole wheat tortillas add fiber and keep you full longer, while spreads like hummus or cream cheese bring everything together with creamy texture and flavor.


Step-by-Step Instructions

1. Lay Out the Tortilla

Place your tortilla flat on a clean surface to create a solid base.

2. Add the Spread

Spread a thin, even layer of your favorite sauce to enhance flavor and prevent dryness.

3. Layer the Fillings

Add protein, vegetables, and cheese evenly across the center.

4. Wrap It Up

Fold in the sides, then roll tightly from the bottom to form a secure wrap.

5. Slice and Pack

Cut in half or into smaller pinwheels for easy serving.


Tips for Perfect Results

Creating the perfect easy wrap recipes for lunch is simple, but these tips will make a big difference:

  • Don’t overfill your wraps to avoid tearing
  • Use fresh tortillas to keep them soft and flexible
  • Dry vegetables thoroughly to prevent sogginess
  • Wrap tightly for better structure and presentation
  • Chill wraps before slicing for cleaner cuts

Variations

One of the best things about this cold lunch idea is the endless variety you can create.

Try These Delicious Variations:

  • Chicken Caesar wrap with romaine and parmesan
  • Turkey avocado wrap with spinach and ranch
  • Veggie hummus wrap with roasted vegetables
  • Tuna salad wrap with crunchy lettuce


What to Serve With It

These easy wrap recipes for lunch pair beautifully with light sides that complement their fresh flavors.

Serve with:

  • Fresh fruit or fruit cups
  • Yogurt or smoothies
  • Veggie sticks with dip
  • Crackers or baked chips

This combination creates a balanced and satisfying meal.


Storage & Reheating

One of the biggest advantages of this cold lunch idea is how well it stores.

  • Wrap tightly in plastic wrap or foil
  • Store in the refrigerator for up to 2 days
  • Keep sauces separate if possible
  • No reheating needed—enjoy straight from the fridge

Perfect for meal prep and busy schedules.


Common Mistakes to Avoid

Avoid these common pitfalls when making easy wrap recipes for lunch:

  • Using too much sauce, making wraps soggy
  • Overloading with fillings
  • Not rolling tightly enough
  • Using stale tortillas

Keeping things balanced ensures perfect wraps every time.


FAQs

Can I make wraps the night before?

Yes, wraps can be made ahead and stored in the fridge for convenience.

What’s the best tortilla for wraps?

Soft flour or whole wheat tortillas work best for flexibility and taste.

How do I keep wraps from getting soggy?

Use minimal sauce and dry vegetables well before assembling.

Are wraps healthy for lunch?

Yes, when made with fresh ingredients and balanced fillings, they are a nutritious option.


Final Thoughts

This cold lunch idea with easy wrap recipes for lunch is the perfect solution for busy days when you need something quick, fresh, and satisfying. With endless combinations and minimal prep, wraps make lunchtime easier and more enjoyable.

Once you master the basics, you can experiment with flavors and ingredients to create your own signature wraps. Simple, delicious, and practical—this is one recipe style you’ll come back to again and again.

Incredible Homemade Lunches: Easy, Delicious Ideas You’ll Crave Every Day

When it comes to midday meals, nothing beats the comfort and flavor of incredible homemade lunches. Whether you’re working from home, packing a lunchbox, or feeding a hungry family, having a lineup of easy and satisfying lunch ideas can completely transform your daily routine. Homemade lunches aren’t just healthier—they’re more affordable, customizable, and often far more delicious than takeout.

In this guide, I’m sharing everything you need to know to create incredible homemade lunches that are quick to prepare, packed with flavor, and perfect for any lifestyle. From wraps and bowls to hearty salads and warm comfort meals, these ideas will keep your lunches exciting all week long.


Why You’ll Love Incredible Homemade Lunches

There are so many reasons why switching to incredible homemade lunches is a game-changer. Not only do they save you money, but they also allow you to control ingredients and portion sizes while exploring flavors you truly enjoy.

Here’s why you’ll love them:

  • Healthier than most takeout options
  • Budget-friendly and cost-effective
  • Easy to customize for dietary needs
  • Perfect for meal prep and planning
  • Endless variety to avoid boredom

Once you get into the habit, you’ll wonder how you ever relied on store-bought meals.


Essential Ingredients for Homemade Lunch Success

Creating incredible homemade lunches starts with stocking your kitchen with versatile, fresh ingredients. Having the right staples on hand makes meal prep faster and more enjoyable.

Must-Have Ingredients:

  • Lean proteins (chicken, turkey, tofu, eggs)
  • Fresh vegetables (spinach, cucumbers, peppers, carrots)
  • Whole grains (rice, quinoa, whole wheat bread)
  • Healthy fats (avocado, olive oil, nuts)
  • Flavor boosters (sauces, herbs, spices)


Ingredient Notes

The secret to truly incredible homemade lunches is using fresh, high-quality ingredients. Crisp vegetables add texture, while balanced proteins and grains keep you full and energized throughout the day. Don’t underestimate the power of a good sauce or dressing—it can completely elevate even the simplest meal.


Step-by-Step: Building the Perfect Homemade Lunch

Creating your own incredible homemade lunches doesn’t require complicated recipes. Follow this simple formula to build balanced and satisfying meals every time.

1. Choose Your Base

Start with a base like rice, pasta, bread, or greens.

2. Add Protein

Include grilled chicken, beans, tuna, or eggs for staying power.

3. Load Up Veggies

Add a mix of crunchy and fresh vegetables for texture and nutrients.

4. Finish with Flavor

Top with sauces, dressings, or seasonings to bring everything together.


Tips for Perfect Results

To consistently create incredible homemade lunches, keep these expert tips in mind:

  • Prep ingredients ahead of time for faster assembly
  • Keep flavors balanced (salty, sweet, tangy, savory)
  • Use airtight containers to maintain freshness
  • Mix textures for a more satisfying meal
  • Don’t forget seasoning—it makes all the difference

These small details can turn a simple lunch into something truly memorable.


Delicious Variations to Try

Variety is key when it comes to enjoying incredible homemade lunches every day. Switching things up prevents boredom and keeps your meals exciting.

Try These Ideas:

  • Wraps filled with grilled chicken and veggies
  • Protein-packed grain bowls with quinoa and roasted vegetables
  • Fresh salads with homemade dressings
  • Sandwiches with creative spreads and fillings


What to Serve With Homemade Lunches

To make your incredible homemade lunches even more satisfying, pair them with simple sides that complement the main dish.

Great options include:

  • Fresh fruit or fruit salad
  • Yogurt or smoothies
  • Light soups
  • Crunchy snacks like nuts or crackers

These additions create a well-rounded and fulfilling meal.


Storage & Reheating Tips

One of the biggest advantages of incredible homemade lunches is how well they work for meal prep. With proper storage, you can enjoy fresh lunches all week long.

  • Store meals in airtight containers
  • Keep dressings separate until ready to eat
  • Refrigerate for up to 3–4 days
  • Reheat gently to avoid drying out food

Planning ahead saves time and ensures you always have something delicious ready.


Common Mistakes to Avoid

Even the best intentions can go wrong without the right approach. Avoid these common mistakes when preparing incredible homemade lunches:

  • Overcomplicating recipes
  • Skipping seasoning
  • Not balancing nutrients
  • Preparing too much or too little
  • Ignoring texture variety

Keeping things simple and balanced is the key to success.


FAQs

What are the easiest homemade lunches to start with?

Wraps, sandwiches, and grain bowls are great beginner-friendly options that require minimal prep.

How can I keep lunches fresh all week?

Store ingredients separately and assemble just before eating when possible.

Are homemade lunches healthier?

Yes, they allow you to control ingredients, reduce processed foods, and include more fresh items.

How do I avoid getting bored with homemade lunches?

Rotate ingredients, try new sauces, and experiment with different cuisines to keep things exciting.


Final Thoughts

Making incredible homemade lunches doesn’t have to be complicated or time-consuming. With a little planning and creativity, you can enjoy meals that are not only healthy and affordable but also genuinely delicious.

By mixing fresh ingredients, bold flavors, and smart preparation techniques, you’ll turn your everyday lunches into something you actually look forward to. Start simple, experiment often, and soon you’ll have a collection of go-to meals that make every day better.