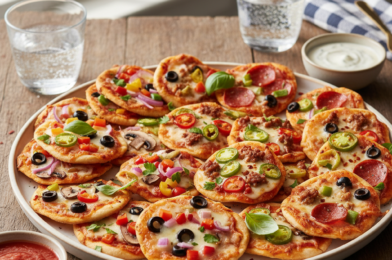
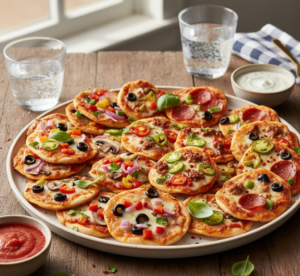
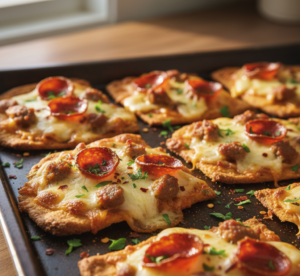
If you love pizza and crunchy snacks, get ready to meet your new obsession: crispy pizza chips. These bite-sized, cheesy delights deliver all the classic pizza flavors you crave—savory sauce, melty cheese, and bold toppings—in a crispy, snackable form that’s impossible to resist.
Whether you’re hosting a party, planning a movie night, or just looking for a fun kitchen experiment, these crispy pizza chips are quick to make and guaranteed to disappear fast. Best of all, they require just a few simple ingredients and can be customized to match your favorite pizza combinations.
Why You’ll Love This Recipe
There’s a reason crispy pizza chips are becoming such a popular snack—they’re easy, fun, and incredibly satisfying.
Here’s why you’ll love them:
- Ready in under 20 minutes
- Low-carb and keto-friendly option
- Packed with bold pizza flavor
- Perfect for parties and snacking
- Highly customizable with toppings
They’re the perfect mix of crunchy, cheesy, and savory goodness.
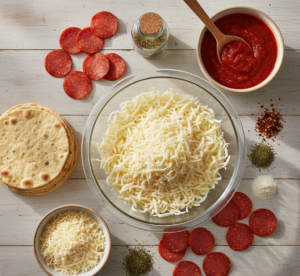
Ingredients
To make these irresistible crispy pizza chips, you’ll need:
- 1 1/2 cups shredded mozzarella cheese
- 1/2 cup grated Parmesan cheese
- 1/2 teaspoon Italian seasoning
- 1/4 teaspoon garlic powder
- Pepperoni slices (optional)
- Marinara sauce for dipping
Ingredient Notes
The magic of crispy pizza chips lies in the cheese. Mozzarella provides that classic stretch and mild flavor, while Parmesan adds a sharp, nutty bite and helps create that crispy texture.
Italian seasoning and garlic powder enhance the pizza flavor without needing a full sauce layer. If you’re adding toppings like pepperoni, keep them small so they crisp up nicely without weighing down the chips.
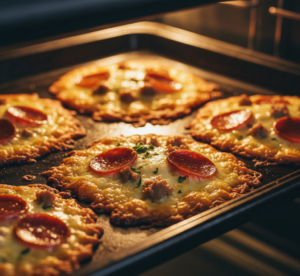
Step-by-Step Instructions
1. Preheat the Oven
Preheat your oven to 375°F (190°C) and line a baking sheet with parchment paper.
2. Create Cheese Mounds
Spoon small piles of mozzarella onto the baking sheet, spacing them apart.
3. Add Toppings
Sprinkle Parmesan, Italian seasoning, and garlic powder on top. Add a small piece of pepperoni if desired.
4. Bake Until Crispy
Bake for 8–10 minutes or until edges are golden and crispy.
5. Cool and Serve
Let the chips cool slightly—they’ll crisp up even more as they set.
Tips for Perfect Results
To get the best crispy pizza chips, keep these tips in mind:
- Use parchment paper to prevent sticking
- Keep cheese piles small and evenly spaced
- Watch closely to avoid burning
- Let chips cool fully for maximum crispiness
- Use freshly shredded cheese for best texture
These simple techniques make a big difference in the final result.
Variations
One of the best things about crispy pizza chips is how easy they are to customize.
Supreme Style
Add tiny bits of sausage, peppers, and olives.
Spicy Version
Sprinkle red pepper flakes or use spicy pepperoni.
Veggie Option
Top with mushrooms or spinach.
Cheddar Blend
Mix in cheddar for a sharper flavor.
What to Serve With It
These crispy pizza chips are perfect on their own, but even better with dips and sides.
- Marinara sauce
- Ranch dressing
- Garlic aioli
- Side salad for balance
They’re a great addition to snack boards or appetizer spreads.
Storage & Reheating
If you have leftovers (which is rare!), crispy pizza chips can be stored easily.
- Store in an airtight container at room temperature for up to 2 days
- Re-crisp in the oven for a few minutes if needed
- Avoid refrigeration to prevent sogginess
They’re best enjoyed fresh but can still be revived with a quick bake.
Common Mistakes to Avoid
Avoid these common mistakes when making crispy pizza chips:
- Using too much cheese per chip
- Not spacing them properly
- Overbaking or burning
- Skipping parchment paper
Avoiding these ensures perfectly crispy results.
FAQs
Are crispy pizza chips low-carb?
Yes! They’re naturally low in carbs, especially without added toppings.
Can I make them in an air fryer?
Absolutely—cook at 375°F for 5–7 minutes.
What cheese works best?
Mozzarella and Parmesan are the ideal combination.
Why aren’t my chips crispy?
They may need more cooling time or thinner cheese portions.
Final Thoughts
These crispy pizza chips are the ultimate snack adventure—fun to make, endlessly customizable, and completely addictive. With their crunchy texture and bold pizza flavor, they’re perfect for any occasion, from casual snacking to entertaining guests.
Once you try them, you’ll see just how easy it is to turn simple ingredients into something truly exciting. Keep this crispy pizza chips recipe handy—you’ll be making it again and again!