Cheesy Potato Egg Scramble

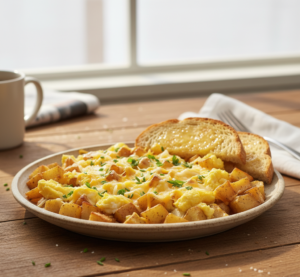
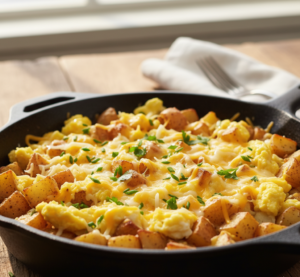
If you’re looking for a hearty, satisfying breakfast that comes together quickly and keeps you full for hours, this cheesy potato egg scramble is exactly what you need. It’s made with simple ingredients—crispy potatoes, fluffy scrambled eggs, and gooey melted cheese—but the result is pure comfort food magic.

This cheesy potato egg scramble is perfect for busy mornings, lazy weekend brunches, or even breakfast-for-dinner nights. It’s budget-friendly, customizable, and loved by both kids and adults. Once you try it, it may just become your go-to breakfast recipe.

Why You’ll Love This Recipe

There are plenty of reasons this cheesy potato egg scramble deserves a spot in your regular breakfast rotation:

  • Quick and easy to prepare
  • Uses simple pantry ingredients
  • High in protein and very filling
  • Perfect for breakfast, brunch, or dinner
  • Easily customizable with add-ins

It’s the kind of meal that feels comforting and indulgent while still being practical for everyday cooking.
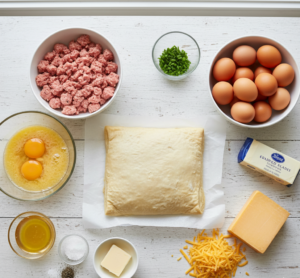
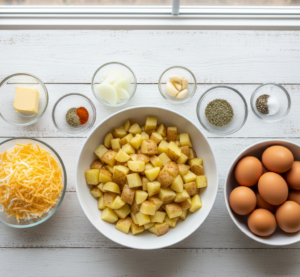

Ingredients

To make this delicious cheesy potato egg scramble, you’ll need:

  • 2 medium potatoes, diced small
  • 4 large eggs
  • 1/2 cup shredded cheddar cheese
  • 2 tablespoons butter or oil
  • 1/4 cup milk (optional, for fluffier eggs)
  • 1/2 small onion, diced
  • Salt and pepper to taste
  • Optional toppings: green onions, hot sauce, bacon bits

Ingredient Notes

The secret to a great cheesy potato egg scramble is texture balance. The potatoes should be crispy on the outside and tender inside, while the eggs should stay soft and creamy.

Cheddar cheese works best because it melts smoothly and adds a rich, sharp flavor. However, you can also mix in mozzarella or pepper jack for a twist. Milk is optional but helps create fluffier scrambled eggs.


Step-by-Step Instructions

1. Cook the Potatoes

Heat butter or oil in a skillet over medium heat. Add diced potatoes and cook until golden and crispy, about 10–12 minutes. Stir occasionally.

2. Add Onions

Add diced onions and cook until softened and slightly caramelized.

3. Prepare the Eggs

In a bowl, whisk eggs with milk, salt, and pepper.

4. Scramble Everything Together

Pour eggs into the skillet with potatoes. Stir gently until eggs are just set.

5. Add Cheese

Sprinkle shredded cheese over the top and let it melt into the scramble.

6. Serve Warm

Remove from heat and serve immediately with your favorite toppings.

Tips for Perfect Results

To make the best cheesy potato egg scramble, keep these tips in mind:

  • Cut potatoes into small, even pieces for faster cooking
  • Don’t overcrowd the pan—crispy potatoes need space
  • Cook eggs on low heat for soft texture
  • Add cheese at the end to avoid overcooking
  • Season at every stage for best flavor

These simple techniques make a big difference in taste and texture.


Variations

One of the best things about cheesy potato egg scramble is how easy it is to customize.

Meat Lover’s Version

Add cooked bacon, sausage, or ham.

Veggie Packed Scramble

Add bell peppers, spinach, or mushrooms.

Spicy Kick

Mix in jalapeños or hot sauce.

Mexican Style

Add salsa, cumin, and pepper jack cheese.

What to Serve With It

This cheesy potato egg scramble pairs well with:

  • Toast or biscuits
  • Fresh fruit
  • Avocado slices
  • Hot coffee or juice
  • Salsa or sour cream

These sides make it a complete and satisfying meal.


Storage & Reheating

To store leftover cheesy potato egg scramble:

  • Refrigerate in an airtight container for up to 3 days
  • Reheat in a skillet for best texture
  • Microwave in short intervals if needed
  • Add a splash of water or milk when reheating

It’s best enjoyed fresh but still reheats well.


Common Mistakes to Avoid

Avoid these mistakes when making cheesy potato egg scramble:

  • Overcooking the eggs (they’ll become rubbery)
  • Cutting potatoes too large (they won’t cook evenly)
  • Not seasoning properly
  • Cooking on too high heat

Avoiding these ensures a perfectly balanced scramble every time.


FAQs

Can I use frozen potatoes?

Yes, but fresh potatoes give better texture and flavor.

Can I make this dairy-free?

Yes, simply skip cheese or use a dairy-free alternative.

What cheese works best?

Cheddar is classic, but mozzarella or pepper jack also work well.

Can I meal prep this?

Yes, it stores well for a few days in the fridge.


Final Thoughts

This cheesy potato egg scramble is the perfect combination of simple ingredients and comforting flavor. It’s quick, filling, and endlessly customizable, making it ideal for any meal of the day.

Whether you’re cooking for family or just yourself, this cheesy potato egg scramble is a reliable, delicious recipe you’ll come back to again and again.

Crockpot French Dip Sandwiches: Easy, Quick, and Delicious Slow Cooker Recipe!

If you’re searching for a comforting, hands-off dinner that delivers big flavor with minimal effort, these Crockpot French dip sandwiches: easy, quick, and delicious slow cooker recipe are exactly what you need. Tender, slow-cooked beef piled onto toasted rolls, topped with melty cheese, and served with a rich, savory au jus for dipping—this is comfort food at its finest.

What makes this recipe so special is the slow cooker. It does all the heavy lifting while you go about your day, and by dinnertime, you’ve got restaurant-quality sandwiches ready to serve. These Crockpot French dip sandwiches: easy, quick, and delicious slow cooker recipe are perfect for busy weeknights, game days, or casual family gatherings.

Why You’ll Love This Recipe

There are so many reasons these Crockpot French dip sandwiches: easy, quick, and delicious slow cooker recipe will become a family favorite.

  • Minimal prep time with maximum flavor
  • Tender, juicy shredded beef
  • Rich homemade au jus for dipping
  • Perfect for meal prep or feeding a crowd
  • Easy, budget-friendly ingredients

It’s one of those meals that tastes like it took hours of effort—but your slow cooker does all the work.


Ingredients

To make these Crockpot French dip sandwiches: easy, quick, and delicious slow cooker recipe, you’ll need:

  • 3–4 lbs beef chuck roast
  • 1 onion, sliced
  • 3–4 cloves garlic, minced
  • 4 cups beef broth
  • 2 tablespoons Worcestershire sauce
  • 1 tablespoon soy sauce
  • 1 teaspoon dried thyme
  • 1 teaspoon black pepper
  • Salt to taste
  • 6–8 hoagie rolls or sandwich buns
  • 6–8 slices provolone or Swiss cheese

Ingredient Notes

The key to amazing Crockpot French dip sandwiches: easy, quick, and delicious slow cooker recipe is using a well-marbled beef chuck roast. As it slow cooks, the fat melts into the broth, creating incredibly tender meat and a flavorful dipping sauce.

Worcestershire sauce and soy sauce add depth and umami, while garlic and onions bring aromatic richness. The result is a deeply savory au jus that makes every bite irresistible.


Step-by-Step Instructions

1. Prepare the Crockpot

Place sliced onions and garlic at the bottom of the slow cooker.

2. Add the Beef

Season the chuck roast with salt and pepper, then place it on top of the onions.

3. Add Liquid and Seasonings

Pour in beef broth, Worcestershire sauce, soy sauce, thyme, and remaining seasoning.

4. Slow Cook

Cook on low for 8–9 hours or high for 4–5 hours until beef is tender and easy to shred.

5. Shred the Beef

Remove beef, shred with forks, and return it to the crockpot to soak in juices.

6. Assemble Sandwiches

Pile beef onto toasted rolls, top with cheese, and serve with warm au jus for dipping.

Tips for Perfect Results

To make the best Crockpot French dip sandwiches: easy, quick, and delicious slow cooker recipe, follow these tips:

  • Use chuck roast for best tenderness
  • Don’t skip searing if you want extra depth (optional)
  • Let beef rest in juices after shredding
  • Toast rolls for structure and flavor
  • Serve au jus hot for best experience

These small steps elevate your sandwiches from good to unforgettable.


Variations

One of the best things about Crockpot French dip sandwiches: easy, quick, and delicious slow cooker recipe is how flexible they are.

Cheesy French Dip

Add extra cheese and melt under the broiler.

Spicy Version

Add sliced jalapeños or hot sauce.

Mushroom French Dip

Add sautéed mushrooms for earthy flavor.

Garlic Butter Rolls

Brush rolls with garlic butter before toasting.

What to Serve With It

These Crockpot French dip sandwiches: easy, quick, and delicious slow cooker recipe pair well with:

  • French fries or sweet potato fries
  • Coleslaw
  • Pickles
  • Side salad
  • Potato chips

These sides balance the richness of the sandwich.


Storage & Reheating

To keep your Crockpot French dip sandwiches: easy, quick, and delicious slow cooker recipe fresh:

  • Store beef and au jus separately in airtight containers
  • Refrigerate for up to 4 days
  • Freeze shredded beef for up to 2 months
  • Reheat gently on stovetop or microwave with broth

This makes it a great meal prep option too.


Common Mistakes to Avoid

Avoid these mistakes when making Crockpot French dip sandwiches: easy, quick, and delicious slow cooker recipe:

  • Using lean cuts of beef (can become dry)
  • Skipping seasoning layers
  • Overcooking on high heat too long
  • Not reserving enough broth for dipping

Avoiding these ensures juicy, flavorful results every time.


FAQs

Can I use a different cut of beef?

Yes, but chuck roast is best for tenderness.

Can I make this ahead of time?

Absolutely—it tastes even better the next day.

Can I cook it on high instead of low?

Yes, but low heat gives the best texture.

What cheese works best?

Provolone and Swiss are classic choices.


Final Thoughts

These Crockpot French dip sandwiches: easy, quick, and delicious slow cooker recipe are the ultimate comfort food—rich, savory, and incredibly satisfying. With minimal effort and maximum flavor, they’re perfect for busy families or anyone craving a hearty, restaurant-style meal at home.

Once you try them, you’ll see why these Crockpot French dip sandwiches: easy, quick, and delicious slow cooker recipe quickly become a regular on your dinner menu.

Layered Chocolate Mousse Brownies for Valentine’s Dessert Ideas (Rich, Romantic & Decadent)

If you’re looking for the ultimate show-stopping dessert for Valentine’s Day, these layered chocolate mousse brownies for Valentine’s dessert ideas are exactly what you need. Imagine a rich, fudgy brownie base topped with a cloud-like layer of silky chocolate mousse—all finished with a glossy chocolate topping or fresh berries.

This dessert is everything romance should taste like: indulgent, smooth, and deeply chocolatey. Whether you’re planning a romantic dinner at home or surprising someone special, these layered chocolate mousse brownies for Valentine’s dessert ideas are guaranteed to impress.

Why You’ll Love This Recipe

There are plenty of reasons these layered chocolate mousse brownies for Valentine’s dessert ideas deserve a spot on your dessert table.

  • Combines two desserts in one: brownies + mousse
  • Perfect for romantic occasions like Valentine’s Day
  • Rich, fudgy, and creamy textures
  • Make-ahead friendly for stress-free entertaining
  • Bakery-style presentation at home

This dessert looks fancy, but it’s surprisingly approachable for home bakers.


Ingredients

To make these layered chocolate mousse brownies for Valentine’s dessert ideas, you’ll need three main components:

For the Brownie Base:

  • 1/2 cup butter
  • 1 cup sugar
  • 2 eggs
  • 1/3 cup cocoa powder
  • 1/2 cup all-purpose flour
  • 1/4 teaspoon salt
  • 1/2 teaspoon vanilla extract

For the Chocolate Mousse:

  • 1 cup heavy whipping cream
  • 1/2 cup semi-sweet chocolate chips
  • 2 tablespoons powdered sugar
  • 1/2 teaspoon vanilla extract

Optional Topping:

  • Melted chocolate drizzle
  • Fresh strawberries
  • Chocolate shavings

Ingredient Notes

The magic of layered chocolate mousse brownies for Valentine’s dessert ideas comes from texture contrast. The brownie layer should be dense and fudgy, while the mousse is light and airy.

Using good-quality chocolate makes a huge difference in flavor. Semi-sweet chocolate balances the sweetness of the mousse, while cocoa powder intensifies the brownie base.


Step-by-Step Instructions

1. Make the Brownie Base

Preheat oven to 350°F (175°C). Melt butter and mix with sugar. Add eggs and vanilla, then whisk in cocoa powder, flour, and salt. Pour into a lined baking pan and bake for 20–25 minutes. Let cool completely.

2. Prepare the Chocolate Mousse

Melt chocolate chips and let cool slightly. Whip heavy cream with powdered sugar and vanilla until soft peaks form. Gently fold melted chocolate into whipped cream.

3. Assemble the Layers

Spread mousse evenly over cooled brownies. Smooth the top and refrigerate for at least 2–3 hours until set.

4. Add Toppings and Serve

Top with chocolate drizzle, berries, or shavings before slicing and serving.

Tips for Perfect Results

To make the best layered chocolate mousse brownies for Valentine’s dessert ideas, keep these tips in mind:

  • Always cool brownies completely before adding mousse
  • Use chilled cream for better whipping
  • Don’t overmix mousse—fold gently
  • Chill long enough for clean layers
  • Use a sharp knife for clean slices

These small details make a big difference in presentation and texture.


Variations

One of the best things about layered chocolate mousse brownies for Valentine’s dessert ideas is how easy they are to customize.

White Chocolate Version

Replace dark chocolate with white chocolate for a sweeter twist.

Raspberry Layer

Add fresh raspberries between brownie and mousse layers.

Mocha Flavor

Add espresso powder to enhance chocolate depth.

Nutty Crunch

Sprinkle chopped hazelnuts or almonds on top.

What to Serve With It

These layered chocolate mousse brownies for Valentine’s dessert ideas pair beautifully with:

  • Fresh strawberries
  • Espresso or coffee
  • Vanilla ice cream
  • Champagne or sparkling juice

These pairings enhance the romantic dessert experience.


Storage & Reheating

Proper storage keeps your layered chocolate mousse brownies for Valentine’s dessert ideas fresh and delicious.

  • Store in the refrigerator for up to 4 days
  • Keep covered to prevent drying
  • Do not freeze (mousse texture may change)
  • Serve chilled for best flavor

They taste even better after resting overnight.


Common Mistakes to Avoid

Avoid these mistakes when making layered chocolate mousse brownies for Valentine’s dessert ideas:

  • Adding mousse to warm brownies
  • Overwhipping or underwhipping cream
  • Skipping chill time
  • Using low-quality chocolate
  • Cutting before fully set

Avoiding these ensures perfect layers every time.


FAQs

Can I make these brownies ahead of time?

Yes! They’re perfect for making a day in advance.

Can I use boxed brownie mix?

Absolutely—it works well if you’re short on time.

Why is my mousse runny?

It likely wasn’t whipped enough or the cream was too warm.

Can I freeze them?

Not recommended due to mousse texture changes.


Final Thoughts

These layered chocolate mousse brownies for Valentine’s dessert ideas are the ultimate romantic treat—rich, creamy, and absolutely unforgettable. They combine the best of two worlds: fudgy brownies and airy chocolate mousse.

Whether you’re celebrating Valentine’s Day or simply want a luxurious dessert to share, this recipe delivers elegance without stress. Once you try these layered chocolate mousse brownies for Valentine’s dessert ideas, they’ll become your go-to special occasion dessert.

EASY MICROWAVE MUG BROWNIE (Fudgy, Fast & Chocolatey Dessert in Minutes)

When a chocolate craving hits, waiting for an oven to preheat is simply not an option. That’s where this easy microwave mug brownie comes in to save the day. Rich, fudgy, and ready in just a couple of minutes, it’s the ultimate single-serve dessert for busy days, late-night cravings, or anytime you need a quick chocolate fix.

The beauty of this easy microwave mug brownie is that it uses simple pantry ingredients you likely already have at home. No fancy equipment, no complicated steps—just mix, microwave, and enjoy a warm, gooey brownie straight from the mug.

Why You’ll Love This Recipe

There are plenty of reasons this easy microwave mug brownie will become your go-to dessert.

  • Ready in under 5 minutes
  • Made with simple pantry staples
  • Perfect single-serving treat
  • Fudgy, rich, and chocolate-loaded
  • No oven required

It’s the fastest way to satisfy your chocolate cravings without making a full batch of brownies.


Ingredients

To make this easy microwave mug brownie, you’ll need:

  • 4 tablespoons all-purpose flour
  • 2 tablespoons cocoa powder
  • 2–3 tablespoons sugar (adjust to taste)
  • Pinch of salt
  • 3 tablespoons milk
  • 2 tablespoons vegetable oil or melted butter
  • 1/4 teaspoon vanilla extract
  • Optional: chocolate chips or nuts

Ingredient Notes

The secret to a perfect easy microwave mug brownie lies in balancing moisture and chocolate flavor. Cocoa powder gives it that deep, rich taste, while oil or butter ensures a soft, fudgy texture.

Milk helps bind everything together, and vanilla extract enhances the chocolate flavor. If you want extra indulgence, chocolate chips melt beautifully inside the batter, creating gooey pockets of chocolate.


Step-by-Step Instructions

1. Mix Dry Ingredients

In a microwave-safe mug, combine flour, cocoa powder, sugar, and salt.

2. Add Wet Ingredients

Stir in milk, oil, and vanilla extract until smooth and lump-free.

3. Add Mix-Ins

Fold in chocolate chips or nuts if using.

4. Microwave

Cook on high for 60–90 seconds, depending on your microwave’s power.

5. Cool Slightly and Enjoy

Let it sit for a minute before eating—it will be very hot!

Tips for Perfect Results

To make the best easy microwave mug brownie, follow these simple tips:

  • Don’t overmix the batter
  • Use a large mug to prevent overflow
  • Start with less cooking time and adjust if needed
  • Let it rest before eating for best texture
  • Add chocolate chips for extra richness

These tips ensure a perfectly fudgy brownie every time.


Variations

One of the best things about this easy microwave mug brownie is how easy it is to customize.

Peanut Butter Swirl

Add a spoonful of peanut butter before microwaving.

Nutty Version

Mix in chopped walnuts or almonds.

Mint Chocolate

Add a drop of peppermint extract.

Double Chocolate

Use chocolate milk instead of regular milk.

What to Serve With It

This easy microwave mug brownie is delicious on its own, but even better with toppings.

  • Vanilla ice cream
  • Whipped cream
  • Chocolate syrup
  • Fresh berries

These additions turn it into a restaurant-style dessert.


Storage & Reheating

Since this is a single-serve dessert, the easy microwave mug brownie is best enjoyed immediately.

  • Best eaten fresh
  • Can be stored covered for up to 1 day
  • Reheat for 10–15 seconds in the microwave if needed

Freshly made is always the most fudgy and delicious.


Common Mistakes to Avoid

Avoid these mistakes when making your easy microwave mug brownie:

  • Overcooking (makes it dry and rubbery)
  • Using too small a mug
  • Not mixing thoroughly
  • Adding too much flour

Avoiding these ensures the perfect gooey texture.


FAQs

Can I make this mug brownie without eggs?

Yes! This recipe is completely egg-free.

Why is my mug brownie dry?

It was likely overcooked—reduce microwave time slightly next time.

Can I double the recipe?

It’s best made as a single serving, but you can cook two mugs separately.

Can I make it gluten-free?

Yes, use a gluten-free flour blend.


Final Thoughts

This easy microwave mug brownie is the ultimate quick dessert—rich, fudgy, and ready in minutes. It’s perfect for satisfying sudden chocolate cravings without the hassle of baking an entire pan of brownies.

Once you try it, you’ll see why this easy microwave mug brownie becomes a favorite go-to treat. Simple, fast, and absolutely delicious, it’s proof that great desserts don’t have to take time.

Loaded Bacon Cheeseburger Pasta You’ll Crave Again and Again

If you’re a fan of bold, comforting flavors, this loaded bacon cheeseburger pasta you’ll crave again and again is about to become your new favorite dinner. Imagine everything you love about a juicy bacon cheeseburger—savory ground beef, crispy bacon, melty cheese—combined with tender pasta and a rich, creamy sauce.

This dish is the definition of comfort food meets convenience. Whether you’re feeding a hungry family or just want leftovers that taste even better the next day, this loaded bacon cheeseburger pasta you’ll crave again and again delivers big flavor with minimal effort..

Why You’ll Love This Recipe

There’s a lot to love about this hearty, satisfying dish. This loaded bacon cheeseburger pasta you’ll crave again and again checks all the boxes for a perfect weeknight meal.

  • Rich, creamy, and packed with flavor
  • Combines two comfort food favorites
  • Easy one-pan or simple stovetop recipe
  • Family-friendly and filling
  • Great for leftovers and meal prep

It’s the kind of meal that brings everyone back to the table for seconds.


Ingredients

To make this irresistible loaded bacon cheeseburger pasta you’ll crave again and again, you’ll need:

  • 12 oz pasta (elbow, penne, or shells)
  • 1 lb ground beef
  • 6 slices bacon, cooked and crumbled
  • 1 small onion, diced
  • 2 cloves garlic, minced
  • 1 cup shredded cheddar cheese
  • 1/2 cup cream cheese
  • 1/2 cup milk
  • 2 tablespoons ketchup
  • 1 tablespoon mustard
  • Salt and pepper to taste

Ingredient Notes

The key to making loaded bacon cheeseburger pasta you’ll crave again and again is layering flavors. Ground beef provides a rich, savory base, while bacon adds smoky crunch that takes the dish to the next level.

Cheddar cheese delivers that classic cheeseburger flavor, and cream cheese helps create a smooth, creamy sauce. The addition of ketchup and mustard gives the dish its signature burger-inspired taste, making every bite feel nostalgic and satisfying.


Step-by-Step Instructions

1. Cook the Pasta

Boil pasta in salted water until al dente. Drain and set aside.

2. Cook the Bacon

In a large skillet, cook bacon until crispy. Remove and crumble, leaving some grease in the pan.

3. Brown the Beef

Add ground beef and diced onion to the skillet. Cook until browned and fully cooked. Stir in garlic.

4. Make the Sauce

Lower heat and add cream cheese, milk, ketchup, and mustard. Stir until smooth and creamy.

5. Combine Everything

Add cooked pasta and half the bacon to the skillet. Mix well, then top with shredded cheese and remaining bacon.

6. Melt and Serve

Let cheese melt, then serve warm.

Tips for Perfect Results

To make the best loaded bacon cheeseburger pasta you’ll crave again and again, follow these tips:

  • Use freshly shredded cheese for better melting
  • Don’t overcook the pasta
  • Drain excess grease if needed
  • Adjust sauce consistency with milk
  • Taste and adjust seasoning before serving

These tips ensure a perfectly creamy and flavorful dish.


Variations

This loaded bacon cheeseburger pasta you’ll crave again and again is easy to customize.

Add Veggies

Include tomatoes, pickles, or spinach.

Spicy Version

Add jalapeños or hot sauce.

Lighter Option

Use ground turkey instead of beef.

Extra Cheesy

Mix in multiple cheeses like mozzarella or pepper jack.

What to Serve With It

Pair this loaded bacon cheeseburger pasta you’ll crave again and again with simple sides to balance the richness.

  • Side salad
  • Garlic bread
  • Roasted vegetables
  • Pickles for a tangy contrast

It’s a complete meal that satisfies every craving.


Storage & Reheating

This loaded bacon cheeseburger pasta you’ll crave again and again stores beautifully for leftovers.

  • Refrigerate in an airtight container for up to 4 days
  • Reheat on the stovetop with a splash of milk
  • Microwave in short intervals, stirring between
  • Not ideal for freezing due to the creamy sauce

Leftovers are just as delicious the next day!


Common Mistakes to Avoid

Avoid these mistakes when making loaded bacon cheeseburger pasta you’ll crave again and again:

  • Overcooking the pasta
  • Using pre-shredded cheese (doesn’t melt as well)
  • Skipping seasoning adjustments
  • Adding too much liquid

These small details make a big difference in the final result.


FAQs

Can I make this ahead of time?

Yes! It reheats well and is great for meal prep.

What pasta works best?

Short pasta like shells or elbow macaroni holds the sauce well.

Can I make it without bacon?

Absolutely—though bacon adds extra flavor.

Is it kid-friendly?

Yes! Kids love the cheeseburger-inspired flavors.


Final Thoughts

This loaded bacon cheeseburger pasta you’ll crave again and again is the ultimate comfort food mashup—rich, cheesy, and packed with bold flavor. It’s easy to make, incredibly satisfying, and perfect for any night of the week.

Once you try it, don’t be surprised if it becomes a regular in your dinner rotation. This dish truly lives up to its name—you’ll be craving it again and again!

Vanilla Mug Cake Recipe (Soft, Fluffy & Ready in Minutes!)

Craving something sweet but don’t want to bake an entire cake? This vanilla mug cake recipe is the perfect solution. Made in just minutes using simple pantry ingredients, this single-serve dessert is soft, fluffy, and incredibly satisfying.

Whether you need a late-night treat, a quick dessert after dinner, or a fun recipe to make with kids, this vanilla mug cake recipe delivers instant gratification without the hassle. Best of all, it’s made right in your microwave—no oven required!

Why You’ll Love This Recipe

There’s a lot to love about this vanilla mug cake recipe, especially when time and simplicity matter.

Here’s why it’s a favorite:

  • Ready in under 5 minutes
  • Uses basic pantry ingredients
  • Perfect single-serving dessert
  • Soft, moist, and fluffy texture
  • Easy to customize with toppings or flavors

It’s the ultimate quick dessert for busy days or spontaneous cravings.


Ingredients

To make this easy vanilla mug cake recipe, you’ll need:

  • 4 tablespoons all-purpose flour
  • 2 tablespoons sugar
  • 1/4 teaspoon baking powder
  • Pinch of salt
  • 3 tablespoons milk
  • 2 tablespoons vegetable oil or melted butter
  • 1/2 teaspoon vanilla extract

Ingredient Notes

The beauty of this vanilla mug cake recipe lies in its simplicity. Each ingredient plays an important role in creating that soft, cake-like texture.

Flour provides structure, while baking powder gives the cake its lift. Milk adds moisture, and oil or butter ensures a tender crumb. Vanilla extract is the star flavor—so use a good-quality one for the best results.


Step-by-Step Instructions

1. Mix Dry Ingredients

In a microwave-safe mug, whisk together flour, sugar, baking powder, and salt.

2. Add Wet Ingredients

Pour in milk, oil, and vanilla extract. Mix until smooth with no lumps.

3. Microwave

Cook on high for 60–90 seconds, depending on your microwave’s power.

4. Cool Slightly and Enjoy

Let the cake cool for a minute before digging in.

Tips for Perfect Results

To get the best results from your vanilla mug cake recipe, keep these tips in mind:

  • Don’t overmix the batter
  • Use a large mug to prevent overflow
  • Start with shorter cook time and add more if needed
  • Let it rest briefly after microwaving
  • Avoid overcooking to keep it moist

These tips help you achieve a perfectly fluffy mug cake every time.


Variations

One of the best things about this vanilla mug cake recipe is how easy it is to customize.

Chocolate Chip Version

Add a tablespoon of chocolate chips.

Funfetti Cake

Mix in colorful sprinkles for a festive touch.

Lemon Twist

Add a little lemon zest for brightness.

Cinnamon Sugar

Sprinkle cinnamon sugar on top before cooking.

What to Serve With It

This vanilla mug cake recipe is delicious on its own, but even better with toppings.

  • Whipped cream
  • Fresh berries
  • Ice cream
  • Chocolate or caramel drizzle

These additions turn a simple mug cake into a decadent dessert.


Storage & Reheating

Since this vanilla mug cake recipe is a single serving, it’s best enjoyed fresh.

  • Eat immediately for best texture
  • If needed, cover and store for up to 1 day
  • Reheat briefly in the microwave (10–15 seconds)

Fresh is always best, but it can be saved in a pinch.


Common Mistakes to Avoid

Avoid these common mistakes when making this vanilla mug cake recipe:

  • Overcooking (leads to dryness)
  • Using a mug that’s too small
  • Not mixing thoroughly
  • Adding too much flour

Keeping these in mind ensures perfect results every time.


FAQs

Can I make this without eggs?

Yes! This recipe is naturally egg-free.

Why is my mug cake rubbery?

It’s likely overcooked—reduce cooking time slightly.

Can I use almond milk?

Absolutely—any milk alternative works well.

Can I double the recipe?

It’s best made as a single serving, but you can make two mugs separately.


Final Thoughts

This vanilla mug cake recipe is proof that you don’t need a lot of time or ingredients to create something delicious. It’s quick, easy, and incredibly satisfying—perfect for when you want dessert without the fuss.

Once you try it, this vanilla mug cake recipe will become your go-to for instant sweet cravings. Simple, comforting, and endlessly customizable, it’s a little treat that always delivers big flavor.

Mexican Street Corn Pasta Salad Is a Must-Try Dish! (Creamy, Zesty & Crowd-Pleasing)

If you’re looking for a bold, flavor-packed side dish that steals the show at every gathering, this Mexican street corn pasta salad is a must-try dish you absolutely need in your recipe collection. Inspired by the classic street food flavors of elote, this pasta salad combines sweet corn, creamy dressing, tangy lime, and a hint of spice into one irresistible bowl.

Perfect for summer cookouts, potlucks, or even a quick weekday side, this Mexican street corn pasta salad is a must-try dish because it delivers both comfort and freshness in every bite. It’s creamy without being heavy, zesty without being overpowering, and incredibly easy to make.

Why You’ll Love This Recipe

There are so many reasons why this Mexican street corn pasta salad is a must-try dish, especially if you love bold, fresh flavors.

Here’s what makes it special:

  • Creamy and tangy with a hint of spice
  • Perfect for BBQs, picnics, and gatherings
  • Easy to prepare ahead of time
  • Combines classic street corn flavors with pasta
  • Customizable with proteins or veggies

It’s the kind of dish that disappears quickly—so you might want to make extra!


Ingredients

To make this delicious Mexican street corn pasta salad is a must-try dish, gather the following:

  • 12 oz pasta (rotini or bowtie)
  • 2 cups corn (fresh, canned, or frozen)
  • 1/2 cup mayonnaise
  • 1/4 cup sour cream
  • 1/2 cup crumbled cotija cheese (or feta)
  • 1 tablespoon lime juice
  • 1 teaspoon chili powder
  • 1/2 teaspoon smoked paprika
  • 1/4 cup chopped cilantro
  • Salt and pepper to taste

Ingredient Notes

The beauty of this Mexican street corn pasta salad is a must-try dish lies in its balance of flavors. Sweet corn is the star, especially when lightly charred for that authentic street corn taste.

Cotija cheese adds a salty, crumbly texture, while the creamy base of mayo and sour cream ties everything together. Fresh lime juice brightens the dish, and chili powder adds just the right amount of warmth.


Step-by-Step Instructions

1. Cook the Pasta

Boil pasta in salted water until al dente. Drain and let cool completely.

2. Prepare the Corn

If using fresh or frozen corn, sauté in a skillet until slightly charred for extra flavor.

3. Make the Dressing

In a large bowl, mix mayonnaise, sour cream, lime juice, chili powder, smoked paprika, salt, and pepper.

4. Combine Ingredients

Add cooled pasta, corn, cilantro, and cheese to the dressing. Toss until well coated.

5. Chill and Serve

Refrigerate for at least 30 minutes before serving for best flavor.

Tips for Perfect Results

To ensure your Mexican street corn pasta salad is a must-try dish turns out perfect every time, keep these tips in mind:

  • Let the pasta cool before mixing to prevent sogginess
  • Char the corn for added depth of flavor
  • Adjust lime juice to taste for extra brightness
  • Use fresh cilantro for the best aroma
  • Chill before serving to enhance flavor

These simple tips elevate the dish from good to unforgettable.


Variations

One of the reasons this Mexican street corn pasta salad is a must-try dish is its versatility.

Add Protein

Include grilled chicken, shrimp, or black beans.

Make It Spicy

Add diced jalapeños or hot sauce.

Lighten It Up

Use Greek yogurt instead of sour cream.

Vegan Option

Use plant-based mayo and skip the cheese or use vegan cheese.

What to Serve With It

This Mexican street corn pasta salad is a must-try dish pairs beautifully with many main courses.

  • Grilled chicken or steak
  • Burgers and hot dogs
  • BBQ ribs
  • Tacos or fajitas

It’s a versatile side that complements both casual and festive meals.


Storage & Reheating

This Mexican street corn pasta salad is a must-try dish stores well and is great for leftovers.

  • Refrigerate in an airtight container for up to 3 days
  • Stir before serving to refresh the texture
  • Add a splash of lime juice if needed
  • Not suitable for freezing

It’s even more flavorful the next day!


Common Mistakes to Avoid

Avoid these common mistakes when making this Mexican street corn pasta salad is a must-try dish:

  • Mixing pasta while still hot
  • Skipping the chilling step
  • Using too much dressing
  • Not seasoning properly

Avoiding these ensures the perfect balance of flavor and texture.


FAQs

Can I make this ahead of time?

Yes! It actually tastes better after chilling for a few hours.

What pasta works best?

Short pasta like rotini or bowtie holds the dressing well.

Can I use canned corn?

Absolutely—just drain and sauté for better flavor.

Is it spicy?

It has mild heat, but you can adjust spice levels easily.


Final Thoughts

This Mexican street corn pasta salad is a must-try dish for anyone who loves bold, fresh, and creamy flavors. It’s easy to make, incredibly versatile, and perfect for any occasion—from backyard BBQs to quick family dinners.

Once you try it, you’ll understand why it’s such a crowd favorite. Add this Mexican street corn pasta salad is a must-try dish to your menu, and watch it become a staple everyone requests again and again.

Laura Bush Cowboy Cookies Classic Recipe (Thick, Chewy & Loaded with Flavor!)

Few cookie recipes have achieved legendary status quite like the Laura Bush Cowboy Cookies classic recipe. Known for their hearty texture and irresistible mix of flavors, these cookies are packed with oats, chocolate chips, coconut, and crunchy pecans—making every bite rich, chewy, and completely satisfying.

Originally shared during a presidential cookie bake-off, this recipe quickly became a beloved American classic. Today, the Laura Bush Cowboy Cookies classic recipe continues to win hearts with its perfect balance of sweetness, texture, and nostalgic charm. Whether you’re baking for a crowd or just treating yourself, these cookies deliver big, bold flavor every time.

Why You’ll Love This Recipe

There’s a reason the Laura Bush Cowboy Cookies classic recipe stands the test of time—it’s simply that good.

Here’s why you’ll love it:

  • Thick, chewy texture with crispy edges
  • Loaded with mix-ins for maximum flavor
  • Perfect for sharing or gifting
  • Great for bake sales and holidays
  • Easy to make in large batches

These cookies are hearty, comforting, and completely irresistible.


Ingredients

To make the authentic Laura Bush Cowboy Cookies classic recipe, you’ll need:

  • 3 cups all-purpose flour
  • 1 tablespoon baking powder
  • 1 tablespoon baking soda
  • 1 tablespoon cinnamon
  • 1 teaspoon salt
  • 1 1/2 cups butter, softened
  • 1 1/2 cups granulated sugar
  • 1 1/2 cups brown sugar
  • 3 large eggs
  • 1 tablespoon vanilla extract
  • 3 cups old-fashioned oats
  • 2 cups chocolate chips
  • 2 cups sweetened shredded coconut
  • 2 cups chopped pecans

Ingredient Notes

The magic of the Laura Bush Cowboy Cookies classic recipe lies in its generous mix-ins and balanced ingredients. Old-fashioned oats give the cookies structure and chew, while coconut adds subtle sweetness and texture.

Pecans bring a buttery crunch that complements the rich chocolate chips. Cinnamon enhances the warmth of the cookies, giving them a comforting, homemade feel. Using both granulated and brown sugar ensures the perfect combination of crisp edges and soft centers.


Step-by-Step Instructions

1. Preheat the Oven

Preheat your oven to 350°F (175°C) and line baking sheets with parchment paper.

2. Mix Dry Ingredients

In a bowl, whisk together flour, baking powder, baking soda, cinnamon, and salt.

3. Cream Butter and Sugar

In a large bowl, beat butter, granulated sugar, and brown sugar until light and fluffy.

4. Add Eggs and Vanilla

Mix in eggs one at a time, then add vanilla extract.

5. Combine Everything

Gradually add dry ingredients, then fold in oats, chocolate chips, coconut, and pecans.

6. Scoop and Bake

Drop large spoonfuls of dough onto baking sheets and bake for 12–15 minutes until golden brown.

Tips for Perfect Results

To master the Laura Bush Cowboy Cookies classic recipe, keep these tips in mind:

  • Use room temperature butter for better mixing
  • Don’t overmix the dough
  • Chill dough for thicker cookies
  • Bake one sheet at a time for even results
  • Let cookies cool on the pan briefly before transferring

These tips ensure bakery-quality cookies every time.


Variations

While the Laura Bush Cowboy Cookies classic recipe is amazing as-is, you can easily customize it.

Nut-Free Version

Skip the pecans or replace with sunflower seeds.

Extra Chocolate

Add white chocolate chips or chunks.

Raisin Twist

Replace some chocolate chips with raisins.

Gluten-Free Option

Use a gluten-free flour blend.

What to Serve With It

These Laura Bush Cowboy Cookies classic recipe treats pair perfectly with:

  • Cold milk
  • Hot coffee or tea
  • Vanilla ice cream
  • Hot chocolate

They’re ideal for dessert platters or afternoon snacks.


Storage & Reheating

Keep your Laura Bush Cowboy Cookies classic recipe fresh with these tips:

  • Store in an airtight container for up to 5 days
  • Freeze baked cookies for up to 2 months
  • Reheat briefly in the microwave for a soft texture
  • Freeze dough for future baking

They’re perfect for making ahead and enjoying later.


Common Mistakes to Avoid

Avoid these common mistakes when making the Laura Bush Cowboy Cookies classic recipe:

  • Overbaking (leads to dry cookies)
  • Skipping parchment paper
  • Not measuring flour correctly
  • Using cold butter

Paying attention to these details ensures perfect results.


FAQs

Why are they called cowboy cookies?

They’re hearty, filling cookies packed with ingredients—perfect for a “cowboy-sized” appetite.

Can I make the dough ahead of time?

Yes! Refrigerate for up to 2 days or freeze for longer storage.

Can I reduce the sugar?

You can slightly reduce it, but it may affect texture.

Are these cookies chewy or crispy?

They’re mostly chewy with slightly crisp edges.


Final Thoughts

The Laura Bush Cowboy Cookies classic recipe is more than just a cookie—it’s a timeless favorite packed with flavor, texture, and nostalgia. From the chewy oats to the rich chocolate and crunchy pecans, every bite is a perfect balance of indulgence and comfort.

Whether you’re baking for family, friends, or just yourself, these cookies are guaranteed to impress. Once you try this Laura Bush Cowboy Cookies classic recipe, it’s sure to become a permanent favorite in your kitchen.

Crispy Pizza Chips: Fun & Addictive Snack Adventure 🍕✨

If you love pizza and crunchy snacks, get ready to meet your new obsession: crispy pizza chips. These bite-sized, cheesy delights deliver all the classic pizza flavors you crave—savory sauce, melty cheese, and bold toppings—in a crispy, snackable form that’s impossible to resist.

Whether you’re hosting a party, planning a movie night, or just looking for a fun kitchen experiment, these crispy pizza chips are quick to make and guaranteed to disappear fast. Best of all, they require just a few simple ingredients and can be customized to match your favorite pizza combinations.

Why You’ll Love This Recipe

There’s a reason crispy pizza chips are becoming such a popular snack—they’re easy, fun, and incredibly satisfying.

Here’s why you’ll love them:

  • Ready in under 20 minutes
  • Low-carb and keto-friendly option
  • Packed with bold pizza flavor
  • Perfect for parties and snacking
  • Highly customizable with toppings

They’re the perfect mix of crunchy, cheesy, and savory goodness.


Ingredients

To make these irresistible crispy pizza chips, you’ll need:

  • 1 1/2 cups shredded mozzarella cheese
  • 1/2 cup grated Parmesan cheese
  • 1/2 teaspoon Italian seasoning
  • 1/4 teaspoon garlic powder
  • Pepperoni slices (optional)
  • Marinara sauce for dipping

Ingredient Notes

The magic of crispy pizza chips lies in the cheese. Mozzarella provides that classic stretch and mild flavor, while Parmesan adds a sharp, nutty bite and helps create that crispy texture.

Italian seasoning and garlic powder enhance the pizza flavor without needing a full sauce layer. If you’re adding toppings like pepperoni, keep them small so they crisp up nicely without weighing down the chips.


Step-by-Step Instructions

1. Preheat the Oven

Preheat your oven to 375°F (190°C) and line a baking sheet with parchment paper.

2. Create Cheese Mounds

Spoon small piles of mozzarella onto the baking sheet, spacing them apart.

3. Add Toppings

Sprinkle Parmesan, Italian seasoning, and garlic powder on top. Add a small piece of pepperoni if desired.

4. Bake Until Crispy

Bake for 8–10 minutes or until edges are golden and crispy.

5. Cool and Serve

Let the chips cool slightly—they’ll crisp up even more as they set.

Tips for Perfect Results

To get the best crispy pizza chips, keep these tips in mind:

  • Use parchment paper to prevent sticking
  • Keep cheese piles small and evenly spaced
  • Watch closely to avoid burning
  • Let chips cool fully for maximum crispiness
  • Use freshly shredded cheese for best texture

These simple techniques make a big difference in the final result.


Variations

One of the best things about crispy pizza chips is how easy they are to customize.

Supreme Style

Add tiny bits of sausage, peppers, and olives.

Spicy Version

Sprinkle red pepper flakes or use spicy pepperoni.

Veggie Option

Top with mushrooms or spinach.

Cheddar Blend

Mix in cheddar for a sharper flavor.

What to Serve With It

These crispy pizza chips are perfect on their own, but even better with dips and sides.

  • Marinara sauce
  • Ranch dressing
  • Garlic aioli
  • Side salad for balance

They’re a great addition to snack boards or appetizer spreads.


Storage & Reheating

If you have leftovers (which is rare!), crispy pizza chips can be stored easily.

  • Store in an airtight container at room temperature for up to 2 days
  • Re-crisp in the oven for a few minutes if needed
  • Avoid refrigeration to prevent sogginess

They’re best enjoyed fresh but can still be revived with a quick bake.


Common Mistakes to Avoid

Avoid these common mistakes when making crispy pizza chips:

  • Using too much cheese per chip
  • Not spacing them properly
  • Overbaking or burning
  • Skipping parchment paper

Avoiding these ensures perfectly crispy results.


FAQs

Are crispy pizza chips low-carb?

Yes! They’re naturally low in carbs, especially without added toppings.

Can I make them in an air fryer?

Absolutely—cook at 375°F for 5–7 minutes.

What cheese works best?

Mozzarella and Parmesan are the ideal combination.

Why aren’t my chips crispy?

They may need more cooling time or thinner cheese portions.


Final Thoughts

These crispy pizza chips are the ultimate snack adventure—fun to make, endlessly customizable, and completely addictive. With their crunchy texture and bold pizza flavor, they’re perfect for any occasion, from casual snacking to entertaining guests.

Once you try them, you’ll see just how easy it is to turn simple ingredients into something truly exciting. Keep this crispy pizza chips recipe handy—you’ll be making it again and again!

Quick & Delicious Sausage Egg Breakfast Rolls – The Perfect Brunch Bite!

If you’re searching for a satisfying, crowd-pleasing breakfast that’s easy to make and even easier to love, these sausage egg breakfast rolls are about to become your new favorite. Packed with fluffy scrambled eggs, savory sausage, and gooey melted cheese, all wrapped in golden, buttery dough, they’re the perfect bite-sized comfort food.

Whether you’re hosting brunch, meal prepping for busy mornings, or just craving something hearty, these sausage egg breakfast rolls deliver big flavor with minimal effort. They’re portable, customizable, and guaranteed to disappear fast!

Why You’ll Love This Recipe

These sausage egg breakfast rolls are everything you want in a morning meal—simple, satisfying, and incredibly delicious.

Here’s why they stand out:

  • Perfect for breakfast, brunch, or meal prep
  • Easy to make with simple ingredients
  • Portable and great for on-the-go eating
  • Family-friendly and freezer-friendly
  • Customizable with your favorite fillings

Once you try them, they’ll quickly become a staple in your breakfast rotation.


Ingredients

To make these irresistible sausage egg breakfast rolls, you’ll need:

  • 1 can refrigerated crescent roll dough or pizza dough
  • 6 large eggs
  • 1/2 lb breakfast sausage
  • 1 cup shredded cheese (cheddar or mozzarella)
  • 2 tablespoons milk
  • Salt and black pepper to taste
  • 1 tablespoon butter

Ingredient Notes

The key to flavorful sausage egg breakfast rolls is using high-quality ingredients. Breakfast sausage adds a savory, slightly spiced flavor, while eggs provide a soft, fluffy texture that balances the richness.

Crescent roll dough is a convenient option that bakes up beautifully golden and flaky, but pizza dough works well if you prefer a heartier bite. Cheese adds that irresistible melt factor—cheddar for sharpness or mozzarella for stretch.


Step-by-Step Instructions

1. Cook the Sausage

In a skillet over medium heat, cook the sausage until browned and fully cooked. Remove and set aside.

2. Scramble the Eggs

In a bowl, whisk eggs with milk, salt, and pepper. Cook in the same skillet with butter until softly scrambled.

3. Prepare the Dough

Roll out the crescent or pizza dough and cut into rectangles or triangles.

4. Fill and Roll

Add sausage, scrambled eggs, and cheese onto each piece of dough. Roll tightly into a log shape.

5. Bake

Place rolls on a baking sheet and bake at 375°F (190°C) for 12–15 minutes or until golden brown.

6. Serve Warm

Let cool slightly before serving.

Tips for Perfect Results

To make the best sausage egg breakfast rolls, keep these tips in mind:

  • Don’t overcook the eggs—they should be soft and slightly creamy
  • Drain excess grease from sausage
  • Seal the dough edges היט to prevent leaks
  • Use parchment paper for easy cleanup
  • Brush tops with butter for extra golden color

These tips ensure your rolls come out perfectly every time.


Variations

One of the best things about sausage egg breakfast rolls is how versatile they are.

Veggie Version

Add spinach, bell peppers, or mushrooms.

Spicy Kick

Use spicy sausage or add hot sauce.

Bacon Swap

Replace sausage with crispy bacon.

Cheesy Deluxe

Mix multiple cheeses like cheddar and pepper jack.

What to Serve With It

These sausage egg breakfast rolls pair perfectly with classic breakfast sides.

  • Fresh fruit salad
  • Yogurt parfait
  • Hash browns or breakfast potatoes
  • Coffee or fresh juice

They’re perfect for brunch spreads or quick weekday breakfasts.


Storage & Reheating

These sausage egg breakfast rolls are ideal for meal prep.

  • Store in the fridge for up to 4 days
  • Freeze for up to 2 months
  • Reheat in oven or air fryer for best texture
  • Microwave for quick reheating (slightly softer texture)

They’re a convenient grab-and-go option for busy mornings.


Common Mistakes to Avoid

Avoid these common mistakes when making sausage egg breakfast rolls:

  • Overfilling the dough
  • Not sealing edges properly
  • Overcooking eggs
  • Skipping preheating the oven

Avoiding these ensures perfect rolls every time.


FAQs

Can I make sausage egg breakfast rolls ahead of time?

Yes! Prepare and refrigerate or freeze before baking.

What dough works best?

Crescent roll dough is easiest, but pizza dough works too.

Can I make them vegetarian?

Absolutely—just skip the sausage and add veggies.

How do I keep them from getting soggy?

Avoid excess moisture and reheat in the oven instead of microwave.


Final Thoughts

These sausage egg breakfast rolls are the ultimate brunch bite—warm, cheesy, and packed with savory goodness. They’re quick to prepare, easy to customize, and perfect for feeding a crowd or prepping ahead for the week.

Once you try this recipe, you’ll see why it’s such a favorite. Whether for a cozy weekend brunch or a busy weekday morning, these sausage egg breakfast rolls deliver comfort and flavor in every bite.