Satisfy Your Cravings with Smashburger Quesadillas – The Ultimate Comfort Food!

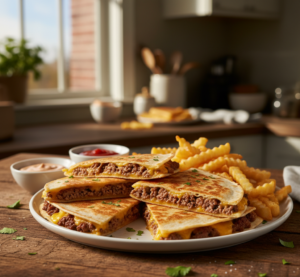
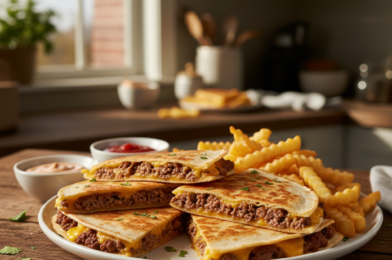
If you’ve ever found yourself torn between a juicy burger and a cheesy quesadilla, this recipe is about to solve that dilemma in the most delicious way possible. These smashburger quesadillas combine the crispy, caramelized goodness of a smashburger with the gooey, melty satisfaction of a quesadilla—all wrapped into one irresistible meal.

Perfect for weeknight dinners, game days, or indulgent weekend treats, smashburger quesadillas are quick to make, packed with flavor, and guaranteed to satisfy even the biggest cravings. Once you try this mashup, it might just become your new go-to comfort food.

Why You’ll Love This Recipe

There’s something incredibly satisfying about these smashburger quesadillas—they deliver bold flavor with minimal effort.

Here’s why you’ll love them:

  • Combines two comfort food favorites in one dish
  • Crispy on the outside, juicy and cheesy inside
  • Ready in under 30 minutes
  • Easily customizable with your favorite burger toppings
  • Perfect for sharing or serving a crowd

This is the kind of recipe that turns simple ingredients into something unforgettable.
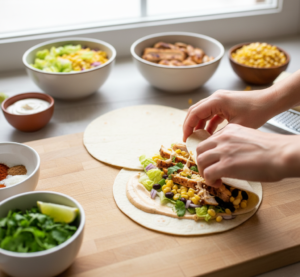
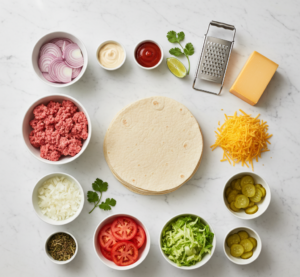

Ingredients

To make the best smashburger quesadillas, you’ll need:

  • 1 lb ground beef (80/20 preferred)
  • 4 large flour tortillas
  • 1 1/2 cups shredded cheese (cheddar, American, or blend)
  • 1/2 small onion, finely chopped
  • Salt and black pepper to taste
  • 2 tablespoons butter or oil

Optional Toppings:

  • Pickles
  • Lettuce
  • Tomato slices
  • Burger sauce or mayo

Ingredient Notes

The magic of smashburger quesadillas comes from the technique as much as the ingredients. Using ground beef with a bit of fat ensures juicy, flavorful patties, while a good melting cheese like cheddar or American creates that signature gooey texture.

Finely chopped onions add a subtle sweetness and depth, and tortillas act as the perfect crispy vessel to hold everything together. You can easily customize toppings to match your favorite burger flavors.


Step-by-Step Instructions

1. Preheat Your Pan

Heat a large skillet or griddle over medium-high heat.

2. Smash the Beef

Divide ground beef into portions, place onto the skillet, and smash thin using a spatula. Season with salt and pepper.

3. Cook Until Crispy

Cook for 2–3 minutes until edges are crispy, then flip and cook briefly.

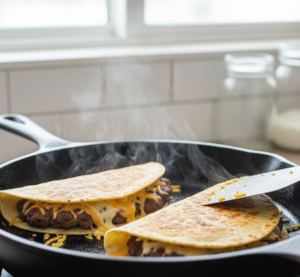
4. Add Tortilla and Cheese

Place a tortilla over the beef, sprinkle cheese, and let it melt.

5. Fold and Crisp

Fold the tortilla in half and cook until golden and crispy on both sides.
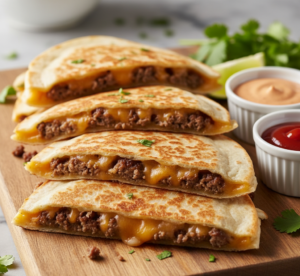
6. Slice and Serve

Remove from heat, slice into wedges, and serve hot.

Tips for Perfect Results

To master smashburger quesadillas, keep these tips in mind:

  • Use high heat for a proper smashburger crust
  • Don’t overcrowd the pan
  • Press the beef thin for even cooking
  • Use enough cheese to bind everything together
  • Let the tortilla crisp fully before flipping

These tips help you achieve that perfect balance of crispy and juicy.
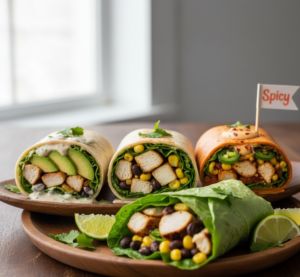

Variations

One of the best things about smashburger quesadillas is how versatile they are.

Bacon Cheeseburger Style

Add crispy bacon for extra flavor.

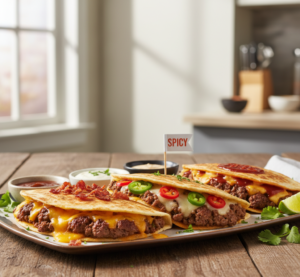
Spicy Jalapeño Version

Include sliced jalapeños and pepper jack cheese.

BBQ Burger Quesadilla

Drizzle BBQ sauce into the filling.

Low-Carb Option

Use low-carb tortillas or lettuce wraps.

What to Serve With It

These smashburger quesadillas pair perfectly with classic comfort sides.

  • French fries or sweet potato fries
  • Onion rings
  • Coleslaw
  • Pickles and dipping sauces

They’re perfect for casual meals or entertaining guests.


Storage & Reheating

If you have leftovers, smashburger quesadillas can be stored and reheated easily.

  • Store in an airtight container for up to 2 days
  • Reheat in a skillet or air fryer for crispiness
  • Avoid microwaving if possible

Fresh is best, but proper reheating keeps them tasty.


Common Mistakes to Avoid

Avoid these common mistakes when making smashburger quesadillas:

  • Not smashing the beef thin enough
  • Cooking on low heat
  • Overfilling the tortilla
  • Skipping the crisping step

Getting these right ensures the perfect texture and flavor.


FAQs

Can I use ground turkey instead of beef?

Yes, but beef provides the best flavor and juiciness.

What cheese works best?

Cheddar, American, or a blend melts beautifully.

Can I make these ahead of time?

They’re best fresh, but you can prep ingredients in advance.

Can I use corn tortillas?

Flour tortillas work best for flexibility and crispiness.


Final Thoughts

These smashburger quesadillas are the ultimate comfort food mashup—crispy, cheesy, juicy, and packed with bold flavor. They’re quick to make, endlessly customizable, and perfect for satisfying cravings any day of the week.

Once you try this recipe, it’s bound to become a staple in your kitchen. Whether you’re cooking for yourself or sharing with friends and family, these smashburger quesadillas deliver every single time.

Southwest Chicken Wraps: Easy & Healthy Lunch Recipes

If you’re looking for a fresh, flavorful, and satisfying meal that doesn’t take hours to prepare, these Southwest chicken wraps are exactly what you need. Loaded with juicy chicken, crisp veggies, and a zesty Southwest-inspired sauce, they deliver bold flavor in every bite while still being light and nutritious.

Perfect for busy weekdays, meal prep, or even a quick dinner, these Southwest chicken wraps strike the perfect balance between convenience and wholesome ingredients. Whether you’re trying to eat healthier or just want something delicious and easy, this recipe checks all the boxes.

Why You’ll Love This Recipe

There’s a lot to love about these Southwest chicken wraps, especially if you enjoy meals that are both healthy and satisfying.

Here’s why they’re a go-to favorite:

  • Quick and easy to prepare in under 30 minutes
  • Packed with protein and fresh vegetables
  • Perfect for meal prep and on-the-go lunches
  • Customizable to fit your taste preferences
  • Balanced flavors with a hint of spice

They’re a great way to enjoy a nutritious meal without sacrificing flavor.


Ingredients

To make these delicious Southwest chicken wraps, you’ll need:

  • 2 cups cooked chicken (grilled or shredded)
  • 4 large whole wheat or flour tortillas
  • 1 cup romaine or mixed greens
  • 1/2 cup black beans (rinsed and drained)
  • 1/2 cup corn kernels
  • 1/2 cup cherry tomatoes, halved
  • 1/2 cup shredded cheese (cheddar or Mexican blend)
  • 1/4 cup red onion, finely chopped

For the Southwest Sauce:

  • 1/2 cup Greek yogurt or sour cream
  • 1 tablespoon lime juice
  • 1 teaspoon chili powder
  • 1/2 teaspoon cumin
  • Salt and pepper to taste

Ingredient Notes

The beauty of these Southwest chicken wraps lies in their fresh, vibrant ingredients. Grilled chicken adds lean protein, while black beans and corn bring fiber and texture. The vegetables add crunch and color, making the wraps both visually appealing and nutritious.

The creamy Southwest sauce ties everything together with a tangy, slightly spicy flavor. Using Greek yogurt instead of sour cream is a great way to keep the wraps lighter while still maintaining that creamy consistency.


Step-by-Step Instructions

1. Prepare the Sauce

In a small bowl, mix Greek yogurt, lime juice, chili powder, cumin, salt, and pepper until smooth.

2. Prepare the Filling

In a large bowl, combine chicken, black beans, corn, tomatoes, onion, and cheese. Toss lightly.

3. Assemble the Wraps

Lay tortillas flat and add a layer of greens. Spoon the chicken mixture on top and drizzle with Southwest sauce.

4. Wrap It Up

Fold in the sides and roll tightly into a wrap.

5. Slice and Serve

Cut in half and serve immediately or wrap for later.

Tips for Perfect Results

To make the best Southwest chicken wraps, keep these tips in mind:

  • Warm tortillas slightly for easier rolling
  • Don’t overfill to prevent tearing
  • Use fresh lime juice for the best flavor
  • Chill the filling slightly for meal prep wraps
  • Add sauce just before serving to avoid sogginess

These simple tips help ensure perfect wraps every time.


Variations

One of the best things about Southwest chicken wraps is how easy they are to customize.

Spicy Version

Add jalapeños or hot sauce for extra heat.

Low-Carb Option

Use lettuce wraps instead of tortillas.

Vegetarian Version

Replace chicken with grilled tofu or extra beans.

Avocado Upgrade

Add sliced avocado for creaminess and healthy fats.

What to Serve With It

These Southwest chicken wraps pair perfectly with light, fresh sides.

  • Fresh fruit salad
  • Tortilla chips and salsa
  • Side of guacamole
  • Iced tea or lemonade

They’re great as a standalone meal or part of a larger lunch spread.


Storage & Reheating

These Southwest chicken wraps are excellent for meal prep.

  • Store in the refrigerator for up to 3 days
  • Wrap tightly in foil or plastic wrap
  • Keep sauce separate if storing longer
  • No reheating needed—best served cold or room temperature

They’re perfect for grab-and-go lunches.


Common Mistakes to Avoid

Avoid these common mistakes when making Southwest chicken wraps:

  • Overfilling the tortilla
  • Adding too much sauce
  • Using soggy or wilted greens
  • Not draining beans properly

Paying attention to these details ensures the best texture and flavor.


FAQs

Can I make Southwest chicken wraps ahead of time?

Yes! Just store the sauce separately and assemble before eating.

What’s the best chicken to use?

Grilled, baked, or rotisserie chicken all work well.

Are these wraps healthy?

Yes, especially when using whole wheat tortillas and Greek yogurt.

Can I freeze them?

It’s not recommended due to the fresh vegetables and sauce.


Final Thoughts

These Southwest chicken wraps are the perfect combination of flavor, convenience, and nutrition. They’re quick to make, easy to customize, and ideal for everything from meal prep to casual lunches.

Once you try this recipe, you’ll see just how simple it is to create a healthy, satisfying meal that doesn’t compromise on taste. Keep these Southwest chicken wraps in your regular rotation—you won’t regret it.

Ultimate Cheesy Ground Beef Melt (Easy, Gooey & Irresistible!)

If you’re craving something hearty, cheesy, and completely satisfying, this Ultimate Cheesy Ground Beef Melt is about to hit the spot. Imagine perfectly seasoned ground beef layered with gooey melted cheese, all tucked between crispy, golden bread—it’s comfort food at its absolute best.

This recipe is perfect for busy weeknights, lazy weekends, or anytime you want a quick meal that feels indulgent without requiring complicated steps. The beauty of this Ultimate Cheesy Ground Beef Melt is that it delivers big, bold flavors using simple ingredients you probably already have in your kitchen.

Why You’ll Love This Recipe

There’s a reason this Ultimate Cheesy Ground Beef Melt quickly becomes a favorite—it checks every box for flavor, convenience, and comfort.

Here’s why you’ll love it:

  • Quick and easy to make in under 30 minutes
  • Loaded with rich, cheesy flavor
  • Perfect for lunch, dinner, or even game day
  • Uses simple, budget-friendly ingredients
  • Easily customizable with your favorite toppings

It’s the kind of recipe you turn to when you want something warm, filling, and guaranteed to satisfy.


Ingredients

To make this delicious Ultimate Cheesy Ground Beef Melt, you’ll need:

  • 1 pound ground beef
  • 4 slices of bread (Texas toast or sandwich bread)
  • 1 1/2 cups shredded cheese (cheddar, mozzarella, or a blend)
  • 1/2 small onion, finely chopped
  • 2 cloves garlic, minced
  • 2 tablespoons butter
  • 1 tablespoon Worcestershire sauce
  • Salt and black pepper to taste
  • Optional: pickles, mustard, or mayo


Ingredient Notes

The key to a perfect Ultimate Cheesy Ground Beef Melt is using the right combination of ingredients. Ground beef should have a bit of fat (like 80/20) for flavor and juiciness. The cheese is where you can really customize—cheddar gives a sharp bite, while mozzarella creates that irresistible stretch.

Fresh garlic and onion build a savory base, while Worcestershire sauce adds a subtle depth that enhances the beef. Choosing sturdy bread like Texas toast helps hold everything together without getting soggy.


Step-by-Step Instructions

1. Cook the Ground Beef

In a skillet over medium heat, cook the ground beef with chopped onion until browned. Add garlic, Worcestershire sauce, salt, and pepper, and cook for another 2–3 minutes.

2. Prepare the Bread

Butter one side of each slice of bread. This will help create that golden, crispy exterior.

3. Assemble the Melt

Place one slice of bread butter-side down in a skillet. Add a layer of cheese, then the beef mixture, followed by more cheese. Top with another slice of bread.

4. Cook Until Golden

Cook over medium heat until the bread is golden brown and the cheese is melted. Flip carefully and cook the other side.

5. Slice and Serve

Remove from heat, let it rest briefly, then slice and serve warm.

Tips for Perfect Results

To make the best Ultimate Cheesy Ground Beef Melt, follow these expert tips:

  • Drain excess grease from the beef for better texture
  • Use medium heat to avoid burning the bread
  • Layer cheese on both sides of the beef for maximum melt
  • Press gently while cooking for even browning
  • Let it rest for a minute before slicing

These small details make a big difference in achieving the perfect melt.


Variations

One of the best things about the Ultimate Cheesy Ground Beef Melt is how easy it is to customize.

Classic Cheeseburger Melt

Add pickles, ketchup, and mustard for a burger-style twist.

Spicy Version

Include jalapeños or hot sauce for a kick.

Mushroom Swiss Melt

Add sautéed mushrooms and Swiss cheese.

Low-Carb Option

Use low-carb bread or lettuce wraps.

What to Serve With It

This Ultimate Cheesy Ground Beef Melt pairs perfectly with simple sides that complement its richness.

  • French fries or sweet potato fries
  • Coleslaw
  • Pickles or chips
  • Tomato soup for dipping

It’s a complete comfort meal when paired with your favorite sides.


Storage & Reheating

If you have leftovers, this Ultimate Cheesy Ground Beef Melt can still taste great with proper storage.

  • Store in an airtight container in the fridge for up to 2 days
  • Reheat in a skillet or air fryer for best results
  • Avoid microwaving to maintain crispiness

Fresh is always best, but reheating properly keeps it delicious.


Common Mistakes to Avoid

Avoid these common mistakes when making Ultimate Cheesy Ground Beef Melt:

  • Using too much grease in the beef
  • Cooking on heat that’s too high
  • Not using enough cheese
  • Skipping the butter on the bread

Avoiding these ensures a perfectly crispy, cheesy result.


FAQs

Can I use ground turkey instead of beef?

Yes, ground turkey works as a lighter alternative.

What’s the best cheese for melts?

Cheddar, mozzarella, or a blend works best.

Can I make this ahead of time?

You can prepare the beef mixture ahead, but assemble fresh for best results.

Can I use a panini press?

Absolutely! It works great for even cooking and crispiness.


Final Thoughts

This Ultimate Cheesy Ground Beef Melt is everything you want in a comfort meal—crispy, cheesy, savory, and incredibly satisfying. It’s simple to make, endlessly customizable, and perfect for any time you need a quick, delicious meal.

Once you try this recipe, it’s bound to become a go-to favorite in your kitchen. Whether for lunch, dinner, or a weekend treat, this Ultimate Cheesy Ground Beef Melt delivers every single time.