Sweet Potato Taco Bowl – Colorful, Hearty & Flavor-Packed

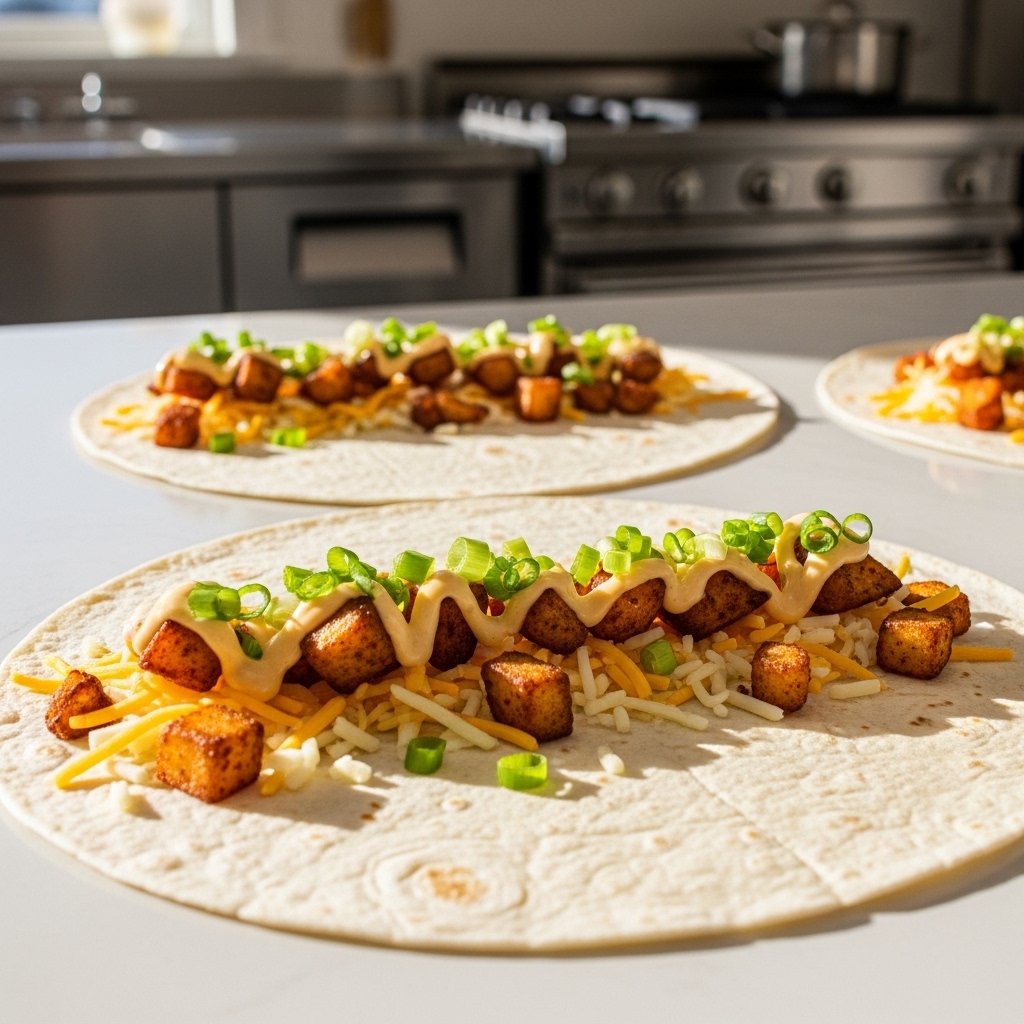
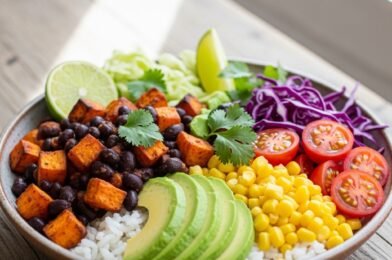
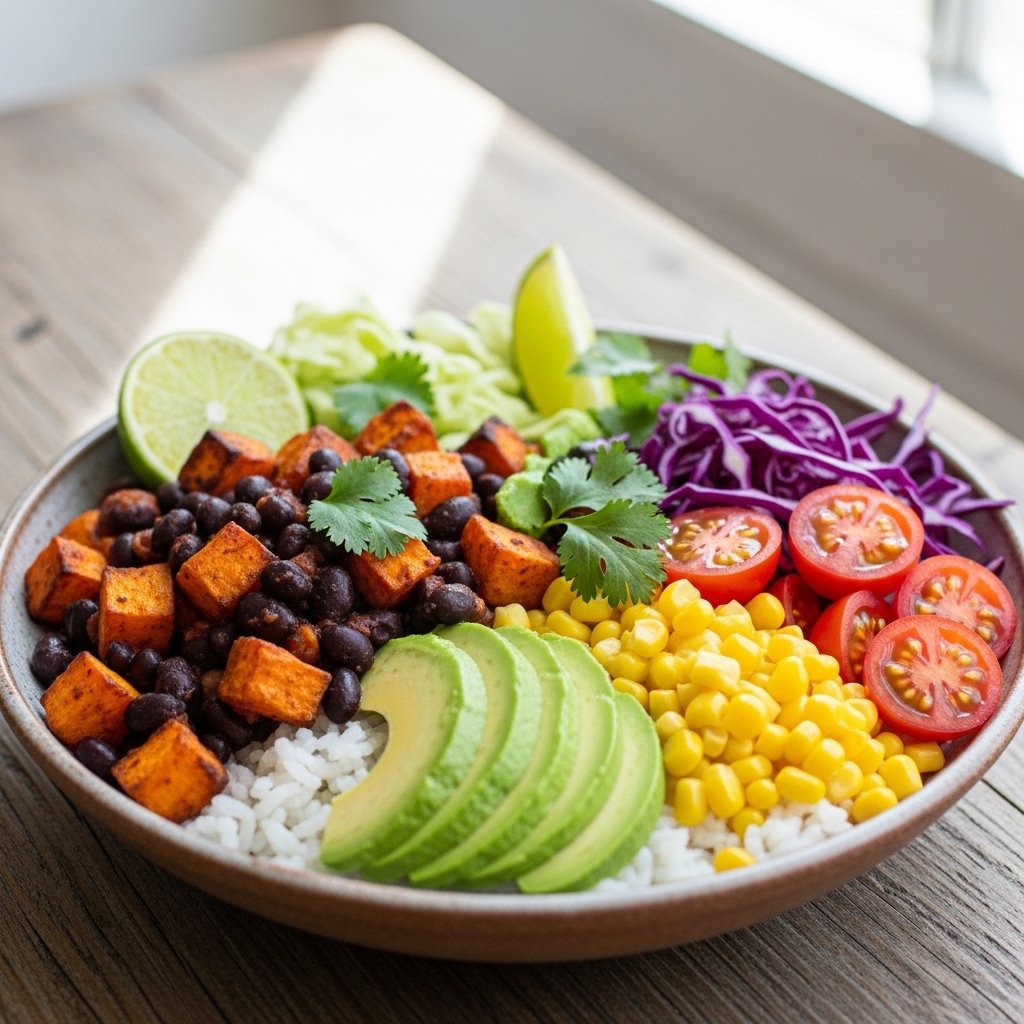
If you’re looking for a meal that’s vibrant, nourishing, and seriously satisfying, this sweet potato taco bowl is about to earn a permanent spot in your weekly rotation. It’s loaded with roasted sweet potatoes, seasoned black beans, fluffy rice, crisp veggies, creamy avocado, and your favorite taco-inspired toppings—all layered into one colorful bowl.

What makes this sweet potato taco bowl so special is how it balances comfort and freshness in every bite. The sweet potatoes are caramelized and tender, the beans add protein and fiber, and the toppings bring brightness, crunch, and creaminess. Whether you’re meal prepping for the week, making a healthy family dinner, or just craving a wholesome lunch, this recipe checks every box.

Why You’ll Love This Sweet Potato Taco Bowl

This bowl is one of those recipes that feels both wholesome and exciting.

What Makes This Bowl So Good

  • Packed with flavor and texture
  • Naturally colorful and fresh
  • Great for meal prep
  • Vegetarian and easy to customize
  • Full of fiber and nutrients
  • Satisfying enough for lunch or dinner

It’s the kind of meal that feels comforting without being heavy, and every ingredient brings something valuable to the bowl.

Ingredients for Sweet Potato Taco Bowl

To build the perfect sweet potato taco bowl, you’ll need:

For the Roasted Sweet Potatoes

  • 2 medium sweet potatoes, peeled and cubed
  • 2 tablespoons olive oil
  • 1 teaspoon chili powder
  • 1 teaspoon smoked paprika
  • 1/2 teaspoon garlic powder
  • Salt and pepper to taste

Bowl Base

  • 2 cups cooked rice (white, brown, or cilantro lime rice)
  • 1 can black beans, drained and rinsed
  • 1 cup corn kernels

Fresh Toppings

  • 1 avocado, sliced
  • 1 cup halved cherry tomatoes
  • 1 cup shredded red cabbage
  • 1/4 cup chopped cilantro
  • Lime wedges

Optional Sauce

  • Greek yogurt or sour cream
  • Lime juice
  • Hot sauce

The combination of sweet potatoes and taco seasoning creates a naturally sweet-savory flavor that makes this bowl unforgettable.

Ingredient Notes and Flavor Tips

Why Sweet Potatoes Work So Well

Sweet potatoes add:

  • Natural sweetness
  • Fiber
  • Creamy texture

When roasted properly, they develop caramelized edges that add depth to the bowl.

Rice Options

Try:

  • Brown rice for extra fiber
  • White rice for softness
  • Cauliflower rice for lighter option

Add More Protein

Want to make it even heartier? Add:

  • Grilled chicken
  • Ground turkey taco meat
  • Tofu or tempeh

This recipe is very flexible.

How to Make a Sweet Potato Taco Bowl

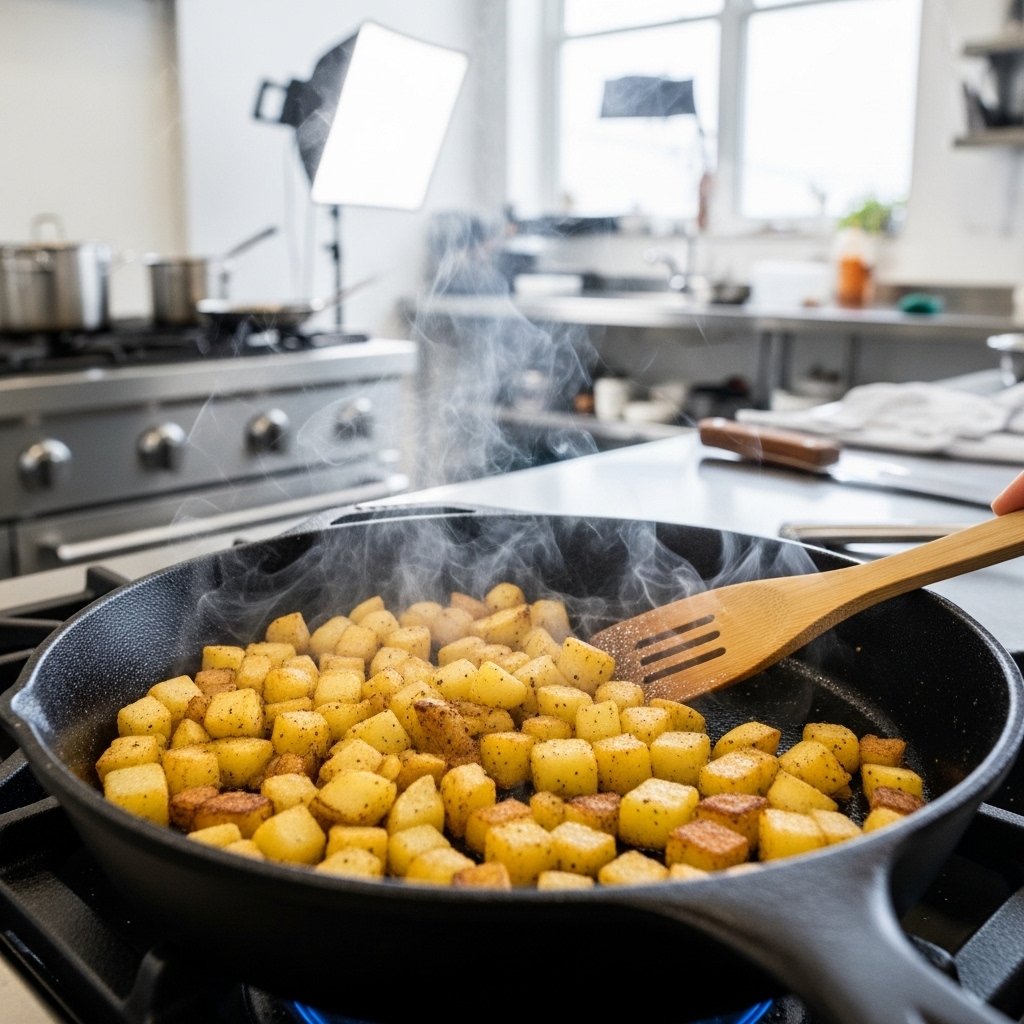
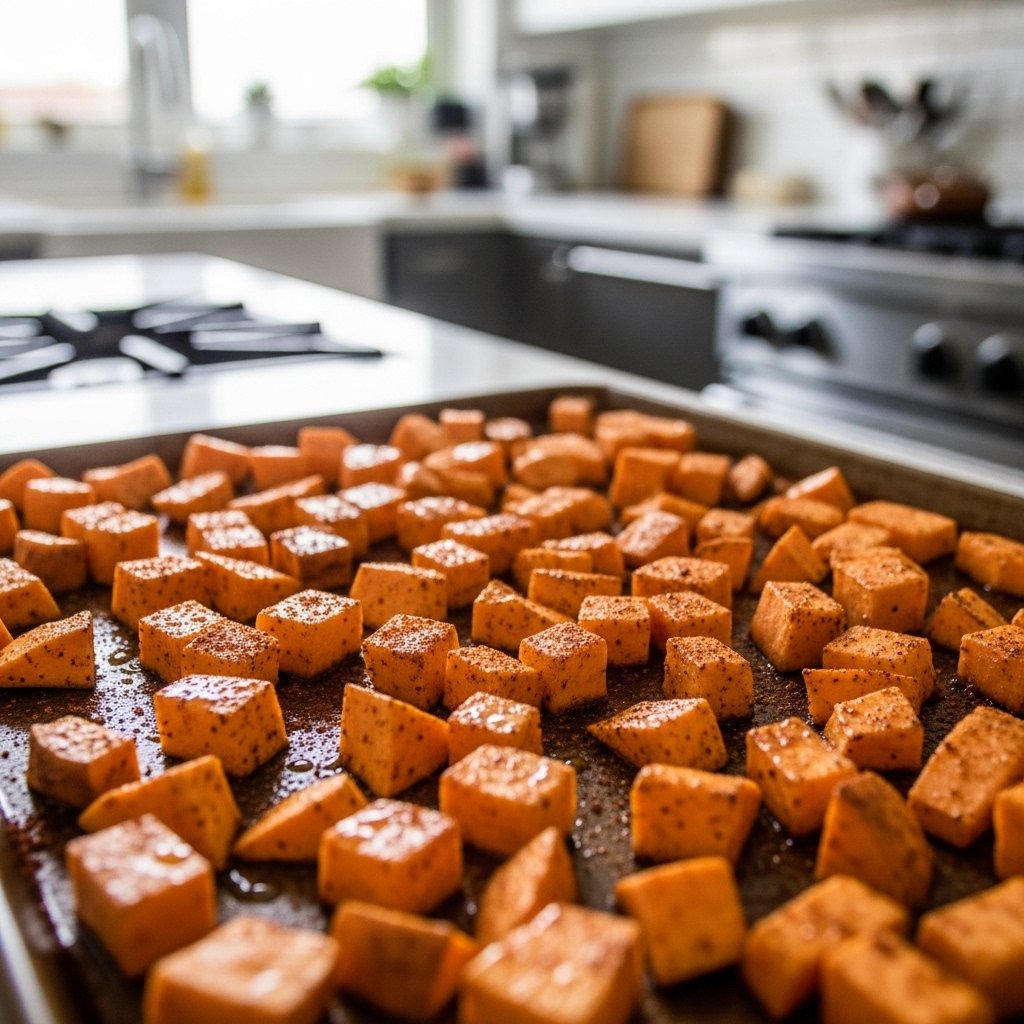
Step 1: Roast the Sweet Potatoes

Preheat oven to 425°F.

Toss cubed sweet potatoes with olive oil, chili powder, smoked paprika, garlic powder, salt, and pepper.

Spread them on a baking sheet in a single layer.

Roast for 25 to 30 minutes, flipping halfway through, until:

  • Golden edges form
  • Centers are tender

This roasting step is what builds the bowl’s signature flavor.

Step 2: Warm the Beans and Prepare the Base

While the sweet potatoes roast:

  • Warm black beans in a small skillet
  • Heat corn lightly if desired
  • Cook or reheat rice

Season beans with:

  • Cumin
  • Garlic powder
  • Pinch of salt

This adds extra taco flavor throughout the bowl.

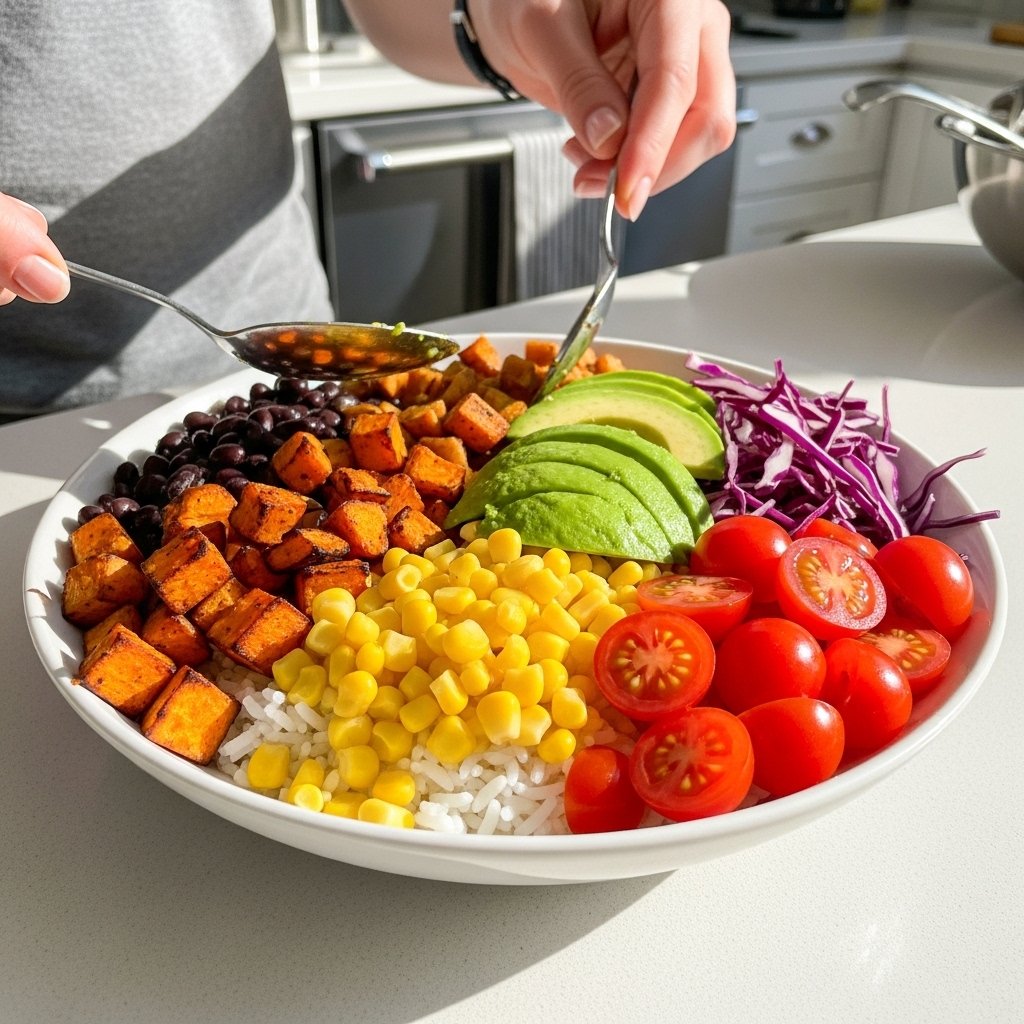
Step 3: Assemble the Bowls

Divide rice into bowls.

Top with:

  • Roasted sweet potatoes
  • Black beans
  • Corn
  • Tomatoes
  • Red cabbage
  • Avocado

Finish with:

  • Cilantro
  • Lime juice
  • Sauce drizzle

Layering ingredients thoughtfully makes the bowl feel fresh and restaurant-worthy.

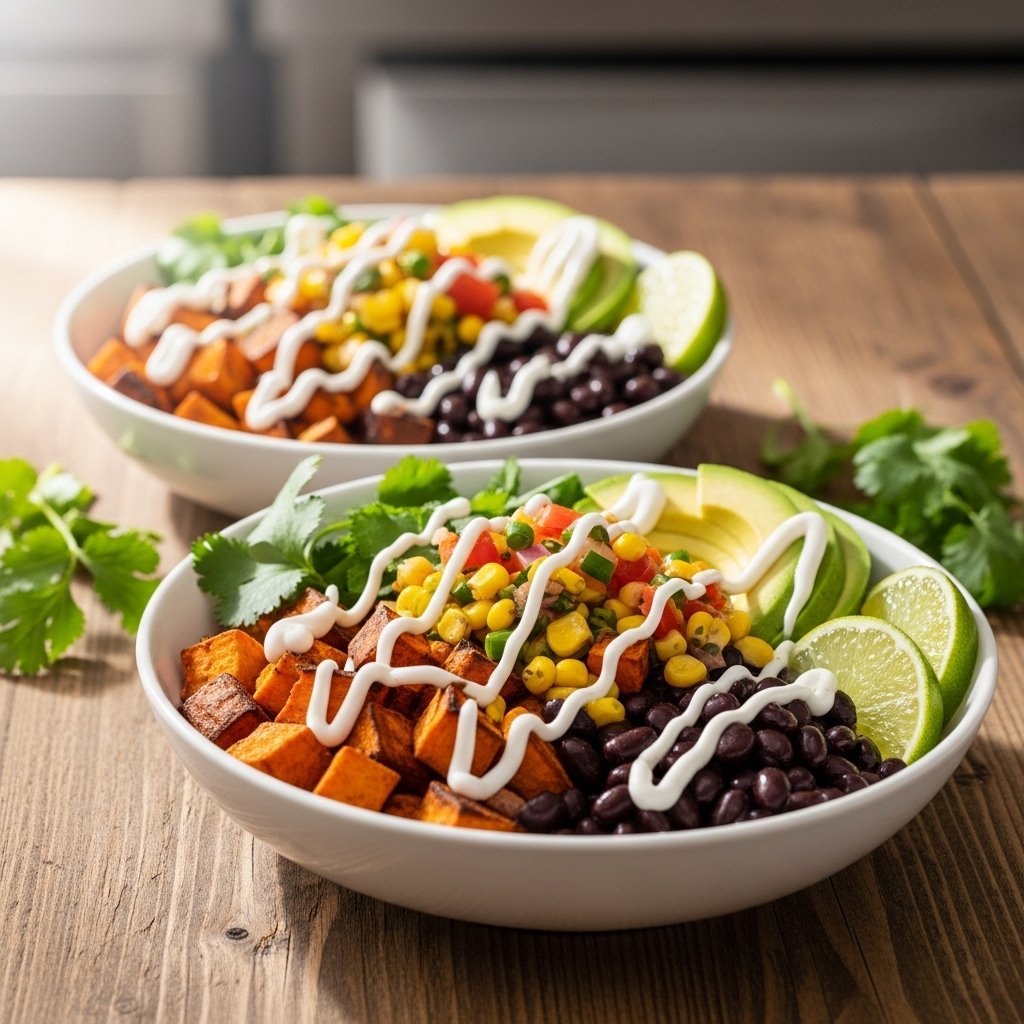
Step 4: Add Sauce and Serve

For a quick creamy drizzle, mix:

  • Greek yogurt or sour cream
  • Lime juice
  • Hot sauce

Drizzle over the top before serving.

That final sauce adds:

  • Creaminess
  • Tang
  • Extra flavor

It ties everything together beautifully.

Tips for the Best Sweet Potato Taco Bowl

To make the best sweet potato taco bowl every time:

  • Cut sweet potatoes evenly for even roasting
  • Don’t overcrowd the baking sheet
  • Season every layer
  • Add avocado just before serving
  • Finish with fresh lime juice

These simple tips make a huge difference.

Variations and Customizations

This bowl is incredibly adaptable.

Delicious Add-Ons

  • Pickled onions
  • Jalapeños
  • Shredded cheese
  • Crushed tortilla chips

Make It Vegan

  • Use dairy-free sauce
  • Add extra beans or tofu

Make It Spicier

  • Add chipotle sauce
  • Sprinkle cayenne

This bowl can easily match your preferences.

What to Serve With a Sweet Potato Taco Bowl

This bowl is satisfying on its own, but pairs well with:

  • Tortilla chips and salsa
  • Guacamole
  • Fresh fruit
  • Mexican street corn

Perfect for:

  • Meal prep lunches
  • Weeknight dinners
  • Casual gatherings

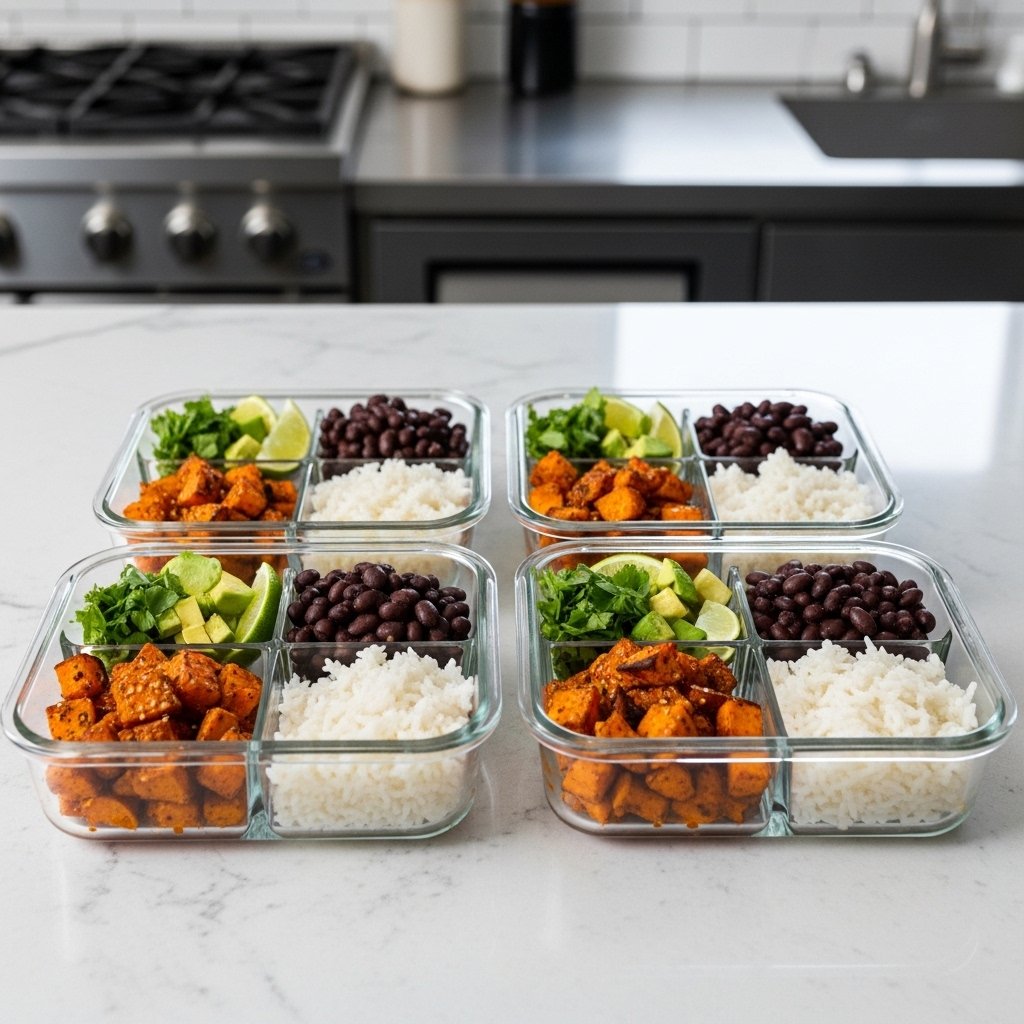
Storage and Meal Prep Tips

This sweet potato taco bowl is meal-prep friendly.

Refrigerate

  • Store components separately up to 4 days

Reheat

  • Warm rice, beans, and potatoes before serving
  • Add fresh toppings afterward

Keeping ingredients separate helps preserve texture.

Common Mistakes to Avoid

For the best bowl, avoid:

  • Overcrowding sweet potatoes
  • Underseasoning beans
  • Using mushy avocado
  • Skipping fresh lime
  • Mixing all components too early for meal prep

Freshness and texture matter.

Frequently Asked Questions

Can I make sweet potato taco bowls ahead?

Yes. They’re excellent for meal prep.

What protein goes best with this bowl?

Black beans, chicken, turkey, tofu, or tempeh.

Can I use frozen sweet potatoes?

Fresh works best for texture, but frozen can work in a pinch.

How do I keep avocado fresh?

Add it just before serving.

Is this recipe gluten-free?

Yes, as long as toppings and sauces are gluten-free.

Final Thoughts

This sweet potato taco bowl is the perfect example of how healthy food can still feel hearty, exciting, and deeply satisfying. It’s colorful, flavorful, and packed with nourishing ingredients that leave you feeling full and energized.

Whether you’re meal prepping for the week, building a quick family dinner, or simply craving something fresh and delicious, this bowl is a recipe you’ll come back to often. One bite of those roasted sweet potatoes with creamy avocado and zesty toppings, and you’ll see why it’s such a favorite.

Delicious Apple Cake: The Perfect Treat for Every Occasion!

There’s something timeless and comforting about a homemade apple cake fresh from the oven. The sweet aroma of cinnamon, buttery batter, and tender baked apples filling your kitchen is enough to make any day feel special. This delicious apple cake is moist, flavorful, and incredibly easy to make, making it the perfect treat for family gatherings, cozy weekends, holiday tables, or even a simple afternoon coffee break.

What makes this apple cake so irresistible is the balance of texture and flavor. Every slice is soft and tender with juicy apple pieces throughout, subtle spice, and just the right amount of sweetness. It’s rich enough to feel indulgent but light enough to enjoy any time of day. Whether served warm with whipped cream or enjoyed plain with tea, this cake is a classic recipe you’ll want to bake again and again.

Why You’ll Love This Apple Cake Recipe

This easy apple cake recipe is everything a homemade dessert should be: simple, comforting, and packed with flavor.

What Makes This Cake Special

  • Moist and tender texture
  • Packed with fresh apples
  • Warm cinnamon flavor
  • Easy pantry ingredients
  • Perfect for all seasons
  • Great for brunch or dessert

Unlike overly dense cakes, this apple cake stays soft for days and has a naturally rich flavor thanks to the fresh fruit.

Ingredients for Delicious Apple Cake

This classic apple cake uses simple ingredients that work beautifully together.

Dry Ingredients

  • 2 cups all-purpose flour
  • 1 teaspoon baking powder
  • 1 teaspoon baking soda
  • 1/2 teaspoon salt
  • 2 teaspoons ground cinnamon
  • 1/4 teaspoon nutmeg (optional)

Wet Ingredients

  • 3/4 cup unsalted butter, softened
  • 1 cup granulated sugar
  • 1/2 cup brown sugar
  • 3 large eggs
  • 2 teaspoons vanilla extract
  • 1/2 cup sour cream or plain Greek yogurt

Fruit

  • 3 cups peeled and chopped apples

Optional Topping

  • Powdered sugar
  • Caramel drizzle
  • Chopped nuts

For the best apple cake, use apples that hold their shape during baking.

Ingredient Notes and Best Apples to Use

Best Apples for Baking

Great options include:

  • Honeycrisp
  • Granny Smith
  • Fuji
  • Pink Lady

These apples:

  • Hold their shape
  • Offer sweet-tart balance
  • Add moisture without getting mushy

Why Sour Cream Helps

Sour cream adds:

  • Moisture
  • Tender crumb
  • Richness

It’s one of the key ingredients that makes this apple cake bakery-quality.

How to Make Delicious Apple Cake

Step 1: Prep the Pan and Oven

Preheat your oven to 350°F.

Grease a 9-inch round cake pan or springform pan and line the bottom with parchment paper.

This helps prevent sticking and ensures clean slices.

Step 2: Mix Dry Ingredients

In a medium bowl, whisk together:

  • Flour
  • Baking powder
  • Baking soda
  • Salt
  • Cinnamon
  • Nutmeg

Set aside.

Step 3: Cream Butter and Sugar

In a large mixing bowl, beat softened butter, granulated sugar, and brown sugar until light and fluffy.

Add eggs one at a time, then vanilla and sour cream.

Mix until smooth and creamy.

This creates a rich batter that stays soft after baking.

Step 4: Fold in Apples and Bake

Gradually add the dry ingredients to the wet mixture and stir until just combined.

Gently fold in chopped apples.

Pour batter into prepared pan and smooth the top.

Bake for 45 to 55 minutes, or until a toothpick inserted in the center comes out clean.

Your kitchen will smell amazing as the apples and cinnamon bake together.

Step 5: Cool and Serve

Let the cake cool in the pan for 15 minutes, then transfer to a wire rack.

Serve:

  • Warm with whipped cream
  • With vanilla ice cream
  • With caramel drizzle

Even plain, this apple cake is incredibly delicious.

Tips for the Best Apple Cake Every Time

To make the perfect apple cake:

  • Don’t overmix the batter
  • Use room temperature ingredients
  • Dice apples evenly
  • Avoid overbaking
  • Let cake cool slightly before slicing

These simple steps help keep the cake moist and tender.

Delicious Variations to Try

This apple cake recipe is wonderfully versatile.

Flavor Variations

  • Add chopped pecans or walnuts
  • Mix in raisins
  • Add a streusel topping
  • Use maple glaze

Seasonal Twists

  • Add cranberries for holidays
  • Add extra spice in fall
  • Top with cream cheese frosting

This cake easily adapts to your taste and the season.

What to Serve With Apple Cake

This cake pairs beautifully with:

  • Coffee
  • Chai tea
  • Hot cider
  • Vanilla ice cream
  • Whipped cream

It’s perfect for:

  • Holiday gatherings
  • Potlucks
  • Brunch tables
  • Cozy weekends

Storage and Reheating Tips

Apple cake stores beautifully.

Room Temperature

  • Store covered for up to 3 days

Refrigerator

  • Store up to 1 week

Freezer

  • Wrap slices and freeze up to 2 months

Warm slices slightly before serving for the best texture.

Common Mistakes to Avoid

To make the best apple cake, avoid:

  • Using overly soft apples
  • Overmixing batter
  • Underbaking center
  • Cutting too soon
  • Skipping pan prep

Taking your time helps create a perfect homemade cake.

Frequently Asked Questions

What apples are best for apple cake?

Honeycrisp, Granny Smith, Fuji, and Pink Lady all work well.

Can I make apple cake ahead of time?

Yes. It actually tastes even better the next day.

Can I freeze apple cake?

Absolutely. Slice and wrap tightly.

Why is my apple cake dense?

This often happens from overmixing or too much moisture.

Can I make this cake gluten-free?

Yes, with a quality 1:1 gluten-free flour blend.

Final Thoughts

This delicious apple cake truly lives up to its name. It’s moist, flavorful, easy to make, and filled with cozy homemade charm that never goes out of style.

Whether you’re baking for a celebration, sharing with loved ones, or simply treating yourself to a slice with coffee, this apple cake recipe is one you’ll treasure. Once you taste that tender crumb and sweet cinnamon apple filling, it’s bound to become a favorite in your kitchen.

Cheesy Potato Burritos: Crispy, Comforting, and Packed With Flavor

If you’re craving something warm, filling, and incredibly satisfying, these cheesy potato burritos are exactly what you need. They combine crispy seasoned potatoes, gooey melted cheese, creamy sauce, and soft tortillas into one irresistible handheld meal. Every bite is loaded with comforting textures and savory flavor, making this recipe perfect for busy weeknights, lazy weekends, or make-ahead lunches.

What makes cheesy potato burritos so special is how simple ingredients come together to create something truly crave-worthy. Potatoes bring heartiness and golden crisp edges, cheese adds richness, and the burrito format makes everything portable and customizable. Whether you’re feeding a family, meal prepping for the week, or just looking for a meatless comfort food option, this recipe is a guaranteed winner.

Why You’ll Love These Cheesy Potato Burritos

These burritos check every box for flavor, texture, and convenience.

What Makes This Recipe So Good

  • Crispy seasoned potatoes
  • Gooey melted cheese
  • Easy pantry ingredients
  • Customizable fillings
  • Great for meal prep
  • Vegetarian-friendly

The contrast between crispy potatoes and soft tortillas makes these burritos especially satisfying. Add your favorite toppings, and they can easily become a go-to comfort meal.

Ingredients for Cheesy Potato Burritos

To make these hearty burritos, you’ll need:

For the Potatoes

  • 3 medium russet potatoes, peeled and diced
  • 2 tablespoons olive oil
  • 1 teaspoon garlic powder
  • 1 teaspoon paprika
  • 1/2 teaspoon onion powder
  • Salt and black pepper to taste

For the Burritos

  • 4 large flour tortillas
  • 1 1/2 cups shredded cheddar or Mexican cheese blend
  • 1/2 cup sour cream
  • 1/4 cup salsa or hot sauce
  • 1/4 cup chopped green onions
  • 1 tablespoon chopped cilantro (optional)

Optional Add-Ins

  • Black beans
  • Scrambled eggs
  • Avocado slices
  • Jalapeños

Russet potatoes work best because they crisp up beautifully while staying fluffy inside.

Ingredient Notes and Smart Tips

Best Potatoes for Burritos

Russet potatoes are ideal because:

  • They crisp easily
  • Stay fluffy inside
  • Absorb seasoning well

Yukon Gold also works if you want a creamier bite.

Cheese Choices

Cheddar gives sharp flavor, but great options include:

  • Monterey Jack
  • Pepper Jack
  • Mexican blend

Sauce Tip

Mix sour cream with a little salsa or hot sauce for a quick creamy burrito sauce. It adds flavor and helps keep the filling moist.

How to Make Cheesy Potato Burritos

Step 1: Cook the Potatoes

Toss diced potatoes with olive oil, garlic powder, paprika, onion powder, salt, and pepper.

Cook them:

  • In a skillet over medium heat for 15–20 minutes
  • Or in the air fryer at 400°F for 12–15 minutes

Cook until:

  • Crispy outside
  • Tender inside

Golden potatoes are the heart of this recipe, so don’t rush this step.

Step 2: Warm the Tortillas and Prep Fillings

Warm tortillas slightly in a dry pan or microwave so they become flexible and easier to roll.

Set out:

  • Cheese
  • Potatoes
  • Sauce
  • Herbs

This makes assembly quick and easy.

Step 3: Assemble the Burritos

Lay each tortilla flat and add:

  • Crispy potatoes
  • Generous shredded cheese
  • Sour cream sauce
  • Green onions

Be careful not to overfill.

Fold in the sides, then roll tightly into a burrito.

This helps keep everything tucked in while cooking.

Step 4: Toast the Burritos

Place assembled burritos seam-side down in a skillet over medium heat or in the air fryer.

Cook until:

  • Outside is golden
  • Tortilla is crisp
  • Cheese is melted

This final step makes them extra delicious and gives that restaurant-style finish.

Tips for Perfect Cheesy Potato Burritos

For the best cheesy potato burritos every time:

  • Dice potatoes evenly for uniform cooking
  • Don’t overcrowd potatoes while crisping
  • Warm tortillas before rolling
  • Don’t overstuff burritos
  • Toast before serving for best texture

A little extra care gives you a much better bite.

Delicious Variations to Try

These cheesy potato burritos are easy to customize.

Tasty Add-Ons

  • Black beans for protein
  • Scrambled eggs for breakfast burritos
  • Bacon bits for smoky flavor
  • Roasted peppers

Sauce Ideas

  • Chipotle mayo
  • Avocado crema
  • Spicy ranch

You can make them mild or bold depending on your mood.

What to Serve With Cheesy Potato Burritos

These burritos pair perfectly with:

  • Salsa and guacamole
  • Mexican rice
  • Black bean salad
  • Corn salad
  • Tortilla chips

They also make a great:

  • Quick lunch
  • Casual dinner
  • Meal prep option

Storage and Reheating Tips

These burritos store well and are excellent for leftovers.

Refrigerate

  • Store wrapped burritos up to 4 days

Freeze

  • Freeze individually wrapped up to 2 months

Reheat

  • Air fry or skillet-toast for best crisp texture

Avoid microwaving too long or tortillas may get soggy.

Common Mistakes to Avoid

To make perfect cheesy potato burritos, avoid:

  • Undercooking potatoes
  • Overstuffing tortillas
  • Skipping tortilla warming
  • Using too much sauce
  • Not sealing burritos properly

Texture and balance matter.

Frequently Asked Questions

Can I make cheesy potato burritos ahead of time?

Yes. They’re great for meal prep and reheat well.

What’s the best cheese for burritos?

Cheddar, Monterey Jack, or Mexican blends all work well.

Can I freeze them?

Absolutely. Wrap tightly and freeze for later.

Can I make them vegan?

Yes. Use dairy-free cheese and vegan sour cream.

Are these good for breakfast?

Definitely. Add eggs or breakfast sausage for a hearty breakfast burrito.

Final Thoughts

These cheesy potato burritos are the kind of meal that hits every comfort food craving at once. They’re crispy, cheesy, filling, and easy to customize with whatever you have on hand.

Whether you’re making them for a quick dinner, prepping lunches for the week, or serving a crowd, this recipe is one you’ll come back to again and again. Once you bite into that crispy tortilla and cheesy potato filling, you’ll understand why this simple recipe feels so incredibly satisfying.

Homemade Air Fryer Tortilla Garlic Bread Recipe: Crispy, Cheesy, and Ready in Minutes

If you love garlic bread but want something faster, lighter, and just as satisfying, this homemade air fryer tortilla garlic bread recipe is going to become one of your favorite kitchen hacks. It delivers everything you love about classic garlic bread—crispy edges, buttery garlic flavor, melted cheese, and a golden finish—but uses tortillas instead of traditional bread for a quicker, thinner, ultra-crispy twist.

This recipe is perfect for busy weeknights, quick snacks, after-school bites, or easy appetizers when you need something delicious without a lot of prep. The air fryer makes it fast and foolproof, and the tortilla base crisps beautifully while still holding all that rich garlic butter flavor. Best of all, you can customize it with herbs, cheeses, and toppings to suit your taste.

Why You’ll Love This Air Fryer Tortilla Garlic Bread Recipe

This quick garlic bread recipe is simple, budget-friendly, and incredibly satisfying.

What Makes This Recipe So Good

  • Ready in under 10 minutes
  • Super crispy texture
  • Uses pantry staples
  • Easy to customize
  • Great as snack, side, or appetizer
  • Less heavy than regular garlic bread

Because tortillas are thin, they crisp quickly and create a crunchy, almost flatbread-like result that’s hard to resist.

Ingredients for Homemade Air Fryer Tortilla Garlic Bread

This easy air fryer garlic bread uses simple ingredients you probably already have.

Basic Ingredients

  • 2 large flour tortillas
  • 3 tablespoons softened butter
  • 2 cloves garlic, minced
  • 1/2 teaspoon garlic powder
  • 1/2 teaspoon Italian seasoning
  • 1/2 cup shredded mozzarella cheese
  • 2 tablespoons grated parmesan cheese
  • 1 tablespoon chopped parsley
  • Pinch of salt

Optional Add-Ons

  • Red pepper flakes
  • Extra herbs
  • Cheddar cheese blend
  • Olive oil drizzle

Fresh garlic gives the best flavor, while garlic powder boosts that classic garlic bread taste.

Ingredient Notes and Smart Tips

Best Tortillas to Use

For the crispiest results:

  • Use large flour tortillas
  • Choose fresh, pliable tortillas
  • Avoid thick wraps that may stay chewy

Thin tortillas create that ideal crispy garlic bread texture.

Cheese Options

Mozzarella melts beautifully, but you can also use:

  • Monterey Jack
  • Parmesan-heavy blend
  • Cheddar for sharper flavor

Garlic Butter Tip

Mixing fresh garlic with softened butter helps evenly spread flavor. Let it sit for a few minutes before using so the garlic infuses into the butter.

How to Make Homemade Air Fryer Tortilla Garlic Bread

Step 1: Make the Garlic Butter

In a small bowl, combine softened butter, minced garlic, garlic powder, Italian seasoning, and a pinch of salt.

Mix until smooth and fragrant.

This buttery mixture is what gives the tortilla garlic bread its rich, savory flavor.

Step 2: Assemble the Tortilla Garlic Bread

Lay the tortillas flat on a clean surface.

Spread the garlic butter evenly across each tortilla, going all the way to the edges.

Top with:

  • Mozzarella
  • Parmesan
  • Parsley

If you like heat, add red pepper flakes.

Make sure toppings are evenly distributed so every bite has flavor.

Step 3: Air Fry Until Crispy

Preheat your air fryer to 375°F for 2 to 3 minutes.

Carefully place one tortilla at a time into the air fryer basket.

Cook for 4 to 6 minutes until:

  • Edges are golden
  • Cheese is melted
  • Tortilla is crisp

Keep an eye on it because tortillas can brown quickly.

Step 4: Slice and Serve

Remove carefully and let cool for 1 minute.

Slice into wedges or strips using a pizza cutter.

Serve warm with:

  • Marinara sauce
  • Ranch dip
  • Soup or salad

The texture is best right after cooking, when the tortilla is perfectly crisp.

Tips for Perfect Air Fryer Tortilla Garlic Bread

To get the best homemade air fryer tortilla garlic bread every time:

  • Don’t overload with toppings
  • Preheat the air fryer
  • Watch closely during final minutes
  • Use softened butter for even spreading
  • Serve immediately for best crunch

Small adjustments make a big difference in texture.

Fun Variations to Try

This tortilla garlic bread recipe is easy to customize.

Flavor Ideas

  • Add pepperoni slices for pizza garlic bread
  • Use pesto instead of garlic butter
  • Add cooked spinach
  • Top with feta and herbs

Extra Crispy Version

Brush tortilla lightly with olive oil before air frying.

This helps create even more crunch.

What to Serve With Tortilla Garlic Bread

This easy side pairs well with:

  • Pasta dishes
  • Tomato soup
  • Caesar salad
  • Air fryer wings
  • Dips and spreads

It’s also perfect as:

  • Party appetizer
  • Late-night snack
  • Lunch side

Storage and Reheating Tips

While best fresh, leftovers can still be enjoyed.

Refrigerate

  • Store in airtight container up to 2 days

Reheat

  • Air fry at 350°F for 2 to 3 minutes

Avoid microwaving because it softens the tortilla.

Common Mistakes to Avoid

To make perfect tortilla garlic bread, avoid:

  • Using too much butter
  • Overloading cheese
  • Skipping preheat
  • Cooking too long
  • Using stale tortillas

Tortillas cook fast, so timing matters.

Frequently Asked Questions

Can I use corn tortillas?

Flour tortillas work best for texture, but corn tortillas can work for a different crisp style.

Can I make this without cheese?

Yes. It will still be flavorful and crisp.

How long does tortilla garlic bread take in the air fryer?

Usually 4 to 6 minutes at 375°F.

Can I make this ahead?

It’s best fresh, but you can prep toppings in advance.

What dips go best with it?

Marinara, ranch, garlic aioli, or spicy mayo are all delicious.

Final Thoughts

This homemade air fryer tortilla garlic bread recipe proves that simple ingredients can create something seriously delicious. It’s crispy, buttery, cheesy, and ready faster than most traditional garlic bread recipes.

Whether you need a quick side dish, a fun snack, or an easy appetizer for guests, this air fryer tortilla garlic bread delivers every time. Once you try that first crunchy, garlicky bite, it’s bound to become a repeat favorite in your kitchen.

Crispy Air Fryer Pizza Rolls: Your New Favorite Snack!

If you’re looking for the ultimate easy comfort snack, these crispy air fryer pizza rolls are about to become your new obsession. They’re everything you want in a quick bite: golden and crunchy on the outside, cheesy and saucy on the inside, and packed with classic pizza flavor in every bite. Best of all, they cook in just minutes with very little effort.

Whether you need an after-school snack, a game day appetizer, a movie night favorite, or a fun party platter, air fryer pizza rolls are one of those simple recipes that always disappear fast. The air fryer gives them a beautifully crisp texture without the mess of deep frying, and the results are consistently better than baking in the oven.

Why You’ll Love These Crispy Air Fryer Pizza Rolls

These pizza rolls are fast, flavorful, and incredibly satisfying.

What Makes This Recipe So Good

  • Ready in under 10 minutes
  • Crispy without deep frying
  • Gooey cheesy center
  • Perfect for kids and adults
  • Great for parties and snacks
  • Easy cleanup

One of the best things about making pizza rolls in the air fryer is how evenly they crisp up. You get crunchy edges and perfectly heated filling without soggy spots.

Ingredients for Air Fryer Pizza Rolls

This recipe is wonderfully simple.

Basic Ingredients

  • 1 bag frozen pizza rolls
  • Cooking spray (optional)

Optional for Serving

  • Marinara sauce
  • Ranch dressing
  • Garlic butter
  • Parmesan cheese
  • Italian seasoning
  • Red pepper flakes

Frozen pizza rolls work perfectly because they’re already filled and ready to cook. The air fryer simply transforms them into something crispier and more delicious.

Ingredient Notes and Air Fryer Prep Tips

Best Pizza Rolls to Use

You can use:

  • Cheese pizza rolls
  • Pepperoni pizza rolls
  • Combination flavor

Any frozen brand works well, but cook time may vary slightly depending on size.

Do You Need Oil?

A light mist of cooking spray can help:

  • Boost crispiness
  • Add golden color

But it’s optional because pizza rolls already contain some fat.

Preheating Matters

Preheating your air fryer helps:

  • Create even crispiness
  • Prevent undercooked centers

A few minutes of preheating makes a noticeable difference.

How to Make Crispy Air Fryer Pizza Rolls

Step 1: Preheat the Air Fryer

Preheat your air fryer to 380°F for about 3 minutes.

This ensures the pizza rolls start crisping immediately when added.

Step 2: Arrange Pizza Rolls

Place the frozen pizza rolls in a single layer in the air fryer basket.

Important:

  • Don’t overcrowd
  • Leave a little space between rolls

This allows hot air to circulate properly and crisp every side.

If desired, lightly spray with cooking oil.

Step 3: Air Fry Until Crispy

Cook for 6 to 8 minutes, shaking the basket halfway through.

The exact time depends on:

  • Air fryer model
  • Pizza roll size
  • Desired crispiness

They’re done when:

  • The outside is golden
  • The filling is hot
  • Cheese is melted inside

Be careful not to overcook, or the filling may burst out.

Step 4: Cool Slightly and Serve

Let the pizza rolls cool for 2 to 3 minutes before serving. The filling gets extremely hot.

Serve with:

  • Warm marinara
  • Ranch
  • Garlic butter dip

For extra flavor, sprinkle with:

  • Parmesan
  • Italian herbs
  • Chili flakes

That finishing touch makes them taste even more like homemade pizza bites.

Tips for Perfect Air Fryer Pizza Rolls

To make the best crispy air fryer pizza rolls every time:

  • Preheat the air fryer
  • Cook in a single layer
  • Shake halfway through
  • Don’t overcook
  • Let cool slightly before eating

These small steps make a big difference in texture and safety.

Fun Variations and Flavor Ideas

These pizza rolls are easy to customize.

Topping Ideas

  • Garlic parmesan butter drizzle
  • Buffalo ranch sauce
  • Crushed red pepper

Turn Them Into a Meal

Serve with:

  • Caesar salad
  • Veggie sticks
  • Soup

Party Board Idea

Add:

  • Mozzarella sticks
  • Wings
  • Fries
  • Dips

They’re a crowd-pleaser for any casual gathering.

Storage and Reheating Tips

While best fresh, leftovers can still be saved.

Refrigerate

  • Store in an airtight container up to 3 days

Reheat

  • Air fry at 350°F for 2 to 3 minutes

Avoid microwaving if possible, since it softens the crust.

Common Mistakes to Avoid

To get the crispiest results, avoid:

  • Overcrowding the basket
  • Skipping preheat
  • Overcooking until they burst
  • Eating too soon and burning your mouth
  • Using too much oil

Simple timing and spacing are key.

Frequently Asked Questions

How long do pizza rolls take in the air fryer?

Usually 6 to 8 minutes at 380°F.

Do I need to thaw pizza rolls first?

No. Cook them straight from frozen.

Why did my pizza rolls burst?

They were likely overcooked or cooked too hot.

Can I make homemade pizza rolls in the air fryer?

Yes. Fresh homemade rolls also work well.

Are air fryer pizza rolls healthier?

They use less oil than deep frying, so they’re a lighter option.

Final Thoughts

These crispy air fryer pizza rolls are proof that the best snacks are often the simplest. With their crunchy exterior, gooey cheesy center, and endless dipping possibilities, they’re a guaranteed hit for kids, adults, and anyone craving easy comfort food.

Whether you’re making a quick snack after work, feeding hungry guests, or setting up the perfect movie night spread, this air fryer recipe is one you’ll turn to again and again. Once you try pizza rolls this way, you may never go back to the oven.

Decadent Salted Caramel Chocolate Cookies: Irresistibly Easy and Delicious!

If there’s one cookie that feels truly indulgent, it’s a batch of salted caramel chocolate cookies fresh from the oven. These cookies combine deep chocolate flavor, buttery richness, gooey caramel pockets, and just the right sprinkle of flaky sea salt for that irresistible sweet-salty contrast. They taste like something you’d find at a high-end bakery, yet they’re surprisingly easy to make at home.

What makes these cookies stand out is the balance of textures and flavors. You get soft, chewy centers, slightly crisp edges, melty caramel in every bite, and a luxurious chocolate base that feels rich without being overwhelming. Whether you’re baking for the holidays, a special gathering, a bake sale, or simply to satisfy a serious dessert craving, these salted caramel chocolate cookies are always a hit.

Why You’ll Love These Salted Caramel Chocolate Cookies

These cookies are everything a great homemade dessert should be: rich, comforting, and easy enough for any home baker.

What Makes This Recipe So Good

  • Deep chocolate flavor
  • Gooey caramel pockets
  • Soft and chewy texture
  • Easy pantry ingredients
  • Bakery-style results
  • Perfect sweet and salty balance

The flaky sea salt on top doesn’t just look beautiful—it enhances the chocolate and caramel, making each bite more flavorful and satisfying.

Ingredients for Salted Caramel Chocolate Cookies

To make these decadent cookies, you’ll need:

For the Cookie Dough

  • 1 cup unsalted butter, softened
  • 1 cup brown sugar
  • 1/2 cup granulated sugar
  • 2 large eggs
  • 2 teaspoons vanilla extract
  • 2 1/4 cups all-purpose flour
  • 1/2 cup unsweetened cocoa powder
  • 1 teaspoon baking soda
  • 1/2 teaspoon salt

Mix-Ins

  • 1 cup semi-sweet chocolate chips
  • 18 to 20 soft caramel candies, chopped or halved

For Finishing

  • Flaky sea salt

Soft caramels work best because they melt beautifully without hardening too much once cooled.

Ingredient Notes for the Best Results

Best Cocoa Powder

Use unsweetened cocoa powder for rich chocolate flavor. Dutch-process cocoa gives a darker, smoother taste, while natural cocoa gives a slightly sharper chocolate note.

Choosing the Right Caramel

For the best gooey center:

  • Use soft wrapped caramel candies
  • Cut into smaller chunks for even distribution
  • Chill caramel pieces slightly before folding into dough

This helps prevent too much spreading during baking.

Sea Salt Matters

Flaky sea salt adds:

  • Flavor contrast
  • Texture
  • Beautiful bakery-style finish

Avoid regular table salt on top, which can taste harsh.

How to Make Salted Caramel Chocolate Cookies

Step 1: Prepare the Dough

In a large bowl, cream softened butter, brown sugar, and granulated sugar until light and fluffy.

Add eggs and vanilla, mixing until smooth.

In another bowl, whisk together flour, cocoa powder, baking soda, and salt.

Gradually add the dry ingredients to the wet ingredients and mix until just combined.

Fold in chocolate chips and caramel pieces gently.

The dough should be thick and rich.

Step 2: Chill the Dough

Cover and chill the dough for at least 30 minutes.

This step is important because:

  • It helps control spreading
  • Deepens flavor
  • Keeps caramel from leaking too quickly

If your kitchen is warm, chilling longer is even better.

Step 3: Scoop and Bake

Preheat your oven to 350°F and line baking sheets with parchment paper.

Scoop large portions of dough onto the baking sheet, leaving room between each cookie.

Bake for 10 to 12 minutes, until edges are set but centers still look slightly soft.

The cookies will continue setting as they cool.

For extra gooey caramel pockets, press a few extra caramel bits into the tops before baking.

Step 4: Finish with Sea Salt

As soon as the cookies come out of the oven, sprinkle lightly with flaky sea salt.

Let them cool on the baking tray for 5 minutes before transferring to a cooling rack.

This resting time helps:

  • Set the caramel
  • Improve texture
  • Prevent breaking

Warm cookies will have beautifully soft caramel centers.

Tips for Perfect Salted Caramel Chocolate Cookies

To get bakery-style results every time:

  • Use room temperature butter
  • Don’t overmix the dough
  • Chill before baking
  • Slightly underbake for soft centers
  • Add sea salt while warm

The goal is a cookie that stays soft and chewy for days.

Variations and Flavor Ideas

These salted caramel chocolate cookies are easy to customize.

Delicious Add-Ins

  • Chopped pecans or walnuts
  • Espresso powder for deeper chocolate flavor
  • Dark chocolate chunks instead of chips
  • Stuffed caramel centers

Holiday Twists

  • Add peppermint pieces in winter
  • Drizzle with melted chocolate
  • Use festive sprinkles

These cookies are especially great for gifting.

What to Serve With Salted Caramel Chocolate Cookies

These cookies pair beautifully with:

  • Cold milk
  • Coffee or espresso
  • Hot cocoa
  • Vanilla ice cream

They’re also ideal for:

  • Holiday cookie trays
  • Dessert boards
  • Birthday parties
  • Cozy movie nights

Storage and Freezing Tips

These cookies store well and stay delicious.

Room Temperature

  • Store in an airtight container for up to 5 days

Freezer

  • Freeze baked cookies for up to 2 months
  • Freeze cookie dough balls for fresh baking later

Place parchment between layers to prevent sticking.

Common Mistakes to Avoid

To make perfect salted caramel chocolate cookies, avoid these common baking mistakes:

  • Skipping dough chilling
  • Overbaking
  • Using hard caramel
  • Overmixing
  • Adding too much salt

A little attention to detail makes these cookies truly bakery-worthy.

Frequently Asked Questions

Can I use caramel sauce instead of candy?

Not for this recipe. Sauce can leak too much during baking.

Why did my caramel leak out?

This can happen if the caramel pieces are too large or placed too close to the edges.

Can I freeze the dough?

Yes. Scoop dough balls and freeze for easy future baking.

What type of chocolate works best?

Semi-sweet or dark chocolate both work beautifully.

How do I keep them soft?

Store airtight and avoid overbaking.

Final Thoughts

These decadent salted caramel chocolate cookies are the ultimate treat when you want something rich, comforting, and completely irresistible. They deliver everything a great cookie should: deep chocolate flavor, gooey caramel, soft texture, and just enough sea salt to make every bite pop.

Whether you’re baking for a celebration, sharing with friends, or treating yourself on a cozy afternoon, this easy recipe is guaranteed to impress. Once you pull that first tray from the oven and taste the warm caramel center, you’ll understand why these cookies are impossible to resist.

Easy Coffee Cake Cookies With Streusel: Soft, Buttery, Bakery-Style Perfection

If you love classic coffee cake but want something a little more playful and portable, these easy coffee cake cookies with streusel are going to become an instant favorite. They have everything people crave in a traditional coffee cake—soft buttery crumb, warm cinnamon flavor, crumbly streusel topping, and sweet vanilla glaze—but in the form of thick, bakery-style cookies.

These cookies are the perfect cross between a dessert cookie and a cozy breakfast treat. They’re wonderful for brunch spreads, holiday baking, afternoon coffee breaks, or simply whenever you want something comforting and homemade. Best of all, they’re much easier to make than a layered coffee cake and still deliver that same nostalgic flavor.

Why You’ll Love These Coffee Cake Cookies With Streusel

These cookies are a dream for anyone who loves soft, buttery baked goods.

What Makes This Recipe Special

  • Soft and tender cookie base
  • Crispy cinnamon streusel topping
  • Sweet vanilla glaze
  • Easy to make with simple ingredients
  • Perfect for breakfast or dessert
  • Great for sharing and gifting

The texture is what really makes these stand out. You get a chewy cookie center, slightly crisp edges, and that irresistible crumb topping in every bite.

Ingredients for Easy Coffee Cake Cookies With Streusel

Here’s everything you need for these coffee cake cookies:

For the Cookie Dough

  • 1 cup unsalted butter, softened
  • 1 cup granulated sugar
  • 1/2 cup brown sugar
  • 2 large eggs
  • 2 teaspoons vanilla extract
  • 3 cups all-purpose flour
  • 1 teaspoon baking soda
  • 1/2 teaspoon baking powder
  • 1/2 teaspoon salt
  • 1 teaspoon cinnamon
  • 1/2 cup sour cream

For the Streusel Topping

  • 3/4 cup all-purpose flour
  • 1/2 cup brown sugar
  • 1 teaspoon cinnamon
  • 5 tablespoons cold butter, cubed

For the Glaze

  • 1 cup powdered sugar
  • 2 to 3 tablespoons milk
  • 1/2 teaspoon vanilla extract

Sour cream in the cookie dough is one of the secret ingredients here. It keeps the cookies extra soft and gives them that coffee cake-like tenderness.

Ingredient Notes and Baking Tips

Why Sour Cream Matters

Sour cream adds:

  • Moisture
  • Tender crumb
  • Slight tang for balance

If needed, you can substitute:

  • Greek yogurt
  • Full-fat plain yogurt

Streusel Tips

The streusel should be crumbly, not wet. Use cold butter and work it in gently with a fork or pastry cutter.

This creates the signature crumb topping that makes coffee cake cookies so special.

How to Make Easy Coffee Cake Cookies With Streusel

Step 1: Make the Streusel First

In a medium bowl, combine flour, brown sugar, and cinnamon. Cut in the cold butter until the mixture forms coarse crumbs.

Place the streusel in the fridge while you make the cookie dough. Keeping it cold helps it stay crumbly during baking.

Step 2: Prepare the Cookie Dough

In a large mixing bowl, cream the softened butter, granulated sugar, and brown sugar until light and fluffy.

Add eggs, vanilla, and sour cream. Mix until smooth.

In a separate bowl, whisk together flour, baking soda, baking powder, salt, and cinnamon.

Gradually add the dry ingredients to the wet ingredients and mix just until combined.

The dough will be soft and thick.

Step 3: Scoop and Top the Cookies

Preheat your oven to 350°F and line baking sheets with parchment paper.

Scoop large portions of dough onto the baking sheet, spacing them well apart.

Gently flatten each cookie slightly, then generously top with chilled streusel.

Don’t press too hard—you want the streusel to stay textured.

Step 4: Bake and Glaze

Bake for 11 to 14 minutes, or until the edges are lightly golden and the centers look just set.

Let the cookies cool on the baking sheet for 5 minutes before transferring to a wire rack.

Whisk together powdered sugar, milk, and vanilla to make a smooth glaze. Once cookies are cooled slightly, drizzle over the tops.

This final touch gives them that true coffee cake bakery finish.

Tips for Perfect Coffee Cake Cookies Every Time

To get the best easy coffee cake cookies with streusel, keep these expert tips in mind:

  • Chill the streusel before using
  • Don’t overmix the dough
  • Use room temperature butter and eggs
  • Slightly underbake for soft centers
  • Let cookies cool before glazing

These simple steps help you get bakery-style texture every time.

Variations and Flavor Ideas

These coffee cake cookies are easy to customize.

Delicious Variations

  • Add chopped pecans or walnuts to streusel
  • Mix mini chocolate chips into dough
  • Add maple extract to glaze
  • Swirl in cinnamon sugar filling

Seasonal Twists

  • Add pumpkin spice in fall
  • Top with apple bits for autumn flavor
  • Add lemon zest for spring brightness

This recipe is flexible enough for every season.

What to Serve With Coffee Cake Cookies

These cookies pair beautifully with:

  • Hot coffee
  • Chai tea
  • Latte or cappuccino
  • Fresh fruit
  • Yogurt parfaits

They’re especially perfect for:

  • Brunch tables
  • Bake sales
  • Holiday cookie boxes
  • Weekend breakfast treats

Storage and Freezing Tips

These cookies store well and stay soft.

Room Temperature

  • Store in an airtight container for up to 4 days

Refrigerator

  • Store up to 1 week

Freezer

  • Freeze baked cookies for up to 2 months

Store with parchment between layers to protect the streusel topping.

Common Mistakes to Avoid

To make the best coffee cake cookies with streusel, avoid these common baking mistakes:

  • Using warm butter for streusel
  • Overbaking
  • Overmixing the dough
  • Skipping parchment paper
  • Glazing while cookies are too hot

Taking your time with texture and temperature makes all the difference.

Frequently Asked Questions

Can I make coffee cake cookies ahead of time?

Yes. You can make the dough ahead and refrigerate it overnight.

Why are my streusel cookies flat?

This usually happens if the butter was too warm or the dough wasn’t thick enough.

Can I freeze coffee cake cookies?

Absolutely. They freeze well both baked and unbaked.

Can I use Greek yogurt instead of sour cream?

Yes. Full-fat Greek yogurt is a great substitute.

Do these taste like coffee?

No. Coffee cake refers to cake served with coffee, not cake flavored with coffee.

Final Thoughts

These easy coffee cake cookies with streusel are the kind of treat that instantly feels comforting and special. They capture everything people love about classic coffee cake in a fun, handheld cookie that’s perfect for any time of day.

Whether you’re baking for a cozy weekend breakfast, a holiday gathering, or just because you’re craving something buttery and sweet, this recipe is guaranteed to deliver soft texture, rich cinnamon flavor, and irresistible homemade charm. One batch, and they’ll quickly become a household favorite.

🍫 Cadbury Egg Protein Balls That Taste Just Like the Real Treat!

If you love the nostalgic taste of Cadbury Creme Eggs but want something a little more balanced for everyday snacking, these Cadbury Egg protein balls are about to become your new obsession. They have everything you crave in the classic candy: rich chocolate coating, a sweet creamy center, and that unmistakable dessert-like flavor—but in a bite-sized, protein-packed form you can enjoy any time.

These no-bake protein balls are ideal for meal prep, post-workout snacks, lunchbox treats, or healthier holiday desserts. They’re easy to make, require simple ingredients, and store beautifully in the fridge. Best of all, they taste indulgent enough to satisfy your sweet tooth without the sugar crash that usually follows candy.

Why You’ll Love These Cadbury Egg Protein Balls

These protein balls are a smart twist on a seasonal favorite.

What Makes This Recipe So Good

  • No baking required
  • High in protein
  • Easy to meal prep
  • Kid-friendly
  • Perfect for Easter or spring treats
  • Naturally portion-controlled

Unlike store-bought candy, these homemade protein balls let you control the sweetness, ingredients, and texture. You still get that rich chocolate satisfaction, but with more staying power.

Ingredients for Cadbury Egg Protein Balls

To make these delicious no-bake bites, you’ll need:

For the Protein Ball Base

  • 1 cup rolled oats
  • 1/2 cup vanilla protein powder
  • 1/4 cup almond flour
  • 1/4 cup peanut butter or cashew butter
  • 2 tablespoons maple syrup or honey
  • 1 teaspoon vanilla extract
  • 2 to 3 tablespoons milk of choice

For the Creamy Center

  • 3 tablespoons Greek yogurt or cream cheese
  • 2 tablespoons powdered peanut butter or vanilla protein powder
  • 1 tablespoon honey
  • A few drops yellow natural food coloring (optional)

For the Chocolate Coating

  • 1 cup dark or semi-sweet chocolate chips
  • 1 teaspoon coconut oil

The combination of oats, nut butter, and protein powder creates a soft, truffle-like base that’s both filling and satisfying.

Ingredient Notes and Smart Swaps

Best Protein Powder to Use

A smooth vanilla protein powder works best because it complements the candy-inspired flavor. Whey, casein, or plant-based powders can all work, but textures may vary slightly.

Nut Butter Choices

Peanut butter adds richness, but you can also use:

  • Cashew butter for a milder taste
  • Almond butter for nuttiness
  • Sunflower seed butter for nut-free needs

Making the Cream Center Authentic

The creamy filling is what gives these protein balls their Cadbury Egg feel. Using Greek yogurt or a little cream cheese creates:

  • Smooth texture
  • Tangy balance
  • Better richness

A tiny drop of yellow coloring helps mimic the classic look.

How to Make Cadbury Egg Protein Balls

Step 1: Make the Protein Dough

In a large bowl, combine oats, protein powder, almond flour, peanut butter, maple syrup, and vanilla. Add milk gradually until the mixture comes together into a soft dough.

It should hold when pressed but not feel sticky.

If needed:

  • Add more oats if too wet
  • Add a splash more milk if too dry

Mixing by hand works well because you can better feel the texture.

Step 2: Prepare the Cream Filling

In a small bowl, mix Greek yogurt, powdered peanut butter, honey, and optional food coloring until smooth.

Chill for 10 to 15 minutes if it feels too soft.

The filling should be thick enough to scoop into small dollops.

Step 3: Shape the Protein Balls

Scoop a small amount of protein dough and flatten it in your palm. Add a tiny bit of creamy filling to the center, then wrap the dough around it and roll into an egg or ball shape.

Repeat with the remaining mixture.

Place the shaped balls on a parchment-lined tray and chill for 20 to 30 minutes so they firm up before coating.

Step 4: Dip in Chocolate

Melt chocolate chips and coconut oil together until smooth. Using a fork or dipping tool, coat each chilled protein ball in chocolate.

Let excess chocolate drip off before returning to the tray.

Chill again until set.

For extra fun:

  • Drizzle with white chocolate
  • Add pastel sprinkles
  • Decorate like mini Easter eggs

Tips for Perfect Protein Balls

To make the best Cadbury Egg protein balls every time, keep these tips in mind:

  • Chill dough if too soft before shaping
  • Don’t overfill centers
  • Use smooth protein powder for better texture
  • Chill before dipping in chocolate
  • Store cold for best consistency

Texture matters with no-bake recipes, so don’t rush the chilling steps.

Variations and Flavor Ideas

These Cadbury Egg protein balls are easy to customize.

Fun Variations

  • Use chocolate protein powder for richer flavor
  • Add crushed graham crackers for crunch
  • Mix in shredded coconut
  • Use white chocolate coating

Make Them More Festive

  • Add pastel drizzle
  • Use colored natural toppings
  • Shape into mini eggs instead of balls

These are great for Easter baskets or spring dessert boards.

What to Serve with Cadbury Egg Protein Balls

These no-bake treats pair well with:

  • Coffee or espresso
  • Protein smoothies
  • Fresh fruit
  • Greek yogurt bowls
  • Easter brunch spreads

They’re also perfect as:

  • Post-workout snacks
  • Midday sweet bites
  • Healthier dessert options

Storage Tips

These protein balls store beautifully.

Refrigerator

  • Store in an airtight container for up to 1 week

Freezer

  • Freeze for up to 2 months

Serve chilled for the best texture, especially if your filling is soft.

Common Mistakes to Avoid

To get the best Cadbury Egg protein balls, avoid these common issues:

  • Adding too much liquid to the dough
  • Skipping chill time
  • Overheating the chocolate
  • Making centers too runny
  • Using gritty protein powder

A little patience gives you a much smoother, better-tasting final result.

Frequently Asked Questions

Are Cadbury Egg protein balls healthy?

They’re a more balanced alternative to candy, with added protein and less sugar.

Can I make them dairy-free?

Yes. Use dairy-free yogurt and dairy-free chocolate.

Do I have to use protein powder?

No, but the texture and protein content will change. You can substitute oat flour or powdered peanut butter.

Can kids eat these?

Yes, they’re family-friendly and fun for spring treats.

How long do they last?

Up to 1 week in the fridge or 2 months frozen.

Final Thoughts

These Cadbury Egg protein balls are proof that healthier treats don’t have to taste boring. They’re creamy, chocolatey, satisfying, and fun enough to feel like a real dessert.

Whether you’re looking for a festive Easter snack, a protein-packed sweet treat, or a simple no-bake recipe to keep in your fridge, this recipe checks every box. Once you make a batch, don’t be surprised if they disappear faster than the real thing.

Stunning Strawberry Cookies: 5 Easy Recipes to Try Today!

If you love fruity desserts that feel fresh, colorful, and a little bit special, these stunning strawberry cookies deserve a spot in your baking rotation. Strawberry cookies bring together buttery richness, soft texture, and bright berry flavor in a way that feels both nostalgic and exciting. Whether you prefer chewy cookies, cake-like textures, sandwich styles, or quick no-fuss treats, there’s a version here for every craving.

This guide goes beyond a single recipe and gives you five easy strawberry cookie ideas that are approachable for beginners but delicious enough to impress guests. From classic soft-baked cookies to white chocolate strawberry delights, these recipes are perfect for spring gatherings, Valentine’s Day, baby showers, afternoon snacks, or simply using up fresh strawberries in a creative way.

Why Strawberry Cookies Are So Popular

Strawberry cookies are loved for more than just their flavor. They bring a bright, cheerful look to dessert tables and offer a refreshing change from heavier chocolate-based treats.

Why You’ll Love These Strawberry Cookie Recipes

  • Naturally sweet berry flavor
  • Beautiful pink and red tones
  • Great for spring and summer baking
  • Easy to customize
  • Perfect for gifting and parties
  • Kid-friendly and beginner-friendly

Strawberries pair beautifully with vanilla, lemon, white chocolate, and cream cheese, making them incredibly versatile in baking.

Essential Ingredients for the Best Strawberry Cookies

Across these five strawberry cookie recipes, you’ll use many of the same baking staples:

  • All-purpose flour
  • Unsalted butter
  • Granulated sugar
  • Brown sugar
  • Eggs
  • Vanilla extract
  • Baking powder or baking soda
  • Salt
  • Fresh strawberries or freeze-dried strawberries

Optional Add-Ins

  • White chocolate chips
  • Cream cheese
  • Lemon zest
  • Powdered sugar
  • Strawberry jam

Using quality ingredients matters, especially when working with fruit. Fresh strawberries add moisture and brightness, while freeze-dried strawberries provide concentrated flavor without making dough too wet.

Recipe 1: Classic Soft Strawberry Cookies

These soft strawberry cookies are tender, buttery, and lightly crisp at the edges.

How to Make Them

Start by creaming softened butter and sugar until light and fluffy. Add egg and vanilla, then mix in flour, baking powder, and a pinch of salt.

Fold in finely chopped fresh strawberries that have been patted dry. Scoop onto a lined baking sheet and bake at 350°F for 10 to 12 minutes.

The result is a soft cookie with juicy berry pockets and a delicate homemade feel.

Recipe 2: Strawberry White Chocolate Chip Cookies

If you love rich bakery-style cookies, this version is especially satisfying.

The creamy sweetness of white chocolate balances strawberries beautifully. Use freeze-dried strawberry powder in the dough for concentrated flavor and fold in white chocolate chips.

Bake until the edges are lightly golden and the centers stay soft.

These cookies feel luxurious and are ideal for gifting.

Recipe 3: Strawberry Shortcake Sandwich Cookies

These are playful and elegant, perfect for special occasions.

Bake two small soft vanilla-strawberry cookies and sandwich them with whipped cream cheese frosting or strawberry buttercream.

For extra flair:

  • Roll edges in crushed freeze-dried strawberries
  • Dust with powdered sugar
  • Add a small strawberry slice garnish

These look beautiful on dessert tables and make wonderful party treats.

Recipe 4: Lemon Strawberry Sugar Cookies

Lemon and strawberry are a naturally bright pairing.

Add fresh lemon zest and a little lemon juice to your sugar cookie dough, then fold in strawberry pieces or freeze-dried strawberries.

The citrus lifts the berry flavor and keeps the cookies tasting fresh rather than overly sweet.

These are perfect for spring brunches, tea parties, or baby showers.

Recipe 5: Easy Strawberry Cake Mix Cookies

For the easiest version, strawberry cake mix cookies are a lifesaver.

Simply combine:

  • 1 box strawberry cake mix
  • 2 eggs
  • 1/3 cup oil

Mix, scoop, and bake. You can add white chocolate chips, sprinkles, or cream cheese filling.

These cookies are:

  • Quick
  • Soft
  • Great for beginners
  • Perfect for last-minute desserts

They’re also a fun recipe to make with kids.

Tips for Perfect Strawberry Cookies Every Time

Working with strawberries in cookies requires a few smart adjustments.

Helpful Baking Tips

  • Pat fresh strawberries dry before adding
  • Don’t overmix the dough
  • Chill sticky dough before baking
  • Use parchment paper for even baking
  • Let cookies cool before storing

Strawberries add moisture, so balancing wet and dry ingredients is essential for great texture.

Best Ways to Serve Strawberry Cookies

These cookies are wonderful on their own, but even better with:

  • Iced coffee or tea
  • Milk
  • Vanilla ice cream
  • Fresh fruit platters
  • Dessert charcuterie boards

They’re also perfect for:

  • Baby showers
  • Spring parties
  • Valentine’s Day boxes
  • Picnic desserts

Storage and Make-Ahead Tips

To keep strawberry cookies tasting fresh:

Storage

  • Store in an airtight container for 3 to 5 days

Freezing

  • Freeze baked cookies for up to 2 months
  • Freeze dough balls and bake fresh later

Use parchment between layers to prevent sticking.

Common Mistakes to Avoid

To make the best strawberry cookies, avoid these issues:

  • Using overly wet strawberries
  • Overbaking
  • Using warm butter incorrectly
  • Skipping dough chill time when needed
  • Storing while still warm

Paying attention to moisture control is the biggest secret to success.

Frequently Asked Questions

Can I use fresh strawberries in cookies?

Yes, but pat them dry first to reduce excess moisture.

Are freeze-dried strawberries better for cookies?

For stronger flavor and better texture control, yes—they’re often ideal.

Can I freeze strawberry cookies?

Absolutely. Both baked cookies and dough freeze well.

How do I keep strawberry cookies soft?

Store them airtight and avoid overbaking.

What pairs well with strawberry cookies?

White chocolate, lemon, vanilla, and cream cheese all pair beautifully.

Final Thoughts

These stunning strawberry cookies prove that fruity desserts can be just as crave-worthy as classic chocolate chip cookies. With five easy recipes to choose from, you can bake soft everyday treats, elegant party cookies, or quick last-minute sweets depending on the occasion.

Whether you’re baking for guests, gifting homemade treats, or simply enjoying a cozy afternoon in the kitchen, strawberry cookies bring freshness, beauty, and delicious flavor to every batch. Once you start experimenting with these berry-filled ideas, you’ll want to make them all year long.

Bright and Tangy Mini Lemon Blueberry Cheesecakes: The Perfect Light and Fresh Treat

If you’re looking for a dessert that feels elegant, refreshing, and perfectly portioned, these mini lemon blueberry cheesecakes are a beautiful choice. They combine everything people love about cheesecake—creamy texture, buttery crust, and rich flavor—with the bright freshness of lemon and the natural sweetness of blueberries. The result is a dessert that feels indulgent without being too heavy.

These mini cheesecakes are ideal for spring and summer gatherings, baby showers, brunches, birthdays, or anytime you want a dessert that looks impressive but is easy to make ahead. Their individual size makes serving simple, and the lemon-blueberry combination is timeless. Every bite is smooth, tangy, sweet, and bursting with flavor.

Why You’ll Love These Mini Lemon Blueberry Cheesecakes

These cheesecakes are more than just pretty—they’re practical and incredibly delicious.

Why This Recipe Works

  • Perfect individual portions
  • Creamy and smooth texture
  • Bright lemon flavor
  • Fresh blueberries in every bite
  • Great make-ahead dessert
  • Beautiful presentation for parties

Unlike full-sized cheesecakes, mini cheesecakes bake faster, chill faster, and are easier to serve. They’re also less intimidating for beginner bakers.

Ingredients for Mini Lemon Blueberry Cheesecakes

Here’s everything you’ll need to make these mini lemon blueberry cheesecakes:

For the Crust

  • 1 cup graham cracker crumbs
  • 3 tablespoons melted butter
  • 2 tablespoons granulated sugar

For the Cheesecake Filling

  • 16 ounces cream cheese, softened
  • 1/2 cup granulated sugar
  • 2 large eggs
  • 1/3 cup sour cream
  • 2 tablespoons fresh lemon juice
  • 1 tablespoon lemon zest
  • 1 teaspoon vanilla extract
  • 1 cup fresh blueberries

Optional Toppings

  • Extra blueberries
  • Lemon zest curls
  • Whipped cream
  • Blueberry compote

Fresh lemon juice and zest are essential here because they give the cheesecakes their signature bright, tangy flavor.

Ingredient Notes and Baking Tips

Best Cream Cheese for Smooth Cheesecake

Use full-fat block cream cheese for the richest texture. Avoid whipped or spreadable cream cheese, which can affect consistency.

Why Fresh Lemon Makes a Difference

Fresh lemon adds:

  • Natural citrus brightness
  • Better aroma
  • More balanced tang

Bottled juice won’t give the same clean flavor.

Blueberry Tips

Fresh blueberries work best because they hold their shape while baking. If using frozen berries:

  • Do not thaw first
  • Toss lightly in flour to reduce sinking

How to Make Mini Lemon Blueberry Cheesecakes

Step 1: Prepare the Crust

Preheat your oven to 325°F. Line a standard muffin tin with cupcake liners.

In a small bowl, combine graham cracker crumbs, melted butter, and sugar. Mix until evenly moistened.

Spoon the crumb mixture into each liner and press firmly into the bottom to form the crust.

Bake for 5 minutes, then let cool slightly.

Step 2: Make the Cheesecake Filling

In a large bowl, beat softened cream cheese until smooth and creamy. Add sugar and mix until fully combined.

Add eggs one at a time, mixing gently after each addition. Then add sour cream, lemon juice, lemon zest, and vanilla.

Mix just until smooth—avoid overbeating, which can add too much air and cause cracking.

Fold in most of the blueberries, reserving a few for topping.

The batter should be silky and thick.

Step 3: Fill and Bake

Divide the cheesecake filling evenly over the crusts, filling each liner nearly full.

Top with a few reserved blueberries.

Bake for 18 to 22 minutes, or until the centers are just set with a slight jiggle.

Turn off the oven, crack the door slightly, and let them cool gradually for 10 minutes.

This helps prevent cracking and keeps the texture creamy.

Step 4: Chill and Decorate

Cool completely at room temperature, then refrigerate for at least 3 hours or overnight.

Before serving, top with:

  • fresh blueberries
  • lemon zest
  • whipped cream if desired

Chilling fully is essential for the best cheesecake texture and flavor.

Tips for Perfect Mini Lemon Blueberry Cheesecakes

For bakery-style mini cheesecakes, keep these tips in mind:

  • Use room temperature ingredients
  • Don’t overmix the batter
  • Bake just until set
  • Cool gradually
  • Chill thoroughly before serving
  • Use cupcake liners for easy removal

These small details help ensure a creamy, crack-free finish.

Delicious Variations to Try

This mini lemon blueberry cheesecake recipe is wonderfully versatile.

Flavor Variations

  • Swap blueberries for raspberries
  • Add a blueberry swirl
  • Use vanilla wafer crust instead of graham cracker
  • Add white chocolate chips

Seasonal Twists

  • Add fresh strawberries in spring
  • Use cranberry topping for winter holidays

This dessert adapts beautifully to different occasions.

What to Serve with Mini Lemon Blueberry Cheesecakes

These cheesecakes pair beautifully with:

  • Iced tea
  • Sparkling lemonade
  • Coffee
  • Fresh fruit platters
  • Light brunch spreads

They’re especially lovely for showers, brunches, and tea parties.

Storage and Make-Ahead Tips

Mini lemon blueberry cheesecakes are ideal for making ahead.

Storage

  • Refrigerate in an airtight container for up to 5 days

Freezing

  • Freeze (without toppings) for up to 2 months
  • Thaw overnight in the fridge before serving

Store toppings separately for the freshest presentation.

Common Mistakes to Avoid

To get the best mini lemon blueberry cheesecakes, avoid these common issues:

  • Using cold cream cheese
  • Overmixing batter
  • Overbaking
  • Skipping chill time
  • Using too much lemon juice

Careful prep and patience are the secrets to perfect texture.

Frequently Asked Questions

Can I make mini lemon blueberry cheesecakes ahead of time?

Yes. They’re even better after chilling overnight.

Can I use frozen blueberries?

Yes. Add them frozen and toss lightly in flour first.

How do I know when mini cheesecakes are done?

The edges should be set, with a slight jiggle in the center.

Can I freeze mini cheesecakes?

Absolutely. Freeze before adding fresh toppings.

Why did my cheesecakes crack?

Usually from overmixing, overbaking, or cooling too quickly.

Final Thoughts

These bright and tangy mini lemon blueberry cheesecakes are the kind of dessert that feels special without being complicated. They’re creamy, fresh, beautifully balanced, and always impressive on the table.

Whether you’re baking for a celebration, preparing a make-ahead dessert for guests, or simply treating yourself to something sweet and citrusy, this recipe is one you’ll want to keep in your collection. Once you taste that silky lemon filling with bursts of juicy blueberry, you’ll understand why this dessert is such a standout favorite.