Chocolate-Dipped Strawberries on Skewers: The Perfect Easy Party Treat

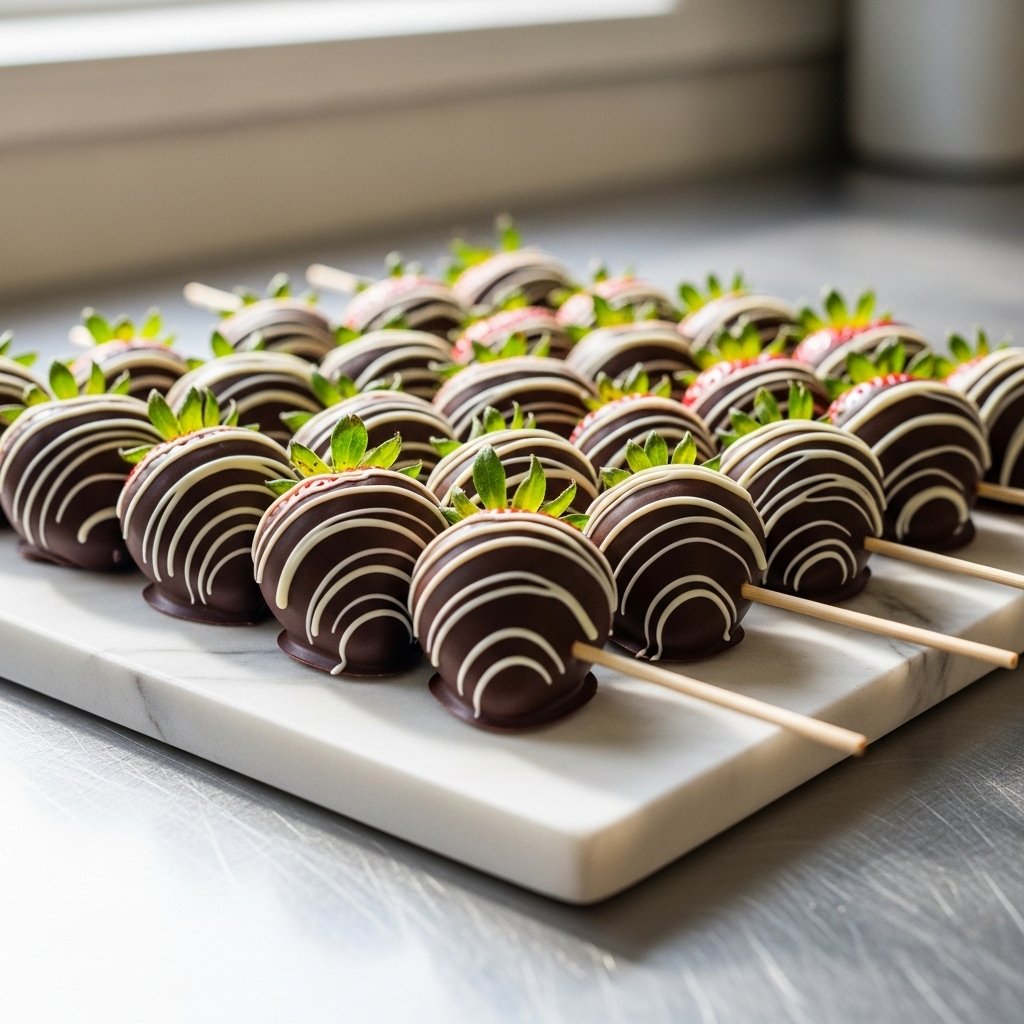
Few desserts feel as effortlessly elegant as chocolate-dipped strawberries on skewers. They’re fresh, juicy, beautifully presented, and surprisingly easy to make at home. Whether you’re planning a romantic dessert platter, a baby shower spread, a summer barbecue, or a festive holiday tray, these strawberry skewers deliver a perfect mix of freshness and indulgence.

What makes this recipe especially fun is the presentation. Sliding strawberries onto skewers turns a classic chocolate-covered fruit into a playful, handheld treat that’s easier to serve and even more eye-catching. The skewers also make decorating simpler, giving you more control while dipping and drizzling. Best of all, this no-bake dessert comes together quickly with just a few ingredients.

Why You’ll Love Chocolate-Dipped Strawberries on Skewers

This easy dessert recipe checks all the boxes for flavor, beauty, and convenience.

Why This Recipe Works

  • No baking required
  • Ready in under 30 minutes
  • Perfect for parties and entertaining
  • Easy to customize with toppings
  • Kid-friendly and fun to make
  • Great for holidays, showers, and gifts

Because the strawberries stay fresh and juicy inside while the chocolate shell hardens on the outside, every bite offers the perfect contrast of texture and flavor.

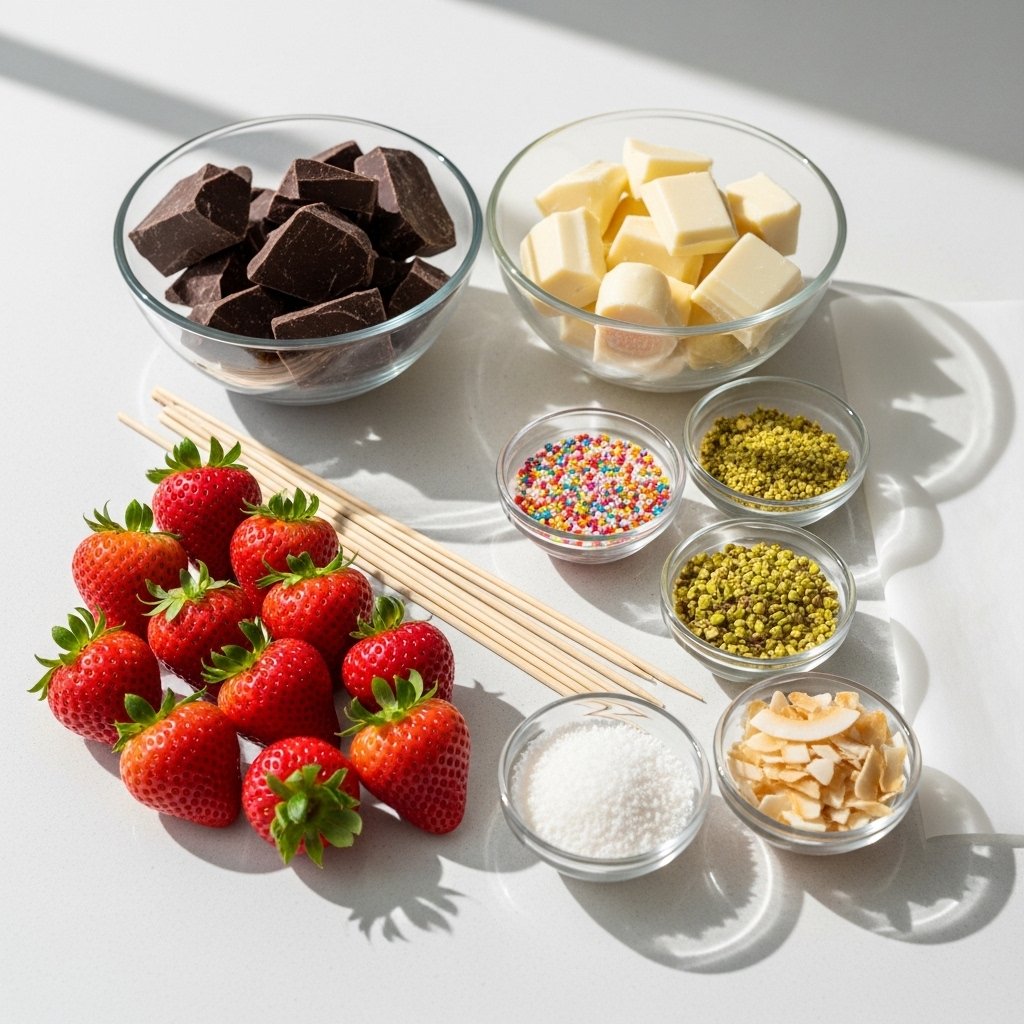
Ingredients for Chocolate-Dipped Strawberries on Skewers

To make this simple dessert, you’ll need:

  • 1 pound fresh strawberries (large, firm berries)
  • 8 to 10 wooden skewers
  • 8 ounces semi-sweet chocolate, chopped or chips
  • 4 ounces white chocolate (optional for drizzle)
  • 1 teaspoon coconut oil or vegetable oil (optional, for smoother melting)

Optional Toppings

  • Crushed pistachios
  • Sprinkles
  • Toasted coconut
  • Crushed cookies
  • Mini chocolate chips

Choosing ripe but firm strawberries is important. Soft berries can release moisture and make the chocolate slide off.

Ingredient Notes for the Best Results

How to Choose the Best Strawberries

Look for strawberries that are:

  • Bright red
  • Firm to the touch
  • Dry on the outside
  • Similar in size for even presentation

Larger strawberries work especially well because they’re easier to skewer and dip.

Best Chocolate for Dipping

Use good-quality chocolate for the smoothest finish and best flavor. Baking bars often melt better than standard chips.

Great options include:

  • Semi-sweet chocolate for balance
  • Dark chocolate for richness
  • Milk chocolate for sweeter flavor

Adding a small amount of oil helps create a silky coating and glossy finish.

How to Make Chocolate-Dipped Strawberries on Skewers

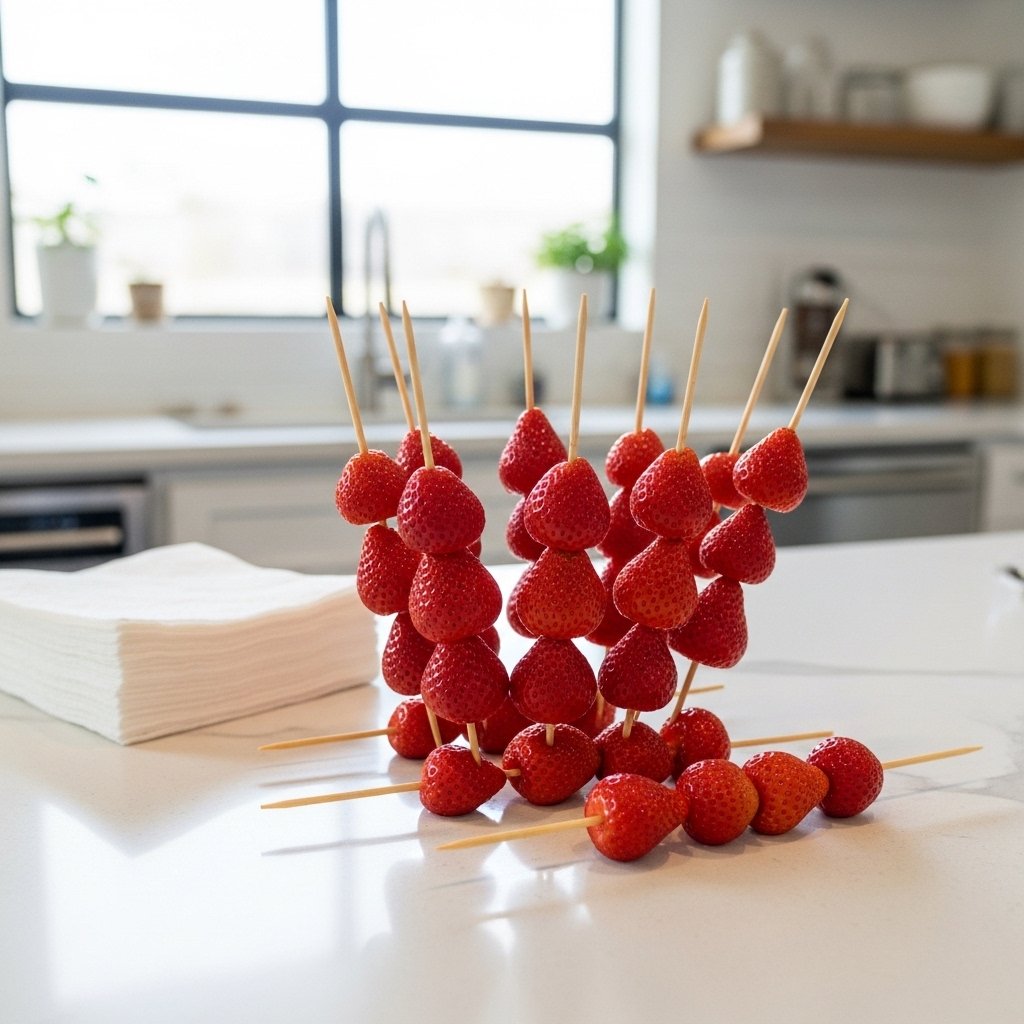
Step 1: Wash and Dry the Strawberries

Rinse the strawberries gently under cool water, then dry them thoroughly with paper towels. Let them air dry for a few extra minutes if needed.

This step is essential because water causes melted chocolate to seize or slide off.

Thread 3 to 4 strawberries onto each skewer, leaving space at the ends for easy handling.

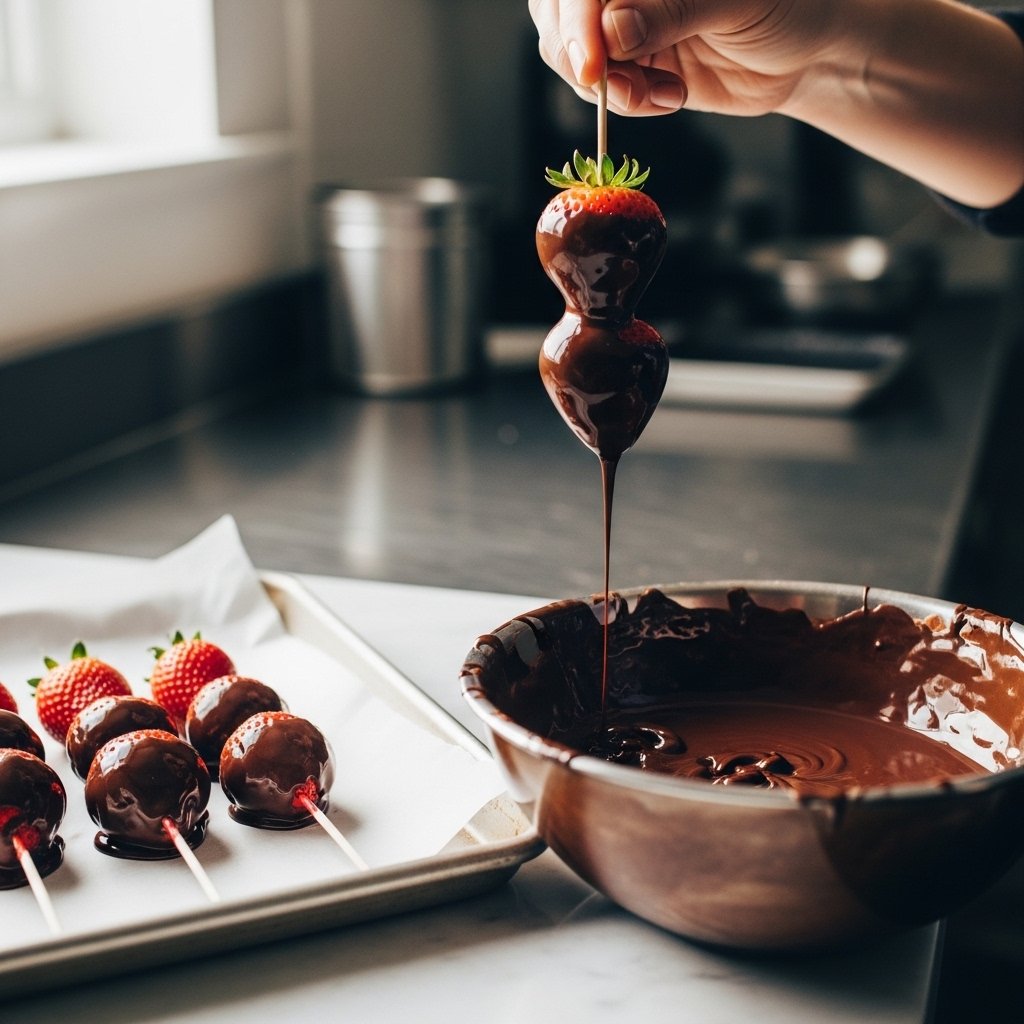
Step 2: Melt the Chocolate

Place the semi-sweet chocolate in a microwave-safe bowl. Heat in 20-second intervals, stirring between each round until smooth and glossy.

If using, stir in coconut oil for a silkier consistency.

You can also use a double boiler if you prefer more control over the melting process.

Step 3: Dip the Strawberry Skewers

Hold each skewer by the end and dip the strawberries into the melted chocolate, turning gently to coat as much or as little as you like.

Let excess chocolate drip off before placing the skewers on a parchment-lined tray.

For best presentation, keep the coating smooth and even.

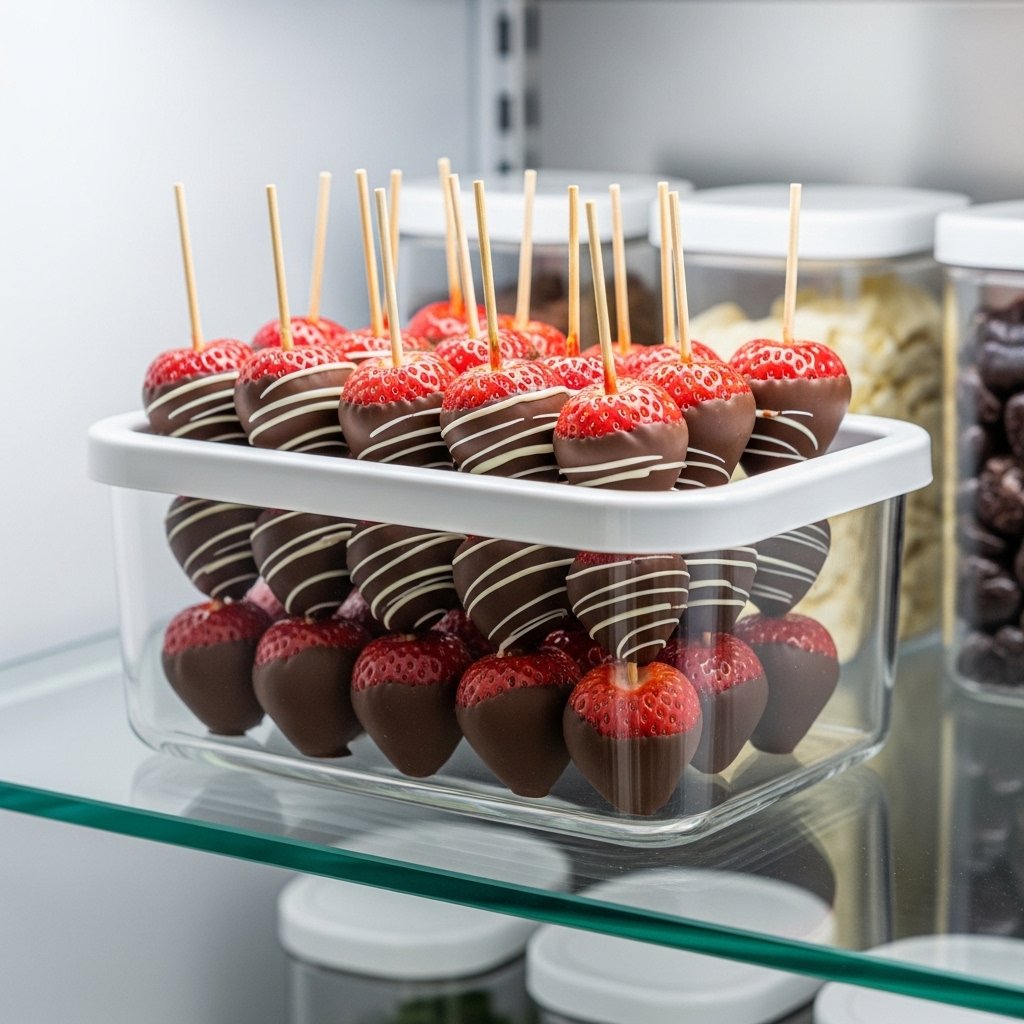
Step 4: Decorate and Set

If using white chocolate, melt it separately and drizzle over the dipped skewers using a spoon or piping bag.

Immediately add toppings before the chocolate sets.

Place the tray in the refrigerator for 15 to 20 minutes, or until the chocolate firms up.

Once set, serve chilled or slightly cool for the best texture.

Tips for Perfect Chocolate-Dipped Strawberry Skewers

A few simple tricks can help you get professional-looking results.

Helpful Tips

  • Dry strawberries completely before dipping
  • Use room temperature berries for better coating
  • Melt chocolate slowly to prevent burning
  • Use parchment paper for easy cleanup
  • Chill briefly to set the coating
  • Avoid overcrowding the tray

Patience during prep makes a huge difference in appearance and texture.

Creative Variations and Fun Toppings

This chocolate-dipped strawberries on skewers recipe is easy to customize.

Flavor Ideas

  • Use dark and white chocolate together
  • Add crushed freeze-dried strawberries
  • Sprinkle sea salt for contrast
  • Dip in caramel first, then chocolate

Party Themes

  • Red, white, and blue sprinkles for July 4th
  • Pink drizzle for baby showers
  • Gold dust for elegant events

These skewers can easily match any celebration or season.

What to Serve with Chocolate-Dipped Strawberries on Skewers

These skewers pair beautifully with:

  • Sparkling lemonade
  • Champagne or prosecco
  • Dessert charcuterie boards
  • Mini cheesecakes
  • Brownie bites

They’re also beautiful wrapped as edible gifts for Valentine’s Day, Mother’s Day, or anniversaries.

Storage Tips

Chocolate-dipped strawberries are best enjoyed fresh, but you can store them briefly.

How to Store

  • Keep in a single layer in an airtight container
  • Line with paper towels to absorb moisture
  • Refrigerate up to 24–36 hours

Avoid freezing, as strawberries release too much water once thawed.

Common Mistakes to Avoid

To make perfect chocolate-dipped strawberries on skewers, avoid these common mistakes:

  • Dipping wet strawberries
  • Overheating the chocolate
  • Using overripe berries
  • Skipping parchment paper
  • Refrigerating too long before serving

Keeping ingredients simple and prep careful ensures beautiful results.

Frequently Asked Questions

How far in advance can I make chocolate-dipped strawberries on skewers?

For best freshness, make them the same day. You can prepare them up to 24 hours in advance.

Why is my chocolate not sticking?

Usually because the strawberries weren’t fully dry or the chocolate was overheated.

Can I use frozen strawberries?

No. Frozen strawberries release too much moisture and become mushy.

What kind of skewers should I use?

Standard wooden skewers work best. You can also use decorative party picks.

Can kids help make this recipe?

Yes. This is a fun and easy recipe for supervised family cooking.

Final Thoughts

These chocolate-dipped strawberries on skewers are proof that simple desserts can still feel special. They’re fresh, beautiful, easy to customize, and always a hit at gatherings.

Whether you’re making them for a celebration, gifting them to someone special, or just treating yourself to something sweet, this recipe is an easy way to create a memorable dessert with minimal effort. Once you try them, you’ll see why they’re such a timeless favorite.

Decadent Banana Chocolate Chip Muffins: A Sweet Morning Treat!

There’s something timeless and comforting about the smell of freshly baked banana chocolate chip muffins filling your kitchen. These Decadent Banana Chocolate Chip Muffins are soft, moist, and packed with sweet banana flavor, melty chocolate chips, and just the right balance of richness. Whether you need a quick breakfast, an afternoon snack, or a cozy weekend baking project, this recipe delivers bakery-style results with simple pantry staples.

What makes these muffins so special is their perfect texture. They’re tender and fluffy inside, with lightly golden tops and pockets of gooey chocolate in every bite. Plus, they’re a wonderful way to use up overripe bananas that might otherwise go to waste. This is the kind of recipe you’ll come back to again and again because it’s reliable, easy, and always delicious.

Why You’ll Love These Banana Chocolate Chip Muffins

These muffins are more than just a sweet treat—they’re practical, crowd-pleasing, and incredibly satisfying.

What Makes This Recipe a Favorite

  • Moist and fluffy texture
  • Rich banana flavor
  • Perfect amount of chocolate chips
  • Easy to make in one bowl
  • Great for breakfast or snacks
  • Freezer-friendly
  • Kid-friendly and family-approved

Unlike dry or dense muffins, this recipe creates a soft crumb that stays tender for days. The bananas naturally sweeten the batter and keep every muffin moist.

Ingredients for Banana Chocolate Chip Muffins

To make these delicious homemade muffins, you’ll need:

  • 3 very ripe bananas, mashed
  • 1/2 cup unsalted butter, melted
  • 1/2 cup brown sugar
  • 1/4 cup granulated sugar
  • 2 large eggs
  • 1 teaspoon vanilla extract
  • 1 3/4 cups all-purpose flour
  • 1 teaspoon baking soda
  • 1 teaspoon baking powder
  • 1/2 teaspoon salt
  • 1 teaspoon cinnamon (optional)
  • 1/2 cup sour cream or Greek yogurt
  • 1 cup semi-sweet chocolate chips
  • Extra chocolate chips for topping

The key to the best banana chocolate chip muffins is using deeply ripe bananas with lots of brown spots. They add sweetness, moisture, and bold banana flavor.

Ingredient Notes and Helpful Baking Tips

Why Overripe Bananas Matter

Overripe bananas are essential because:

  • They mash easily
  • They taste sweeter
  • They add moisture
  • They create a richer aroma

Bananas that look too soft for eating are often perfect for baking.

Best Chocolate Chips to Use

Semi-sweet chocolate chips are the classic choice because they balance the sweetness of the bananas. You can also use:

  • Dark chocolate chips
  • Milk chocolate chips
  • Mini chocolate chips
  • Chocolate chunks

For extra indulgence, use a mix of chips and chunks.

How to Make Banana Chocolate Chip Muffins

Step 1: Prep Your Oven and Muffin Pan

Preheat your oven to 375°F. Line a standard muffin tin with paper liners or lightly grease each cup.

Proper prep ensures even baking and easy cleanup.

Step 2: Mix the Wet Ingredients

In a large mixing bowl, mash the bananas until mostly smooth. Add melted butter, brown sugar, granulated sugar, eggs, vanilla, and sour cream.

Whisk until fully combined and creamy.

The batter should smell sweet and rich already at this stage.

Step 3: Add Dry Ingredients

In a separate bowl, whisk together flour, baking soda, baking powder, salt, and cinnamon.

Gradually fold the dry ingredients into the wet mixture. Stir gently until just combined. Do not overmix, or the muffins may become dense.

Fold in the chocolate chips last.

This gentle mixing method helps create tender, bakery-style muffins.

Step 4: Fill and Bake

Divide the batter evenly among the muffin cups, filling each about 3/4 full. Sprinkle extra chocolate chips on top for a bakery-style finish.

Bake for 18 to 22 minutes, or until the tops are golden and a toothpick inserted in the center comes out mostly clean.

Let the muffins cool in the pan for 5 minutes before transferring to a wire rack.

Step 5: Cool and Enjoy

Let the muffins cool slightly before serving so the crumb can set properly. The chocolate chips will still be warm and melty, creating the perfect bite.

Serve warm for the ultimate cozy experience.

Tips for Perfect Banana Chocolate Chip Muffins

To make sure your banana chocolate chip muffins turn out beautifully every time, keep these tips in mind:

  • Use room temperature eggs for smoother batter
  • Measure flour correctly using the spoon-and-level method
  • Don’t overmix the batter
  • Use ripe bananas only
  • Top with extra chocolate chips before baking
  • Let muffins cool before storing

Small baking details make a big difference in final texture.

Fun Variations to Try

This banana chocolate chip muffin recipe is wonderfully flexible.

Tasty Add-Ins

  • Chopped walnuts or pecans
  • Shredded coconut
  • Peanut butter chips
  • Oats for texture

Healthier Swaps

  • Whole wheat flour for part of the flour
  • Greek yogurt instead of sour cream
  • Coconut sugar instead of white sugar

You can even make mini muffins for lunchboxes or parties.

What to Serve with Banana Chocolate Chip Muffins

These muffins are delicious on their own, but they pair well with:

  • Fresh fruit
  • Greek yogurt
  • Coffee or tea
  • Smoothies
  • Scrambled eggs for a balanced breakfast

They’re ideal for brunch spreads, school snacks, or cozy mornings at home.

Storage and Freezing Tips

These muffins store beautifully and stay moist for days.

Room Temperature Storage

  • Store in an airtight container for up to 3 days

Refrigerator

  • Store for up to 1 week

Freezer

  • Freeze in a sealed bag for up to 3 months

To reheat:

  • Microwave for 10–15 seconds
  • Warm in the oven at 300°F for a few minutes

Common Mistakes to Avoid

To get the best banana chocolate chip muffins, avoid these common baking mistakes:

  • Using underripe bananas
  • Overmixing the batter
  • Overbaking
  • Using too much flour
  • Skipping muffin liners without greasing

Paying attention to these simple details ensures soft, tender muffins every time.

Frequently Asked Questions

Can I make banana chocolate chip muffins ahead of time?

Yes. They store well and are perfect for meal prep or make-ahead breakfasts.

Can I freeze banana chocolate chip muffins?

Absolutely. Let them cool completely before freezing.

How ripe should bananas be for muffins?

Very ripe with lots of brown spots is best for sweetness and moisture.

Can I make these muffins healthier?

Yes. Reduce sugar slightly, use Greek yogurt, or swap part of the flour for whole wheat.

Why are my muffins dense?

Usually because the batter was overmixed or too much flour was added.

Final Thoughts

These Decadent Banana Chocolate Chip Muffins are everything a homemade muffin should be: moist, flavorful, easy to make, and deeply comforting. They’re the perfect way to turn simple ingredients into something special that feels like a bakery treat right from your own oven.

Whether you bake them for a busy weekday breakfast, a weekend brunch, or a sweet afternoon snack, this recipe is one you’ll want to keep in your regular rotation. Once you taste that soft banana crumb with pockets of melted chocolate, you’ll understand why these muffins are such a beloved classic.

Zesty Cowboy Butter Lemon Bowtie Chicken & Broccoli Delight!

If you’re craving a dinner that feels comforting, fresh, and restaurant-worthy without requiring hours in the kitchen, this Zesty Cowboy Butter Lemon Bowtie Chicken & Broccoli Delight is exactly what your weeknight routine needs. Tender chicken, vibrant broccoli, buttery lemon sauce, and perfectly cooked bowtie pasta come together in one irresistible dish that tastes rich while still feeling bright and balanced.

This recipe combines the bold flavors of cowboy butter—garlic, herbs, lemon, and a little kick of spice—with juicy chicken and wholesome broccoli for a meal that’s both satisfying and family-friendly. The bowtie pasta catches every bit of that silky sauce, making each bite flavorful and comforting. Whether you’re feeding hungry kids, hosting a casual dinner, or meal prepping lunches, this pasta recipe is a reliable favorite.

Why You’ll Love This Cowboy Butter Lemon Bowtie Chicken Recipe

This recipe has everything people want in an easy dinner: flavor, texture, color, and convenience.

What Makes This Recipe Special

  • Packed with bold lemon garlic butter flavor
  • Balanced with protein, pasta, and vegetables
  • Easy enough for busy weeknights
  • Ready in under 45 minutes
  • Great for leftovers and meal prep
  • Family-friendly and crowd-pleasing

The cowboy butter sauce takes this dish to another level. It adds richness without making the pasta feel heavy, while fresh lemon keeps everything lively and fresh.

Ingredients for Zesty Cowboy Butter Lemon Bowtie Chicken & Broccoli Delight

To make this flavorful pasta recipe, you’ll need:

Main Ingredients

  • 12 ounces bowtie pasta (farfalle)
  • 1 1/2 pounds boneless skinless chicken breast or thighs, cubed
  • 3 cups broccoli florets
  • 2 tablespoons olive oil
  • Salt and black pepper to taste

Cowboy Butter Lemon Sauce

  • 5 tablespoons unsalted butter
  • 4 garlic cloves, minced
  • 1 tablespoon Dijon mustard
  • 1 tablespoon fresh lemon juice
  • 1 teaspoon lemon zest
  • 1/2 teaspoon smoked paprika
  • 1/4 teaspoon red pepper flakes
  • 1 teaspoon Italian seasoning
  • 2 tablespoons chopped parsley
  • 1/4 cup grated Parmesan cheese
  • 1/3 cup reserved pasta water

Fresh lemon juice and zest are especially important here because they give the cowboy butter sauce its signature brightness.

Ingredient Notes and Best Substitutions

Best Chicken for This Recipe

Chicken breast works beautifully because it cooks quickly and stays tender when cut into bite-sized pieces. Chicken thighs offer extra juiciness and deeper flavor.

Why Bowtie Pasta Works So Well

Bowtie pasta, also called farfalle, is ideal because:

  • It holds sauce well
  • Adds visual appeal
  • Cooks evenly
  • Pairs perfectly with chunky ingredients

You can also substitute:

  • Penne
  • Rotini
  • Shell pasta

Broccoli Brings Freshness

Broccoli adds:

  • Bright color
  • Fiber and nutrients
  • A fresh contrast to buttery sauce

Fresh broccoli is best, but frozen florets can work in a pinch.

Step-by-Step: How to Make Cowboy Butter Lemon Bowtie Chicken & Broccoli Delight

Step 1: Cook the Pasta and Broccoli

Bring a large pot of salted water to a boil. Cook bowtie pasta according to package directions until al dente. In the last 2 to 3 minutes of cooking, add broccoli florets directly to the pasta water.

This method saves time and helps the broccoli stay bright green and tender-crisp.

Before draining, reserve about 1/3 cup of pasta water. Drain and set aside.

Step 2: Cook the Chicken

While the pasta cooks, season the chicken with salt, pepper, and a little smoked paprika.

Heat olive oil in a large skillet over medium-high heat. Add chicken pieces in a single layer and cook until golden brown and cooked through, about 5 to 7 minutes.

Avoid overcrowding the pan so the chicken develops a nice golden crust instead of steaming.

Step 3: Make the Cowboy Butter Lemon Sauce

Reduce heat to medium. Add butter to the same skillet, followed by garlic, Dijon mustard, lemon juice, zest, red pepper flakes, Italian seasoning, and parsley.

Stir gently until fragrant and silky. Add the Parmesan cheese and a splash of reserved pasta water to create a glossy sauce.

This sauce should coat the back of a spoon—rich but not overly thick.

Step 4: Combine and Serve

Add the cooked pasta and broccoli to the skillet. Toss everything gently until the bowtie pasta is coated and the broccoli and chicken are evenly distributed.

Taste and adjust with more lemon juice, salt, or red pepper flakes if needed.

Finish with:

  • extra Parmesan
  • fresh parsley
  • lemon wedges

Serve warm for the best flavor and texture.

Tips for the Best Cowboy Butter Lemon Bowtie Chicken

A few simple techniques will help you make this dish perfectly every time.

Helpful Cooking Tips

  • Salt your pasta water generously for better flavor
  • Don’t overcook the broccoli
  • Use fresh lemon for the brightest taste
  • Reserve pasta water before draining
  • Let the chicken brown before stirring
  • Add sauce gradually if you want more control

These little details create a dish that tastes polished and balanced.

Variations and Flavor Ideas

This cowboy butter lemon bowtie chicken and broccoli delight is easy to customize.

Delicious Variations

  • Add spinach for extra greens
  • Use shrimp instead of chicken
  • Stir in sun-dried tomatoes
  • Add mushrooms for earthiness
  • Make it creamy with a splash of heavy cream

Make It Lighter

  • Use whole wheat pasta
  • Reduce butter slightly
  • Add extra broccoli or zucchini

This recipe is flexible enough to suit different tastes and dietary goals.

What to Serve with This Pasta Dish

This pasta is filling on its own, but it also pairs beautifully with:

  • Garlic bread
  • Caesar salad
  • Roasted asparagus
  • Sparkling lemon water
  • Light white wine

For guests, serve it with a simple dessert like lemon bars or berry sorbet.

Storage and Reheating Tips

This pasta stores surprisingly well, making it great for leftovers.

Storage

  • Refrigerate in an airtight container for up to 4 days

Reheating

  • Reheat gently on the stove with a splash of broth or water
  • Microwave in short intervals, stirring between rounds

Avoid overheating, which can dry out the chicken and make the sauce greasy.

Common Mistakes to Avoid

To make sure your cowboy butter lemon bowtie chicken turns out amazing, avoid these common pitfalls:

  • Overcooking the pasta
  • Skipping reserved pasta water
  • Using bottled lemon juice instead of fresh
  • Cooking chicken on low heat
  • Adding Parmesan over high heat too quickly

Taking your time with each step helps build the best flavor and texture.

Frequently Asked Questions

Can I make cowboy butter lemon bowtie chicken ahead of time?

Yes. You can make it a day ahead and reheat gently. Add a splash of water or broth to loosen the sauce.

What is cowboy butter sauce made of?

Cowboy butter typically includes butter, garlic, herbs, lemon, mustard, and spices for a rich but zesty flavor.

Can I use frozen broccoli?

Yes. Just thaw and drain it first so excess water doesn’t thin the sauce.

How do I keep chicken tender in pasta?

Cook it over medium-high heat just until done, and avoid overcooking during reheating.

Can I make this dish spicy?

Absolutely. Add more red pepper flakes or a dash of cayenne.

Final Thoughts

This Zesty Cowboy Butter Lemon Bowtie Chicken & Broccoli Delight is the kind of recipe that turns a regular dinner into something memorable. It’s comforting without being too heavy, bright without being fussy, and easy enough to make even on your busiest nights.

With juicy chicken, tender broccoli, perfectly cooked pasta, and that irresistible cowboy butter lemon sauce, this recipe is one you’ll come back to again and again. Whether you’re making it for your family, meal prepping for the week, or treating yourself to a cozy homemade dinner, it’s a dish that truly delivers on flavor and simplicity.

BEST RECIPE for Healthy Steak Bites with Sweet Potatoes & Peppers | Meal-Prep Bowl

If you’ve been searching for a healthy, satisfying lunch or dinner that tastes just as good on day four as it does fresh out of the skillet, this Healthy Steak Bites with Sweet Potatoes & Peppers Meal-Prep Bowl is exactly what you need. Packed with lean protein, fiber-rich sweet potatoes, colorful bell peppers, and bold seasonings, this bowl is a complete meal that feels nourishing without ever tasting boring.

This recipe is ideal for anyone who wants to eat well without spending hours in the kitchen. The steak bites are juicy and flavorful, the roasted sweet potatoes are caramelized and tender, and the peppers add freshness, crunch, and color. Whether you’re meal prepping for work lunches, looking for a post-workout meal, or simply trying to make weeknight dinners easier, this bowl delivers convenience and crave-worthy flavor in every bite.

Why You’ll Love This Healthy Steak Bites Meal-Prep Bowl

This recipe is more than just a trendy meal-prep idea—it’s practical, balanced, and deeply satisfying. It gives you protein, healthy carbs, vegetables, and healthy fats all in one bowl, making it a great option for staying full and energized.

Reasons This Recipe Works

  • High in protein for muscle support and satiety
  • Naturally gluten-free
  • Great for meal prep and batch cooking
  • Easy to customize with sauces and toppings
  • Family-friendly and beginner-friendly
  • Ready in about 40 minutes

The combination of textures is especially satisfying. You get crispy edges on the steak bites, soft roasted sweet potatoes, and lightly charred peppers for a meal that never feels repetitive.

Ingredients for Healthy Steak Bites with Sweet Potatoes & Peppers

Here’s what you’ll need to make these healthy steak bites meal-prep bowls:

For the Steak Bites

  • 1 1/2 pounds sirloin steak, cut into bite-sized cubes
  • 1 tablespoon olive oil
  • 1 teaspoon garlic powder
  • 1 teaspoon smoked paprika
  • 1/2 teaspoon onion powder
  • 1/2 teaspoon black pepper
  • 1 teaspoon kosher salt

For the Sweet Potatoes and Peppers

  • 2 large sweet potatoes, peeled and cubed
  • 2 bell peppers (red, yellow, or orange), sliced
  • 1 small red onion, sliced
  • 2 tablespoons olive oil
  • 1 teaspoon chili powder
  • 1/2 teaspoon cumin
  • Salt and pepper to taste

Optional Toppings

  • Avocado slices
  • Fresh parsley or cilantro
  • Lime wedges
  • Greek yogurt sauce
  • Hot sauce

Fresh, colorful ingredients make a huge difference here. Choosing quality steak and ripe peppers helps elevate the flavor and texture of the entire meal.

Ingredient Notes and Smart Substitutions

Best Cut of Steak for Steak Bites

Sirloin is one of the best choices for healthy steak bites because it’s lean, tender, and cooks quickly. Ribeye offers more richness, while flank steak also works if sliced properly.

Sweet Potatoes Add Healthy Comfort

Sweet potatoes are ideal in this meal-prep bowl because they:

  • Add natural sweetness
  • Provide fiber and complex carbs
  • Roast beautifully
  • Reheat well

If needed, you can substitute:

  • Butternut squash
  • Yukon gold potatoes
  • Cauliflower for lower carbs

Peppers Add Flavor and Freshness

Bell peppers bring sweetness, color, and crunch. A mix of red, yellow, and orange peppers makes the bowl visually appealing and nutritionally balanced.

Step-by-Step: How to Make Healthy Steak Bites Meal-Prep Bowls

Step 1: Roast the Sweet Potatoes and Peppers

Preheat your oven to 425°F. On a large baking sheet, toss sweet potato cubes, peppers, and onion with olive oil, chili powder, cumin, salt, and pepper.

Spread everything in an even layer to avoid steaming. Roast for 25 to 30 minutes, flipping halfway through, until the sweet potatoes are tender and caramelized and the peppers are slightly blistered.

Roasting at high heat helps bring out natural sweetness while keeping the vegetables from becoming soggy.

Step 2: Season and Sear the Steak Bites

While the vegetables roast, pat the steak cubes dry with paper towels. This helps create a better sear. Toss them with olive oil, garlic powder, smoked paprika, onion powder, salt, and pepper.

Heat a large cast iron skillet over medium-high heat until hot. Add steak bites in a single layer without overcrowding. Sear for 2 to 3 minutes per side until browned and cooked to your preferred doneness.

Work in batches if needed. Overcrowding the pan traps steam and prevents a proper crust.

Step 3: Assemble the Meal-Prep Bowls

Once everything is cooked, divide the roasted vegetables and steak bites evenly into meal-prep containers or serving bowls.

Top with:

  • sliced avocado
  • fresh herbs
  • a squeeze of lime
  • your favorite healthy sauce

This bowl is delicious warm, room temperature, or reheated, making it ideal for weekly meal prep.

Tips for Perfect Healthy Steak Bites Every Time

A few smart techniques can take this meal from good to exceptional.

Pro Cooking Tips

  • Cut steak into evenly sized cubes for consistent cooking
  • Let steak sit at room temperature for 15–20 minutes before searing
  • Don’t skip drying the steak before seasoning
  • Use a hot pan for a flavorful crust
  • Roast veggies in a single layer for caramelization
  • Let steak rest for a few minutes before serving

These small details help lock in moisture and maximize flavor.

Easy Variations and Add-Ons

One reason this healthy steak bites with sweet potatoes and peppers recipe is so popular is how easy it is to customize.

Flavor Variations

  • Add taco seasoning for a Tex-Mex bowl
  • Use teriyaki sauce for an Asian-inspired version
  • Add chipotle seasoning for smoky heat

Extra Add-Ins

  • Black beans
  • Quinoa
  • Brown rice
  • Spinach or kale
  • Feta cheese

You can also turn this into lettuce wraps or stuff it into tortillas for meal variety throughout the week.

What to Serve with Steak Bites Meal-Prep Bowls

These bowls are a complete meal, but if you want to round things out, pair them with:

  • A light cucumber salad
  • Fresh fruit
  • Sparkling water with citrus
  • Protein smoothie
  • Homemade salsa or yogurt dip

For entertaining, serve buffet-style so everyone can build their own bowl.

Storage and Reheating Tips

This healthy steak bites meal-prep bowl is perfect for make-ahead lunches.

Storage

  • Store in airtight containers in the fridge for up to 4 days
  • Keep avocado and fresh toppings separate until serving

Reheating

  • Microwave for 1–2 minutes until warm
  • Reheat in a skillet for best texture
  • Add a splash of broth if needed to keep steak moist

Meal prep works best when ingredients are cooled before storing to avoid condensation.

Common Mistakes to Avoid

To make the best healthy steak bites with sweet potatoes and peppers, avoid these common errors:

  • Overcrowding the pan when searing steak
  • Cutting sweet potatoes too large
  • Under-seasoning the vegetables
  • Overcooking the steak
  • Packing hot food directly into containers

Cooking each element properly ensures your meal-prep bowls stay delicious all week.

Frequently Asked Questions

What is the best steak for healthy steak bites?

Sirloin is one of the best options because it’s lean, tender, and affordable. Ribeye is richer, while flank steak is also a great choice.

Can I make this recipe ahead of time?

Yes. This recipe was designed for meal prep and stores very well for several days.

How do I keep steak bites tender?

Use high heat, avoid overcooking, and let the meat rest after cooking.

Can I freeze steak meal-prep bowls?

Yes, but for best texture, freeze without avocado or fresh herbs. Thaw overnight before reheating.

Are sweet potatoes good for meal prep?

Absolutely. They hold up well in the fridge, reheat beautifully, and add healthy carbohydrates.

Final Thoughts

This Healthy Steak Bites with Sweet Potatoes & Peppers Meal-Prep Bowl is one of those recipes that makes healthy eating feel easy, realistic, and delicious. It’s packed with bold flavor, loaded with nutrients, and flexible enough to fit your weekly routine.

Whether you’re planning lunches for the week, trying to eat more balanced meals, or just want a reliable dinner recipe that doesn’t disappoint, this meal-prep bowl deserves a spot in your regular rotation. Once you make it, you’ll understand why it’s one of the best healthy steak bites recipes to keep on repeat.

Twice Baked Loaded Breakfast Potatoes

If you’re looking for a hearty, satisfying breakfast that feels both comforting and special, these Twice Baked Loaded Breakfast Potatoes are about to become your new favorite morning recipe. Crispy potato skins are filled with a creamy mashed potato mixture, savory breakfast toppings, melty cheese, and fluffy eggs for a breakfast dish that’s indulgent, filling, and absolutely unforgettable.

This recipe combines everything people love about a loaded baked potato with classic breakfast flavors. The result is a brunch-worthy meal that looks impressive but is surprisingly easy to make at home. Whether you’re feeding your family on a lazy Sunday, planning a holiday brunch, or prepping breakfast ahead for busy weekdays, this recipe delivers every time.

Why You’ll Love These Twice Baked Loaded Breakfast Potatoes

There’s a reason this recipe is such a crowd-pleaser. It checks all the boxes for flavor, texture, and convenience.

Perfect for Breakfast, Brunch, or Meal Prep

These loaded breakfast potatoes are versatile enough for:

  • Weekend family breakfasts
  • Holiday brunch spreads
  • Make-ahead weekday meals
  • Breakfast-for-dinner nights

Because the potatoes are baked twice, the skins become beautifully crisp while the inside stays creamy and rich. Every bite gives you a balance of crunchy edges, fluffy filling, smoky bacon, and gooey cheese.

Packed with Flavor and Customizable

One of the best parts about twice baked breakfast potatoes is how easy they are to customize. You can make them spicy, vegetarian, extra cheesy, or protein-packed depending on your preferences. They’re also a great way to use leftover baked potatoes.

Ingredients for Twice Baked Loaded Breakfast Potatoes

To make this delicious recipe, gather the following ingredients:

  • 4 large russet potatoes
  • 2 tablespoons olive oil
  • 1 teaspoon kosher salt
  • 1/2 teaspoon black pepper
  • 4 tablespoons unsalted butter
  • 1/3 cup sour cream
  • 1/4 cup milk or heavy cream
  • 1 cup shredded sharp cheddar cheese
  • 6 slices cooked bacon, crumbled
  • 4 large eggs
  • 2 green onions, sliced
  • 1/2 teaspoon garlic powder
  • 1/2 teaspoon smoked paprika
  • Optional: hot sauce, sausage, diced bell peppers

Choosing russet potatoes is key because their thick skins hold up well during baking and their interiors mash into a fluffy, creamy filling.

Ingredient Notes for the Best Flavor

Why Russet Potatoes Work Best

Russet potatoes are ideal for twice baked potatoes because they bake up light and fluffy inside while developing a sturdy, crisp outer shell. Avoid waxy potatoes like red or Yukon Gold for this recipe, since they won’t give the same fluffy texture.

Cheese, Bacon, and Eggs Matter

Sharp cheddar adds bold flavor and melts beautifully. Thick-cut bacon provides smoky crunch. For eggs, soft scrambled works best because it stays tender after baking. If you prefer runny yolks, you can crack an egg into each potato boat during the second bake.

Using full-fat dairy also makes a big difference in richness and texture.

How to Make Twice Baked Loaded Breakfast Potatoes

Step 1: Bake the Potatoes

Preheat your oven to 400°F. Scrub and dry the potatoes well, then rub them with olive oil and season lightly with salt. Place directly on the oven rack or on a baking sheet.

Bake for 50 to 60 minutes, or until fork tender. The skins should feel slightly crisp and the centers soft.

Let the potatoes cool just enough to handle safely.

Step 2: Prepare the Filling

Slice each baked potato in half lengthwise. Carefully scoop out the flesh, leaving a thin border around the skin to help it hold its shape.

Place the potato flesh in a large mixing bowl. Add:

  • butter
  • sour cream
  • milk
  • garlic powder
  • smoked paprika
  • half the cheese
  • half the bacon

Mash until creamy but still slightly textured. Taste and adjust seasoning with salt and pepper.

This filling should be rich, fluffy, and well-seasoned because it’s the heart of your breakfast potatoes.

Step 3: Fill and Bake Again

Spoon the mashed filling back into each potato shell, mounding it slightly for a bakery-style look. Top with the remaining cheese and bacon.

Return the stuffed potatoes to the oven and bake at 375°F for 15 to 20 minutes until heated through and the tops are golden and bubbling.

Step 4: Add Eggs and Finish

While the potatoes bake, softly scramble the eggs in a skillet over low heat. Keep them slightly underdone because they’ll continue cooking from residual heat.

Remove the potatoes from the oven and top each one with fluffy scrambled eggs. Sprinkle with sliced green onions and extra cheese if desired.

Serve immediately while hot and melty.

Tips for Perfect Twice Baked Loaded Breakfast Potatoes

Making perfect twice baked loaded breakfast potatoes is easy when you follow a few expert tips:

  • Bake potatoes fully the first time so the inside is soft and mashable.
  • Don’t scoop too close to the skin or they may collapse.
  • Use warm dairy ingredients for a smoother filling.
  • Avoid overmixing or the potatoes can become gluey.
  • Add eggs at the end to keep them soft and tender.
  • Broil briefly for extra crispy tops.

A little patience during both baking stages makes all the difference in texture.

Easy Variations to Try

These twice baked breakfast potatoes are incredibly flexible.

Protein Variations

  • Swap bacon for breakfast sausage
  • Add diced ham
  • Mix in shredded rotisserie chicken

Veggie Add-Ins

  • Sautéed spinach
  • Mushrooms
  • Bell peppers
  • Jalapeños for heat

Cheese Ideas

  • Pepper jack for spice
  • Monterey Jack for creaminess
  • Gouda for smoky richness

You can even make a vegetarian version by skipping the bacon and adding roasted veggies and black beans.

What to Serve With Loaded Breakfast Potatoes

These potatoes are filling on their own, but they pair beautifully with lighter sides to round out the meal.

Great serving ideas include:

  • Fresh fruit salad
  • Greek yogurt parfaits
  • Avocado slices
  • Buttery toast
  • Fresh orange juice or coffee

For brunch gatherings, serve them alongside pancakes, waffles, or a breakfast casserole for an impressive spread.

Storage and Reheating Tips

Twice baked loaded breakfast potatoes are excellent for meal prep.

How to Store

  • Refrigerate leftovers in an airtight container for up to 4 days
  • Store toppings like eggs separately if possible for best texture

How to Reheat

  • Oven: 350°F for 15–20 minutes
  • Air fryer: 350°F for 8–10 minutes
  • Microwave: 1–2 minutes (less crispy but still tasty)

You can also freeze the stuffed potatoes before adding eggs. Wrap tightly and freeze for up to 2 months.

Common Mistakes to Avoid

To make sure your loaded breakfast potatoes turn out amazing, avoid these common issues:

  • Underbaking the potatoes the first time
  • Using too much liquid in the filling
  • Overmixing the mashed potatoes
  • Overcooking the eggs
  • Skipping seasoning layers

Season every component well for the best overall flavor.

Frequently Asked Questions

Can I make twice baked loaded breakfast potatoes ahead of time?

Yes. You can bake and fill the potatoes a day ahead. Store them covered in the fridge, then do the second bake before serving. Add eggs fresh for the best texture.

What are the best potatoes for twice baked breakfast potatoes?

Large russet potatoes are the best choice because they have sturdy skins and fluffy interiors.

Can I freeze twice baked breakfast potatoes?

Absolutely. Freeze after stuffing and before the second bake. Thaw overnight in the fridge, then bake until hot.

How do I make this recipe healthier?

Use turkey bacon, reduced-fat cheese, Greek yogurt instead of sour cream, and add vegetables like spinach or peppers.

Can I use leftover baked potatoes?

Yes, leftover baked potatoes work wonderfully and save time.

Final Thoughts

These Twice Baked Loaded Breakfast Potatoes are everything you want in a comforting breakfast: crispy, creamy, cheesy, savory, and deeply satisfying. They feel special enough for entertaining but simple enough for everyday cooking.

The beauty of this recipe is that it’s both reliable and adaptable. Once you make it once, you’ll find yourself coming back to it for holidays, brunches, meal prep, and cozy mornings at home. If you love breakfast recipes that feel homemade, hearty, and packed with flavor, this one deserves a permanent spot in your kitchen.

Cobb Salad Recipe (High-Protein Salad) – Classic, Fresh & Filling

If you’re looking for a meal that is fresh, filling, and packed with protein, this Cobb Salad Recipe (High-Protein Salad) is exactly what you need. It’s a classic American salad that combines crisp greens, juicy chicken, creamy avocado, eggs, bacon, and tangy dressing—all in one satisfying bowl.

Unlike light salads that leave you hungry an hour later, a Cobb salad is hearty enough to serve as a full meal. It’s perfect for lunch, dinner, or even meal prep when you want something healthy but still indulgent.

This Cobb Salad Recipe (High-Protein Salad) is easy to customize and comes together quickly, making it a go-to option for busy days.


Why You’ll Love This Cobb Salad Recipe (High-Protein Salad)

There are so many reasons to love this Cobb Salad Recipe (High-Protein Salad):

  • Packed with high-quality protein
  • Fresh, crisp, and satisfying textures
  • Perfect balance of healthy fats and nutrients
  • Easy to prepare in under 30 minutes
  • Great for meal prep or quick dinners

It’s the kind of meal that keeps you full and energized without feeling heavy.


Ingredients

To make this Cobb Salad Recipe (High-Protein Salad), you’ll need:

Salad Base:

  • 6 cups chopped romaine lettuce
  • 2 cooked chicken breasts (grilled or roasted)
  • 4 slices cooked bacon, crumbled
  • 2 hard-boiled eggs, sliced
  • 1 avocado, diced
  • 1 cup cherry tomatoes, halved
  • 1/2 cup crumbled blue cheese (optional)

Dressing:

  • 1/3 cup olive oil
  • 2 tablespoons red wine vinegar
  • 1 teaspoon Dijon mustard
  • 1 teaspoon honey
  • Salt and pepper to taste


Ingredient Notes

Each ingredient in this Cobb Salad Recipe (High-Protein Salad) plays an important role. The chicken provides lean protein, while eggs and bacon add richness and depth. Avocado contributes healthy fats, making the salad more satisfying.

Romaine lettuce gives the perfect crunchy base, and tomatoes add freshness and acidity. Blue cheese is optional but adds a bold, tangy flavor that balances everything beautifully.

The dressing is simple but essential—it ties all the flavors together with a light, tangy finish.


Step-by-Step Instructions

Step 1: Cook the Protein

Grill or roast chicken and cook bacon until crispy. Slice and set aside.


Step 2: Prepare the Vegetables

Wash and chop romaine lettuce, slice tomatoes, and dice avocado.


Step 3: Boil the Eggs

Hard-boil eggs, cool, peel, and slice.


Step 4: Make the Dressing

Whisk olive oil, vinegar, mustard, honey, salt, and pepper.


Step 5: Assemble the Salad

Arrange lettuce in a bowl and top in rows with chicken, bacon, eggs, avocado, and tomatoes.


Step 6: Add Dressing and Serve

Drizzle dressing over the salad and serve immediately.


Tips for Perfect Results

To make the best Cobb Salad Recipe (High-Protein Salad), follow these tips:

  • Use freshly cooked chicken for best flavor
  • Keep ingredients chilled for crisp texture
  • Slice ingredients evenly for presentation
  • Add dressing just before serving
  • Use ripe avocado for creaminess

These small steps make a big difference in taste and texture.


Variations

You can easily customize this Cobb Salad Recipe (High-Protein Salad):

  • Swap chicken for grilled shrimp or turkey
  • Use feta or cheddar instead of blue cheese
  • Add cucumbers or corn for extra crunch
  • Make it keto-friendly by reducing tomatoes
  • Add quinoa for extra fiber

This salad is flexible and easy to adapt.


What to Serve With It

Pair your Cobb Salad Recipe (High-Protein Salad) with:

  • Crusty bread or garlic toast
  • Fresh fruit salad
  • Soup like tomato or chicken broth
  • Iced tea or lemonade

These sides make the meal more complete and satisfying.


Storage & Meal Prep

To store your Cobb Salad Recipe (High-Protein Salad):

  • Store ingredients separately for best freshness
  • Keep dressing in a sealed container
  • Refrigerate cooked proteins up to 3 days
  • Assemble just before eating

This helps maintain texture and flavor.


Common Mistakes

Avoid these mistakes when making Cobb Salad Recipe (High-Protein Salad):

  • Overdressing the salad
  • Using warm ingredients
  • Not seasoning proteins properly
  • Cutting ingredients unevenly
  • Using overripe avocado

Avoiding these ensures a perfect salad every time.


FAQs

1. Is Cobb salad good for weight loss?

Yes, it’s high in protein and healthy fats, which help keep you full.

2. Can I make it ahead of time?

Yes, just store ingredients separately.

3. What dressing works best?

Classic red wine vinaigrette is ideal.

4. Can I skip bacon or cheese?

Absolutely, it’s easy to customize.


Final Thoughts

This Cobb Salad Recipe (High-Protein Salad) is a perfect example of how simple ingredients can come together to create something truly satisfying. It’s fresh, filling, and packed with nutrients, making it ideal for any meal of the day.

Whether you’re eating healthy, meal prepping, or just craving something delicious, this Cobb salad will quickly become a favorite in your kitchen.

Clean Eating for Blood Sugar: Simple, Delicious Recipes to Stay Balanced

If you’ve ever experienced energy crashes, sugar cravings, or mid-afternoon fatigue, your blood sugar levels may be the reason. That’s where clean eating for blood sugar comes in—a simple, sustainable approach to nourishing your body while keeping your energy steady throughout the day.

Clean eating focuses on whole, minimally processed foods that naturally support stable blood sugar levels. By choosing the right balance of protein, healthy fats, and fiber-rich carbohydrates, you can enjoy delicious meals without the rollercoaster of spikes and crashes.

In this guide, you’ll learn how to build balanced meals, discover easy recipes, and understand how clean eating for blood sugar can transform the way you feel every day.


Why You’ll Love Clean Eating for Blood Sugar

Adopting clean eating for blood sugar isn’t about restriction—it’s about feeling your best.

  • Steady energy throughout the day
  • Fewer sugar cravings
  • Improved focus and mood
  • Better digestion
  • Long-term health benefits

When you fuel your body with whole foods, everything from your energy to your mood improves naturally.


Key Ingredients for Balanced Meals

To succeed with clean eating for blood sugar, focus on these core ingredients:

  • Lean proteins (chicken, fish, eggs, tofu)
  • Healthy fats (avocado, olive oil, nuts)
  • Complex carbs (quinoa, brown rice, oats)
  • Fiber-rich vegetables (broccoli, spinach, peppers)
  • Low-glycemic fruits (berries, apples)

These ingredients help slow digestion and prevent blood sugar spikes.


Ingredient Notes

Understanding how ingredients affect your body is key to mastering clean eating for blood sugar. Foods high in refined sugar or simple carbs can cause rapid spikes, while fiber and protein help slow glucose absorption.

For example, pairing carbohydrates with protein—like apple slices with almond butter—can significantly improve blood sugar stability. Similarly, adding healthy fats like olive oil or nuts enhances satiety and prevents overeating.

The goal is balance, not elimination.


Step-by-Step: Building a Blood Sugar-Friendly Meal

Step 1: Start with Protein

Choose a protein source like chicken, eggs, or tofu.

Step 2: Add Fiber

Include vegetables or whole grains.

Step 3: Include Healthy Fats

Add avocado, olive oil, or nuts.

Step 4: Keep Portions Balanced

Avoid overloading on carbs alone.

Step 5: Stay Hydrated

Drink water to support digestion and metabolism.

This method ensures every meal supports clean eating for blood sugar.


Tips for Perfect Results

To get the most out of clean eating for blood sugar, follow these tips:

  • Eat regularly to avoid blood sugar dips
  • Combine protein, fat, and carbs in every meal
  • Avoid processed snacks
  • Choose whole foods over packaged items
  • Monitor portion sizes

Consistency is key to maintaining stable energy levels.


Variations and Meal Ideas

You don’t have to eat the same thing every day. Here are some ideas for clean eating for blood sugar:

  • Breakfast: Greek yogurt with berries and nuts
  • Lunch: Grilled chicken salad with olive oil dressing
  • Dinner: Salmon with quinoa and roasted vegetables
  • Snacks: Hummus with veggies or nuts

These options keep meals exciting and balanced.


What to Serve With It

Pair your meals with:

  • Herbal teas
  • Lemon water
  • Fresh salads
  • Light soups

These additions complement your clean eating routine and support digestion.


Storage & Meal Prep Tips

Meal prepping is a powerful tool for clean eating for blood sugar.

  • Store meals in airtight containers
  • Prep ingredients ahead of time
  • Keep healthy snacks ready
  • Refrigerate meals for up to 3–4 days

Planning ahead helps you stay consistent and avoid unhealthy choices.


Common Mistakes

Avoid these mistakes when practicing clean eating for blood sugar:

  • Skipping meals
  • Eating too many refined carbs
  • Ignoring portion sizes
  • Not including enough protein
  • Relying on “healthy” processed foods

Awareness of these pitfalls can make a big difference.


FAQs

1. What is clean eating for blood sugar?

It’s a way of eating whole, balanced foods to keep blood sugar levels stable.

2. Can I still eat carbs?

Yes! Focus on complex carbs like whole grains and vegetables.

3. How often should I eat?

Every 3–4 hours to maintain stable energy.

4. Is this diet good for weight loss?

Yes, it can support healthy weight management naturally.


Final Thoughts

Clean eating for blood sugar is more than a diet—it’s a lifestyle that helps you feel energized, focused, and balanced every day. By choosing whole foods and building balanced meals, you can enjoy delicious recipes while supporting your health.

Start small, stay consistent, and enjoy the benefits of clean eating for blood sugar—your body will thank you.

Tortilla Pizza Rolls That Make Lunchtime Fun and Fuss-Free for Kids

If you’re looking for a quick, kid-friendly meal that’s both fun and delicious, these Tortilla Pizza Rolls That Make Lunchtime Fun and Fuss-Free for Kids are about to become your new go-to recipe. They combine everything kids love about pizza—gooey cheese, savory sauce, and tasty toppings—wrapped in a soft tortilla and baked or pan-toasted to crispy perfection.

Perfect for busy school days, weekend lunches, or even after-school snacks, these tortilla pizza rolls are incredibly easy to make and require minimal prep. Even better, they’re customizable, so you can adapt them to suit picky eaters or adventurous little foodies alike.

Whether you’re packing lunchboxes or serving a warm meal at home, these tortilla pizza rolls make lunchtime exciting without any stress.


Why You’ll Love This Recipe

These Tortilla Pizza Rolls That Make Lunchtime Fun and Fuss-Free for Kids check all the boxes for a perfect meal:

  • Quick and easy to prepare
  • Kid-approved flavors
  • Crispy on the outside, cheesy on the inside
  • Perfect for lunchboxes or snacks
  • Easily customizable with different toppings

They’re the ultimate solution when you need something fast, tasty, and family-friendly.


Ingredients

To make these fun Tortilla Pizza Rolls, you’ll need:

  • 4 large flour tortillas
  • 1 cup pizza sauce
  • 1 1/2 cups shredded mozzarella cheese
  • 1/2 cup mini pepperoni (or toppings of choice)
  • 1 teaspoon Italian seasoning
  • 1 tablespoon olive oil or melted butter

Optional toppings:

  • Bell peppers
  • Olives
  • Cooked sausage
  • Mushrooms


Ingredient Notes

The beauty of these Tortilla Pizza Rolls That Make Lunchtime Fun and Fuss-Free for Kids lies in their simplicity. Flour tortillas work best because they roll easily and crisp up nicely when cooked.

Mozzarella cheese is a must for that classic pizza stretch, while pizza sauce adds rich tomato flavor. You can keep it simple with pepperoni or mix in veggies for added nutrition.

Choosing high-quality ingredients ensures the best flavor, even in such a simple recipe.


Step-by-Step Instructions

Step 1: Prep the Tortillas

Lay each tortilla flat on a clean surface.


Step 2: Add Sauce and Toppings

Spread a thin layer of pizza sauce over each tortilla, then sprinkle cheese and toppings evenly.


Step 3: Roll Tightly

Roll each tortilla tightly into a log shape.


Step 4: Slice Into Rolls

Cut each rolled tortilla into bite-sized pieces.


Step 5: Cook Until Crispy

Bake at 400°F for 10–12 minutes or pan-cook until golden and crispy.


Tips for Perfect Results

For the best Tortilla Pizza Rolls That Make Lunchtime Fun and Fuss-Free for Kids, follow these tips:

  • Don’t overfill the tortillas
  • Roll tightly to prevent unwrapping
  • Use just enough sauce to avoid sogginess
  • Preheat your oven for even cooking
  • Brush with oil or butter for extra crispiness

These small steps ensure perfectly crispy, cheesy rolls every time.


Variations

You can easily customize these Tortilla Pizza Rolls:

  • Make a veggie version with spinach and mushrooms
  • Add cooked chicken for extra protein
  • Use BBQ sauce instead of pizza sauce
  • Try different cheeses like cheddar or provolone
  • Make a breakfast version with eggs and bacon

These variations keep the recipe exciting and adaptable for any taste.


What to Serve With It

Pair these Tortilla Pizza Rolls That Make Lunchtime Fun and Fuss-Free for Kids with:

  • Marinara or ranch dipping sauce
  • Fresh fruit or veggie sticks
  • A simple green salad
  • Yogurt or smoothies
  • Juice or milk for kids

These sides turn a simple snack into a complete meal.


Storage & Reheating

To store your Tortilla Pizza Rolls:

  • Keep in an airtight container in the fridge for up to 3 days
  • Reheat in oven or air fryer for crispiness
  • Avoid microwaving too long to prevent sogginess
  • Freeze for up to 1 month for quick meals

These are perfect for prepping ahead of busy days.


Common Mistakes

Avoid these mistakes when making Tortilla Pizza Rolls That Make Lunchtime Fun and Fuss-Free for Kids:

  • Using too much sauce
  • Not rolling tightly
  • Overcrowding the baking tray
  • Skipping preheating
  • Overcooking and drying them out

Keeping these in mind ensures perfect results every time.


FAQs

1. Can I make tortilla pizza rolls ahead of time?

Yes! Prepare and refrigerate before baking, then cook when ready.

2. Can I freeze them?

Absolutely. Freeze before or after cooking and reheat as needed.

3. What’s the best cheese to use?

Mozzarella is best, but blends work great too.

4. Are these good for lunchboxes?

Yes! They taste great warm or at room temperature.


Final Thoughts

These Tortilla Pizza Rolls That Make Lunchtime Fun and Fuss-Free for Kids are the perfect solution for busy parents and hungry kids. They’re quick, customizable, and packed with flavor—everything you want in a stress-free meal.

With minimal prep and endless variation options, this recipe proves that lunchtime doesn’t have to be boring or complicated. Once you try these tortilla pizza rolls, they’ll quickly become a family favorite you’ll make again and again.

Cheesy Potato Egg Scramble – The Ultimate Comfort Breakfast

There’s something incredibly comforting about a hot skillet filled with crispy potatoes, fluffy eggs, and gooey melted cheese. This Cheesy Potato Egg Scramble is the kind of breakfast that feels like a warm hug—simple, satisfying, and packed with flavor.

Whether you’re cooking for a relaxed weekend brunch or need a quick and filling weekday breakfast, this recipe delivers every time. It’s easy to customize, budget-friendly, and comes together in one pan for minimal cleanup.


Why You’ll Love This Cheesy Potato Egg Scramble

This cheesy potato egg scramble recipe is a favorite for so many reasons:

  • Quick and easy one-pan meal
  • Hearty and filling breakfast
  • Perfect balance of crispy, creamy, and cheesy
  • Customizable with your favorite add-ins
  • Great for breakfast, brunch, or even dinner

It’s a go-to recipe when you want comfort food without the fuss.


Ingredients

To make this Cheesy Potato Egg Scramble, you’ll need:

  • 2 cups diced potatoes (russet or Yukon gold)
  • 4 large eggs
  • 1 cup shredded cheddar cheese
  • 2 tablespoons olive oil or butter
  • ½ onion, diced
  • ½ teaspoon garlic powder
  • Salt and pepper to taste
  • Optional: bell peppers, spinach, or cooked bacon


Ingredient Notes

Each ingredient plays a key role in this cheesy potato egg scramble recipe:

  • Potatoes: provide a crispy, hearty base
  • Eggs: add protein and fluffy texture
  • Cheese: creates melty richness
  • Onion: enhances flavor with sweetness
  • Seasonings: bring everything together

For best results, cut potatoes evenly for consistent cooking.


Step-by-Step Instructions

1. Cook the Potatoes

Heat oil in a skillet and cook diced potatoes until golden and crispy.


2. Add Onion and Seasoning

Stir in onion and cook until soft and fragrant.


3. Whisk the Eggs

Beat eggs in a bowl with salt and pepper.


4. Add Eggs to Skillet

Pour eggs over potatoes and cook gently, stirring occasionally.


5. Add Cheese

Sprinkle cheese over the mixture and let it melt.


6. Serve Hot

Serve immediately with fresh herbs or toppings.


Tips for Perfect Results

To make the best cheesy potato egg scramble, follow these tips:

  • Use a non-stick or well-seasoned skillet
  • Cook potatoes fully before adding eggs
  • Don’t overcook eggs—they should stay soft
  • Add cheese at the end for best melt
  • Season in layers for balanced flavor

Variations

Customize your potato egg scramble recipe with these ideas:

Meat Lovers

Add bacon, sausage, or ham.

Veggie Version

Include spinach, mushrooms, or zucchini.

Spicy Kick

Add chili flakes or hot sauce.

Cheese Swap

Try mozzarella, pepper jack, or feta.


What to Serve With It

This cheesy breakfast scramble pairs well with:

  • Toast or English muffins
  • Fresh fruit
  • Avocado slices
  • Smoothies or coffee

Storage & Reheating

  • Store leftovers in fridge up to 3 days
  • Reheat in skillet for best texture
  • Microwave for quick reheating
  • Not ideal for freezing


Common Mistakes to Avoid

  • Undercooking or overcooking potatoes
  • Overcooking eggs
  • Adding cheese too early
  • Not seasoning properly

FAQs

1. Can I use frozen potatoes?

Yes, just cook them until crispy.

2. What cheese works best?

Cheddar is classic, but any melting cheese works.

3. Can I make this ahead?

Yes, but it’s best fresh.

4. Is it gluten-free?

Yes, naturally gluten-free.


Final Thoughts

This Cheesy Potato Egg Scramble is everything you want in a breakfast—quick, hearty, and incredibly satisfying. It’s versatile enough for any day of the week and simple enough for beginners.

Once you try it, it’ll quickly become a staple in your kitchen.

Quick & Delicious Sausage Egg Breakfast Rolls – The Perfect Brunch Bite!

If you’re looking for a crowd-pleasing breakfast that’s both easy and incredibly satisfying, these Quick & Delicious Sausage Egg Breakfast Rolls are exactly what you need. Packed with savory sausage, fluffy eggs, and melty cheese all wrapped in golden, flaky dough, they’re the perfect bite for brunch, holidays, or even busy weekday mornings.

What makes these breakfast rolls stand out is how simple they are to prepare while delivering big, comforting flavors. Whether you’re feeding a family or hosting friends, this recipe guarantees smiles all around.


Why You’ll Love This Sausage Egg Breakfast Rolls Recipe

These sausage egg breakfast rolls are a must-try for so many reasons:

  • Quick and easy to make
  • Perfect for meal prep or brunch
  • Kid-friendly and customizable
  • Packed with protein and flavor
  • Great for on-the-go breakfasts

They’re the kind of recipe you’ll find yourself making again and again.


Ingredients

To make these Quick & Delicious Sausage Egg Breakfast Rolls, you’ll need:

  • 1 can refrigerated crescent roll dough
  • 6 large eggs
  • 1 cup cooked breakfast sausage
  • 1 cup shredded cheddar cheese
  • 2 tablespoons milk
  • Salt and pepper to taste
  • Optional: chopped green onions or bell peppers


Ingredient Notes

Understanding your ingredients helps you perfect this sausage egg breakfast rolls recipe:

  • Crescent dough: creates a flaky, golden crust
  • Sausage: adds savory richness
  • Eggs: provide fluffy texture and protein
  • Cheese: brings creamy, melty goodness
  • Milk: makes eggs softer and lighter

Choose high-quality sausage and fresh eggs for the best flavor.


Step-by-Step Instructions

1. Cook the Sausage

Brown the sausage in a skillet until fully cooked, then set aside.


2. Scramble the Eggs

Whisk eggs with milk, then cook gently until just set.


3. Prepare the Dough

Unroll crescent dough and separate into triangles.


4. Add Fillings

Place sausage, eggs, and cheese onto each dough triangle.


5. Roll Them Up

Carefully roll each triangle into a crescent shape.


6. Bake

Bake at 375°F for 12–15 minutes until golden brown.


7. Serve Warm

Let cool slightly and serve fresh.


Tips for Perfect Results

To get the best sausage egg breakfast rolls, keep these tips in mind:

  • Don’t overfill the dough to avoid leaks
  • Cook eggs slightly underdone (they finish in oven)
  • Use parchment paper for easy cleanup
  • Let rolls cool slightly before serving
  • Brush tops with egg wash for extra golden color

Variations

Switch up your breakfast rolls recipe with these ideas:

Spicy Version

Add jalapeños or hot sauce.

Veggie Version

Include spinach, mushrooms, or peppers.

Cheese Lovers

Mix in mozzarella or pepper jack.

Meat Options

Use bacon or turkey sausage instead.


What to Serve With It

These sausage egg breakfast rolls pair perfectly with:

  • Fresh fruit salad
  • Yogurt parfaits
  • Smoothies
  • Coffee or fresh juice

Storage & Reheating

  • Store in fridge up to 3 days
  • Reheat in oven or microwave
  • Freeze for up to 1 month
  • Wrap individually for easy grab-and-go


Common Mistakes to Avoid

  • Overcooking eggs before baking
  • Overstuffing rolls
  • Not sealing dough properly
  • Skipping preheating oven

FAQs

1. Can I make these ahead of time?

Yes, prepare and refrigerate before baking.

2. Can I freeze breakfast rolls?

Absolutely, they freeze well.

3. What cheese works best?

Cheddar, mozzarella, or blends work great.

4. Can I use homemade dough?

Yes, but crescent dough is quicker.


Final Thoughts

These Quick & Delicious Sausage Egg Breakfast Rolls are everything you want in a breakfast recipe—easy, flavorful, and incredibly satisfying. Whether for brunch, meal prep, or a quick weekday breakfast, they deliver every time.

Once you try them, they’ll become a staple in your kitchen.